Academy
FOR DEVELOPERS

How to create a new project
In this academy, you’ll learn how to create a new project, understand your database hierarchy, select tables for drill down and code resolution, add missing foreign keys, create a configuration, add widgets to the dashboard, edit SQL queries, edit factors, edit the loading dialog.
Prerequisite:
Table of content:
+ New project: create new project
Creation of a new project begins with the selection of an empty target folder in which XML objects will be stored.
Steps:
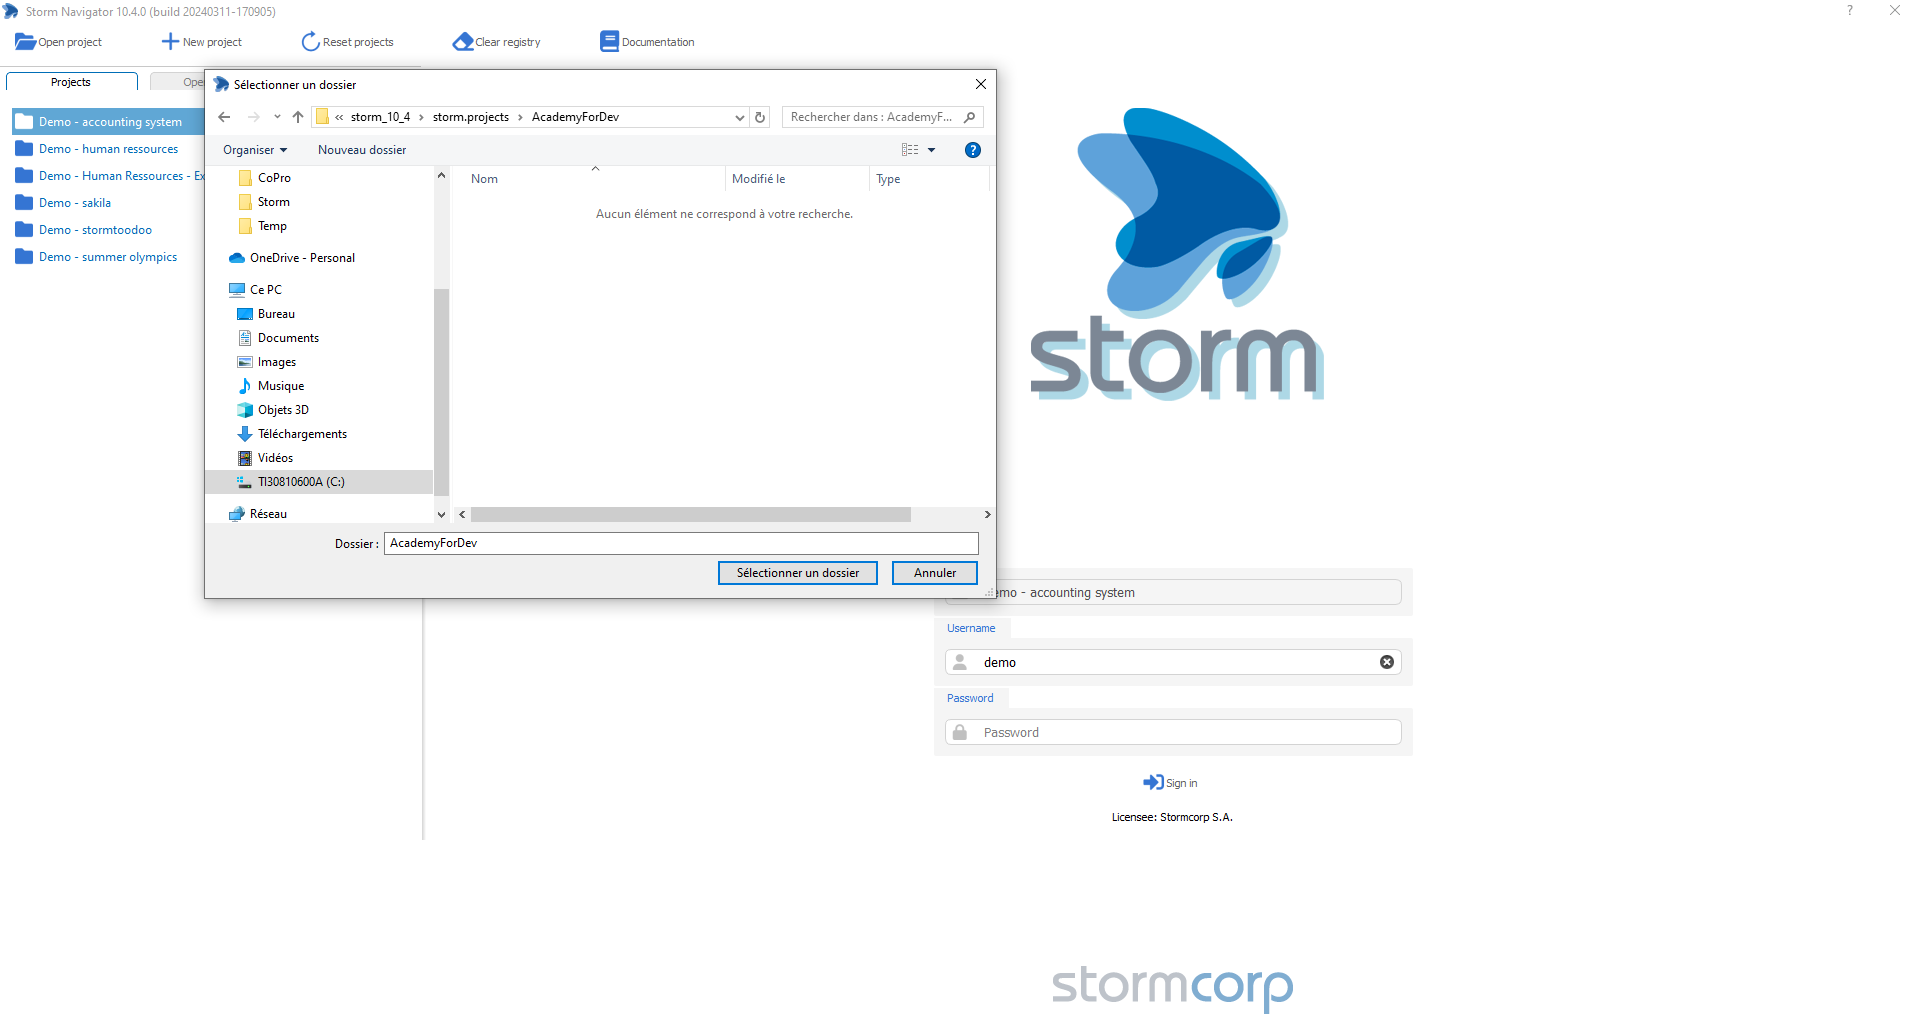
- Login screen: click on + New project
- Select an empty folder, for exemple ..\storm.projects\AcademyForDev.
- Folder name will become the project name
- An empty config is then created
- Sign in (no password)
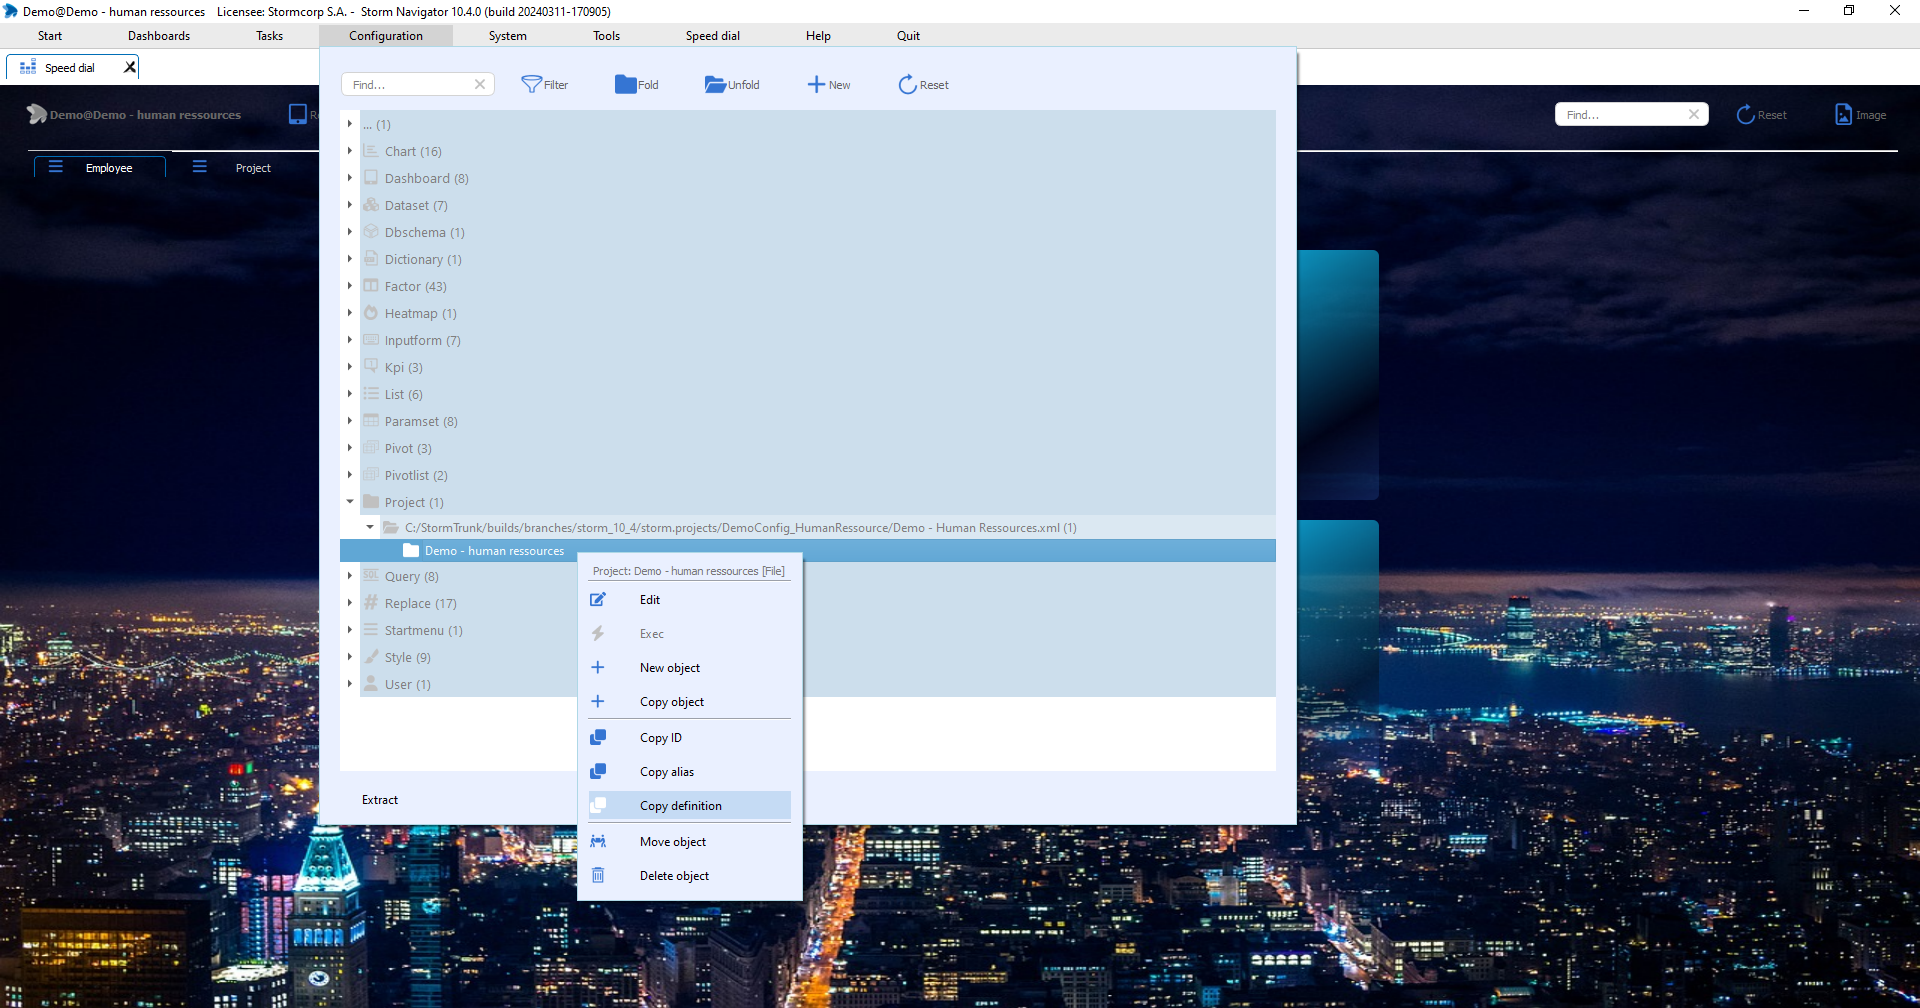
Copy definition: Demo – Human ressources project
Avoid having to enter it manually in the new project.
Steps
- Login to project: Demo – Human ressources
- Configuration -> Projects-> Demo -Human ressources -> Right-click -> Copy definition
- Past to the new project
- Save
- Login again to get new projects
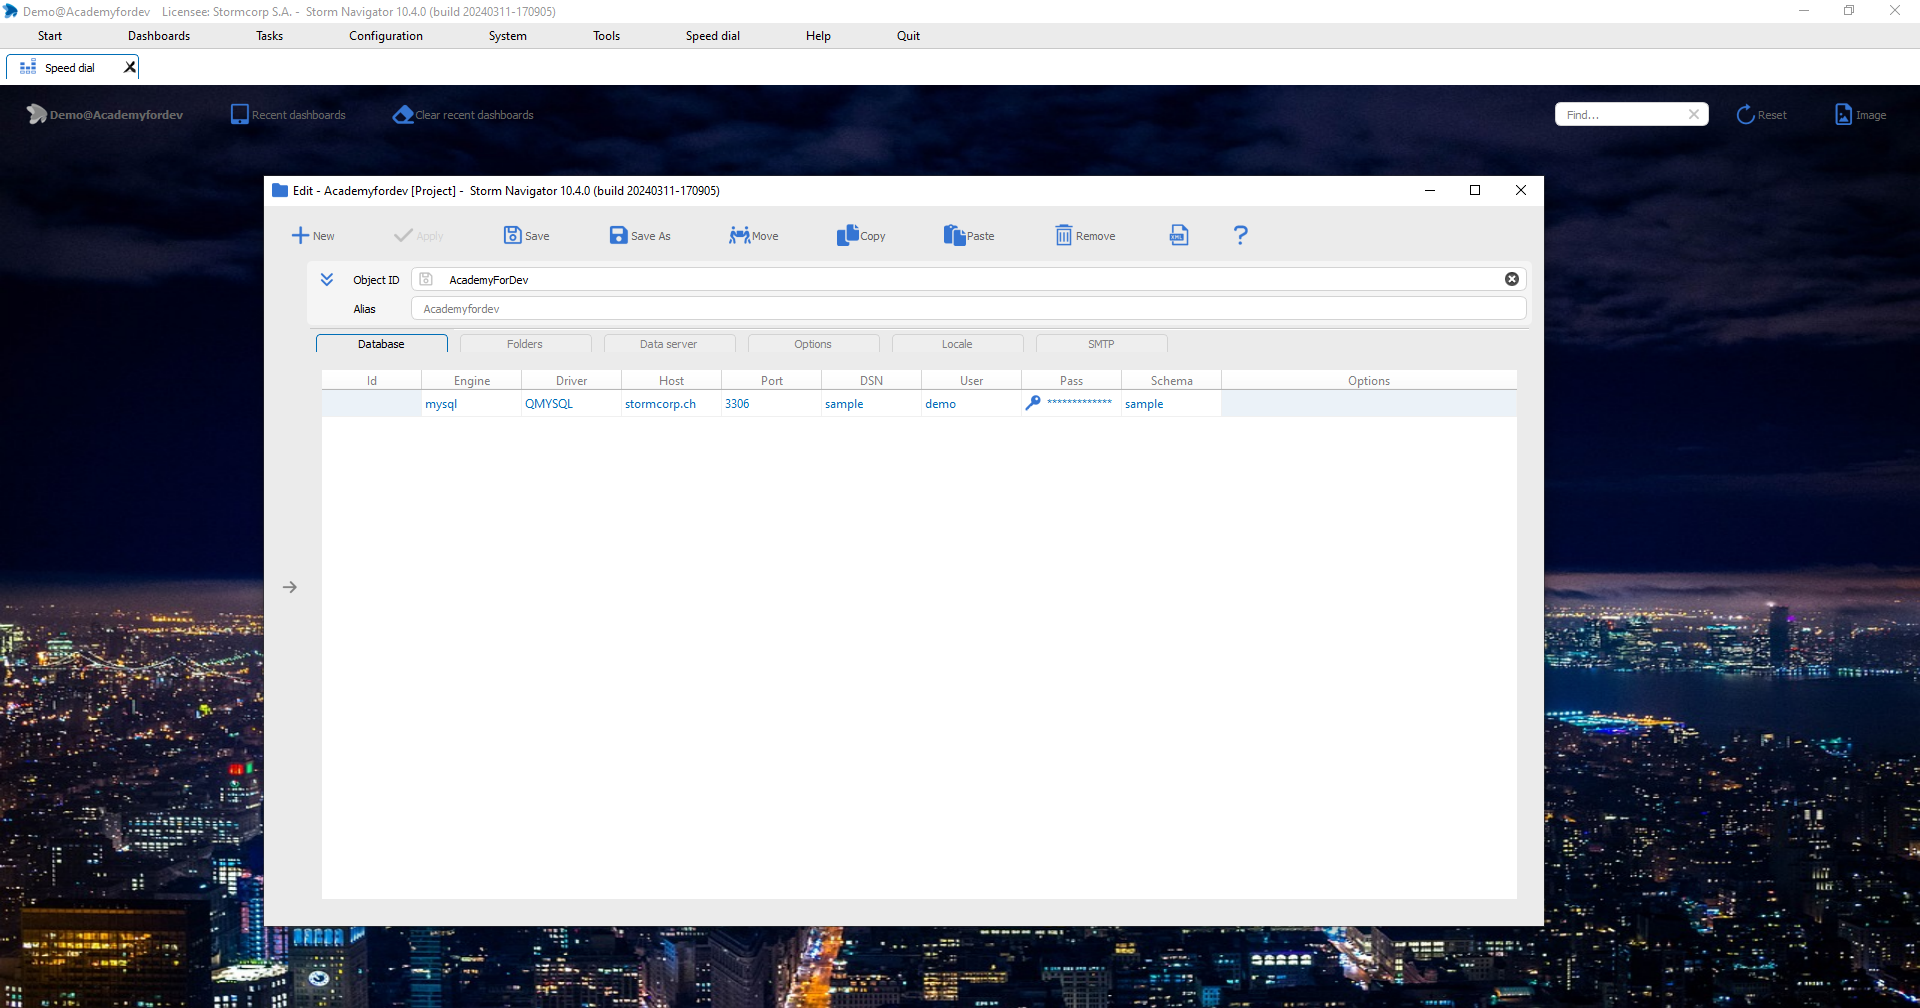
Databases: connection information
Enter database id, database engine, pilots, host, port and datasource where to connect.
Add other databases by adding rows.
Database:
- Id: Database ID
- Engine: double-click to get possible list
- Driver: UseODBC if no native driver is installed
- Host: of database
- Port: to connect
- User: Can saved into project if it is used by StormServer
- Password: will be encrypted into the xml project source file
- Schema: Double-click to get the list
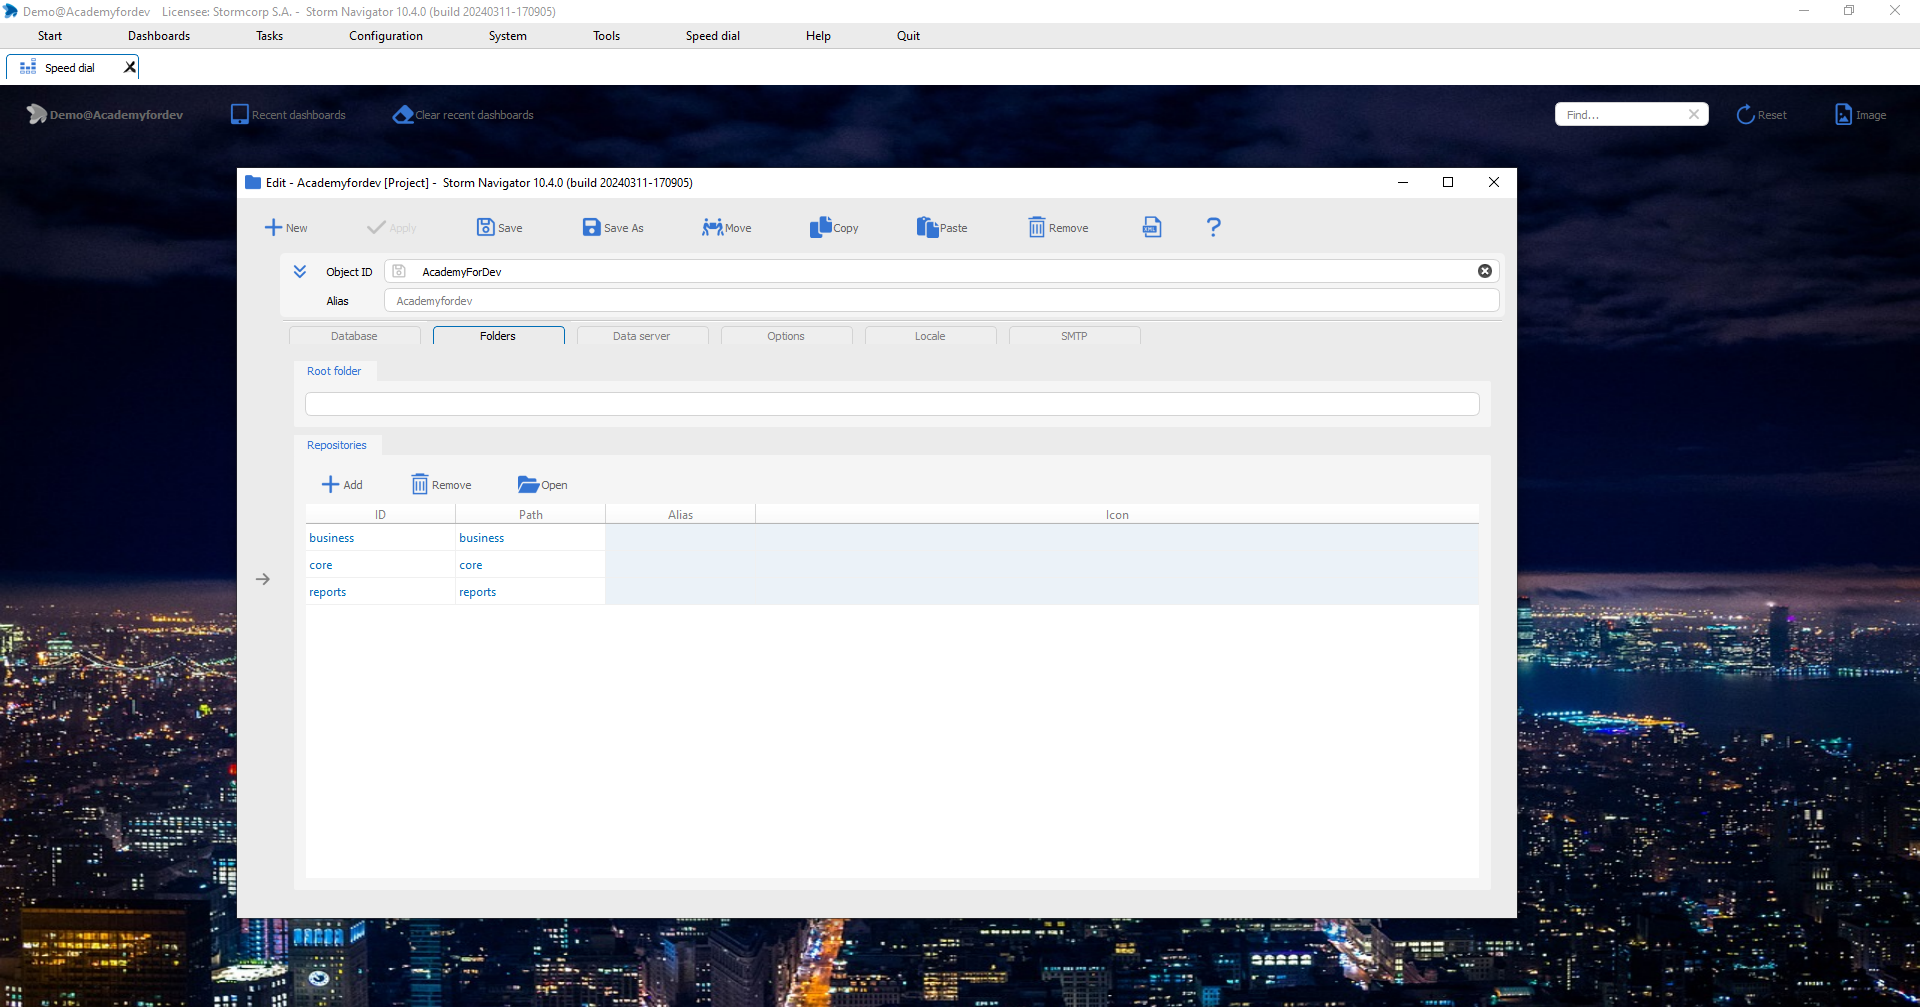
Folders: list of repositories
A root folder can be specify. If empty, the project selected folder will be used.
Business, core and report repositories are created by +New project
Folders:
- Id: Repository Id
- Path: absolute or relative path to repository
- Alias: for final user
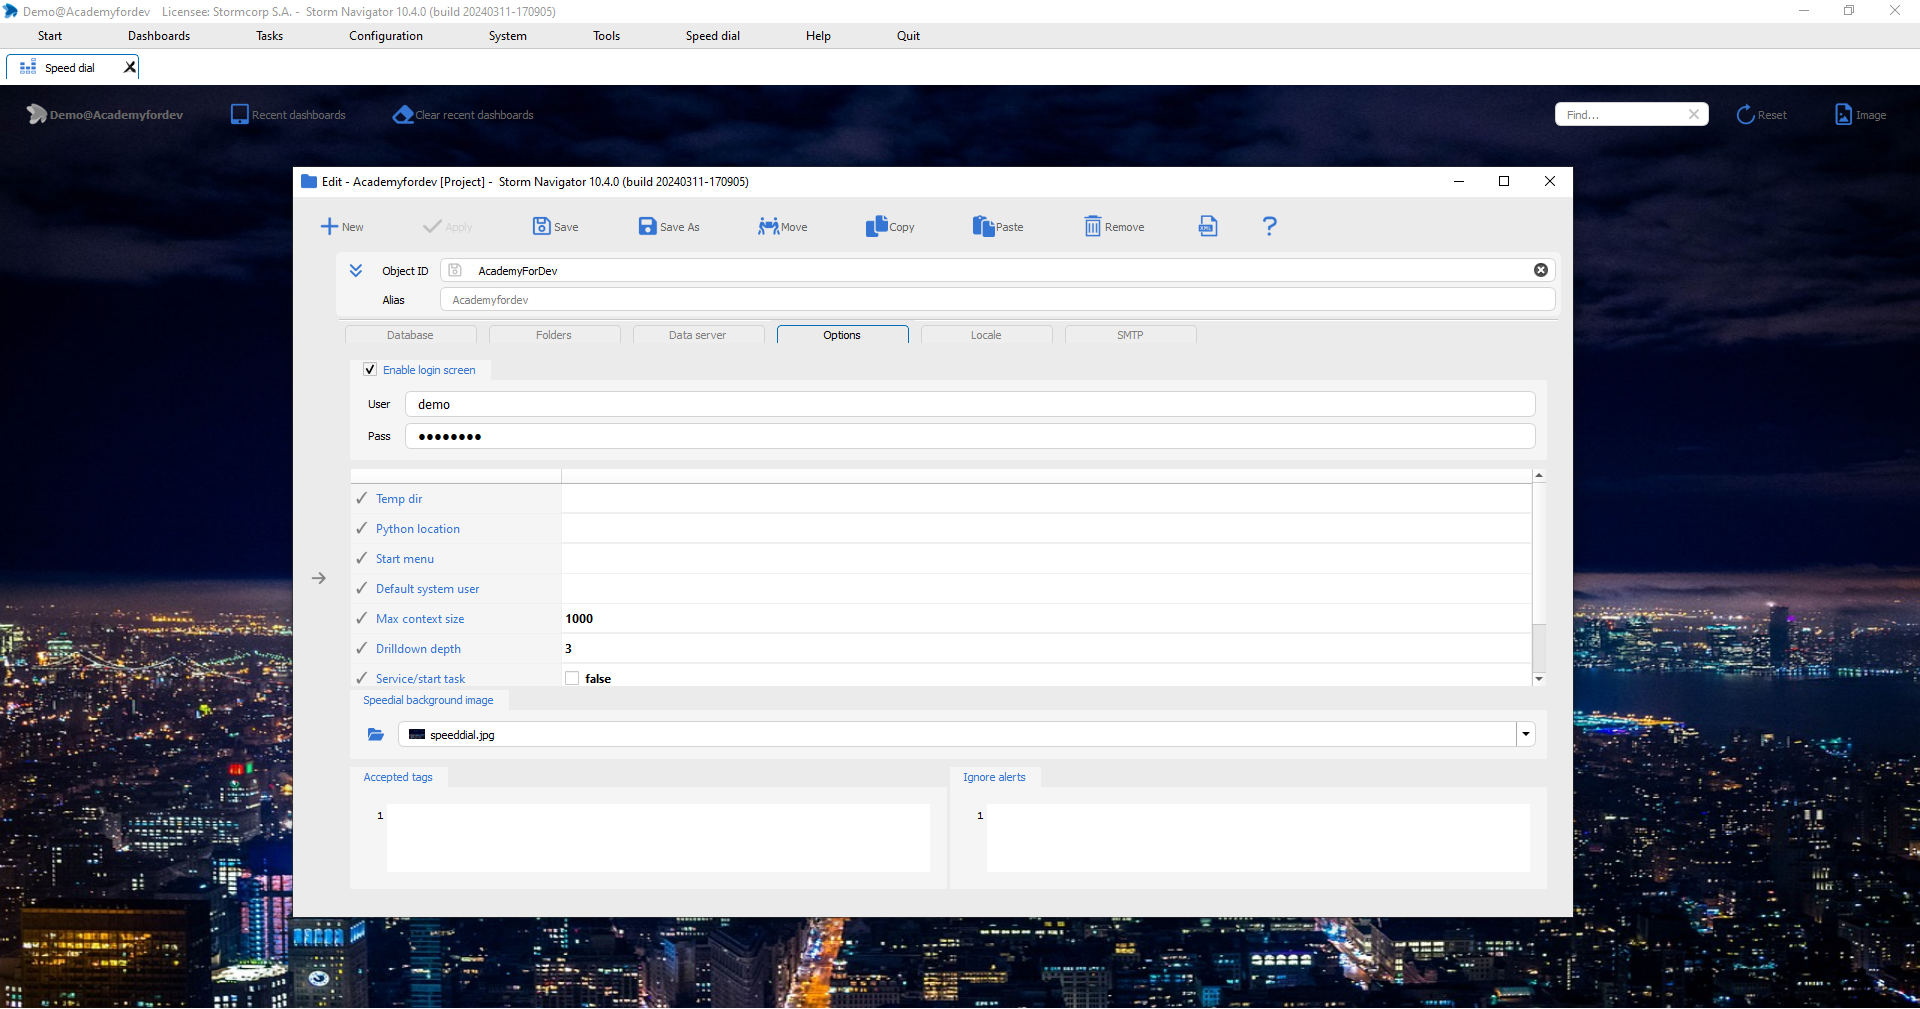
Options: default users login, projects options, speed dial background image
Other option are described in server installation
Steps:
- Speed dial background image to select an image
- Save
- Relogin
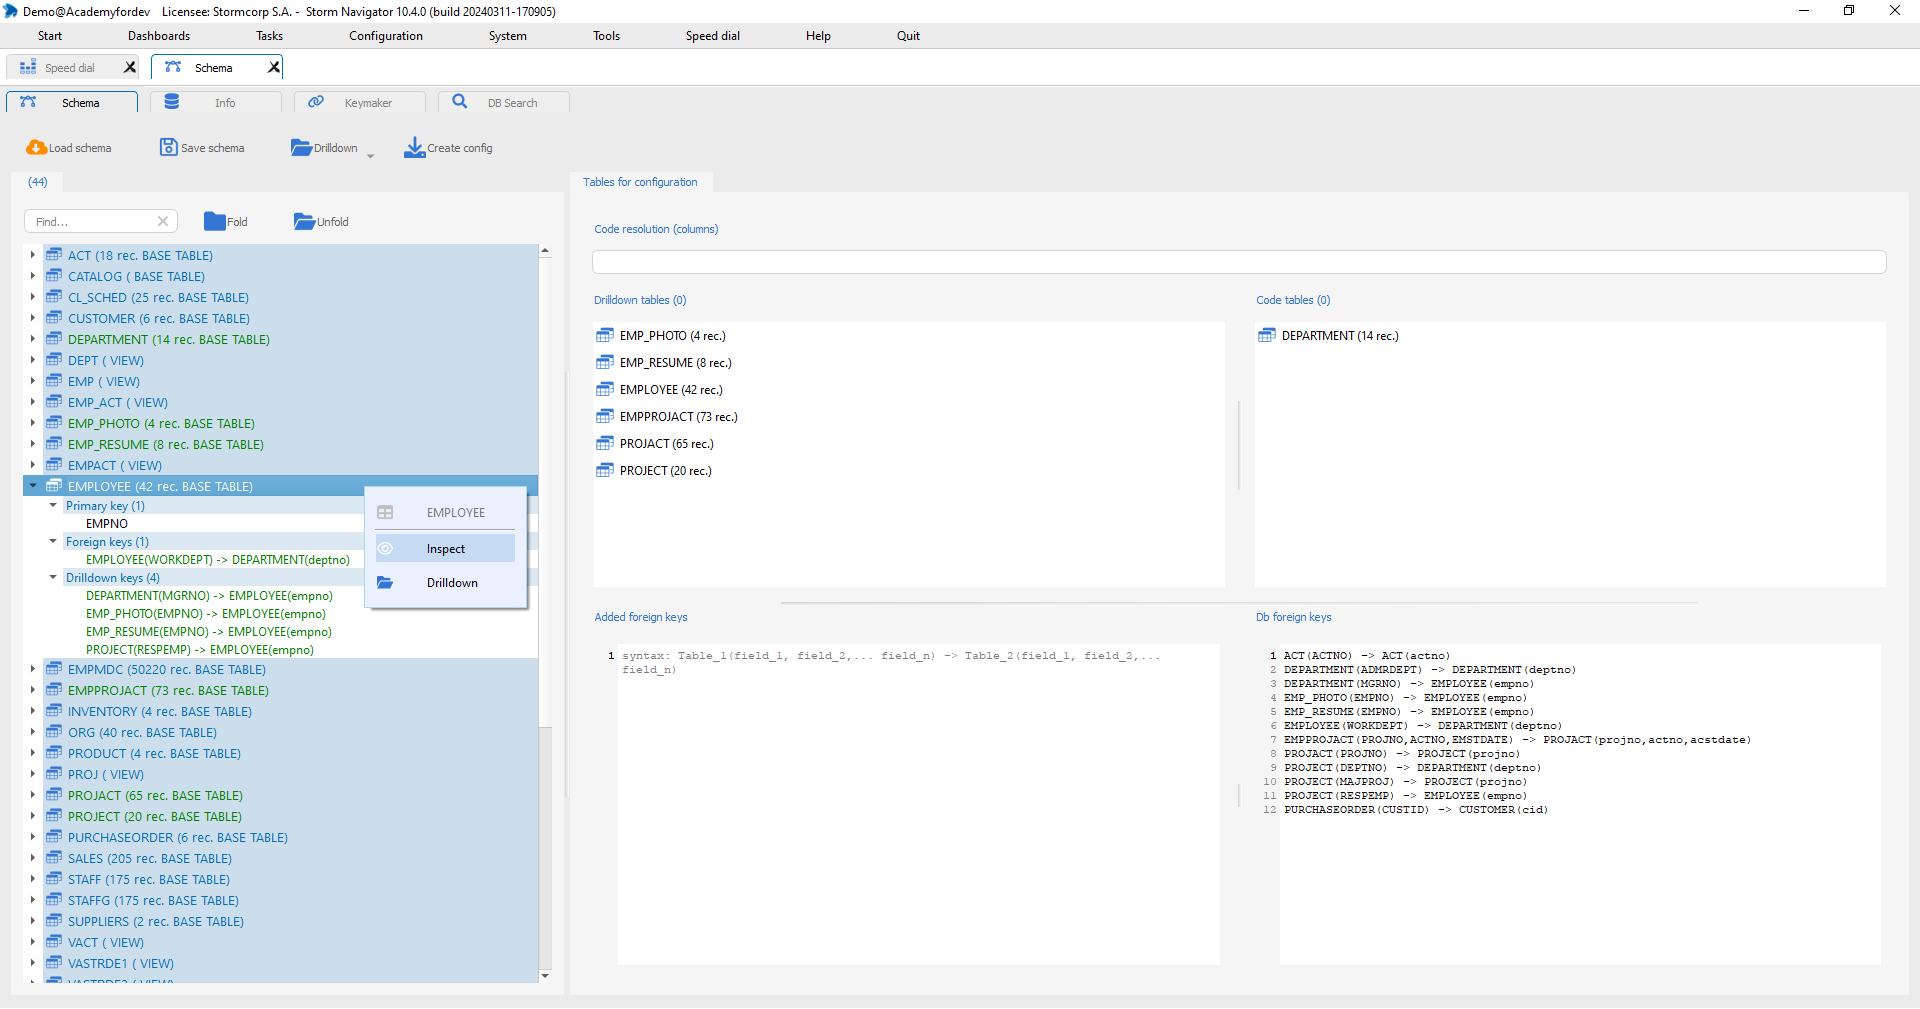
Schema: database hierarchy, drill down and code tables, create a config
Hiearchy and data must be analysed to understand what are Drill down tables and Code tables.
Schema:
- Load schema: Load schema meta data
- Save Schema: Save selected Drilldown and Code table, Added foreign keys and Code resolution (column)
- Drilldown -> DB structure: Hierarchy of foreign key
- Drilldown -> DB drilldown: Drilldown tree for the whole database
- Drilldown -> My drilldown: Drilldown tree for dashboard tables only
- Create config: Create an XML configuration
Tables:
- Find: A table in shema
- Primary key: DB primary key
- Foreign keys: Formated DB foreign keys
- Drill down keys: Formated drill down key (calculated by Storm)
Tables for configuration:
- Code resolution (column): Column containing the text corresponding to the code (if it’s always the same field name)
- Drill down tables: Become dashboards
- Code tables: Loaded ans stay in memory as Global data
- Added foreign keys: Missing foreign keys
- Db foreign keys: Formated list
A table can be selected twice, as code and then also for drill down. If no tables are selected, all tables are considered as drill down table.
Right-click menu on table
Inspect: Display non formated and formated data
Drill down: Tree starting from selected table.
Press shift and roll-over:
- Table name to get a tips with data preview
Info:
Tables: Tables list with database information
Columns: Fields list with meta data
Primary keys: Database primary key definitions and formated primary keys
Foreign keys: Database foreign key definitions and formated foreign keys
Keymaker:
Table/Column: Tables with foreign key to be defined
FK Tables/Column: Foreign tables with pointed foreign field
DB Search:
Searches: Enter find string
Find: Search for text through all fields of all tables
Steps:
- Clik on Load schema selecting the desired schema in case of multiple schemas
- Drag and drop tables with data, from schema table list to Dashboard tables (to get one dashboard per selected table)
- Drag and drop tables with codes, from schema table list to Code tables (for automatic code resolution)
- Del key to remove a selected table
- Define the Code resolution (column)
- Save schema
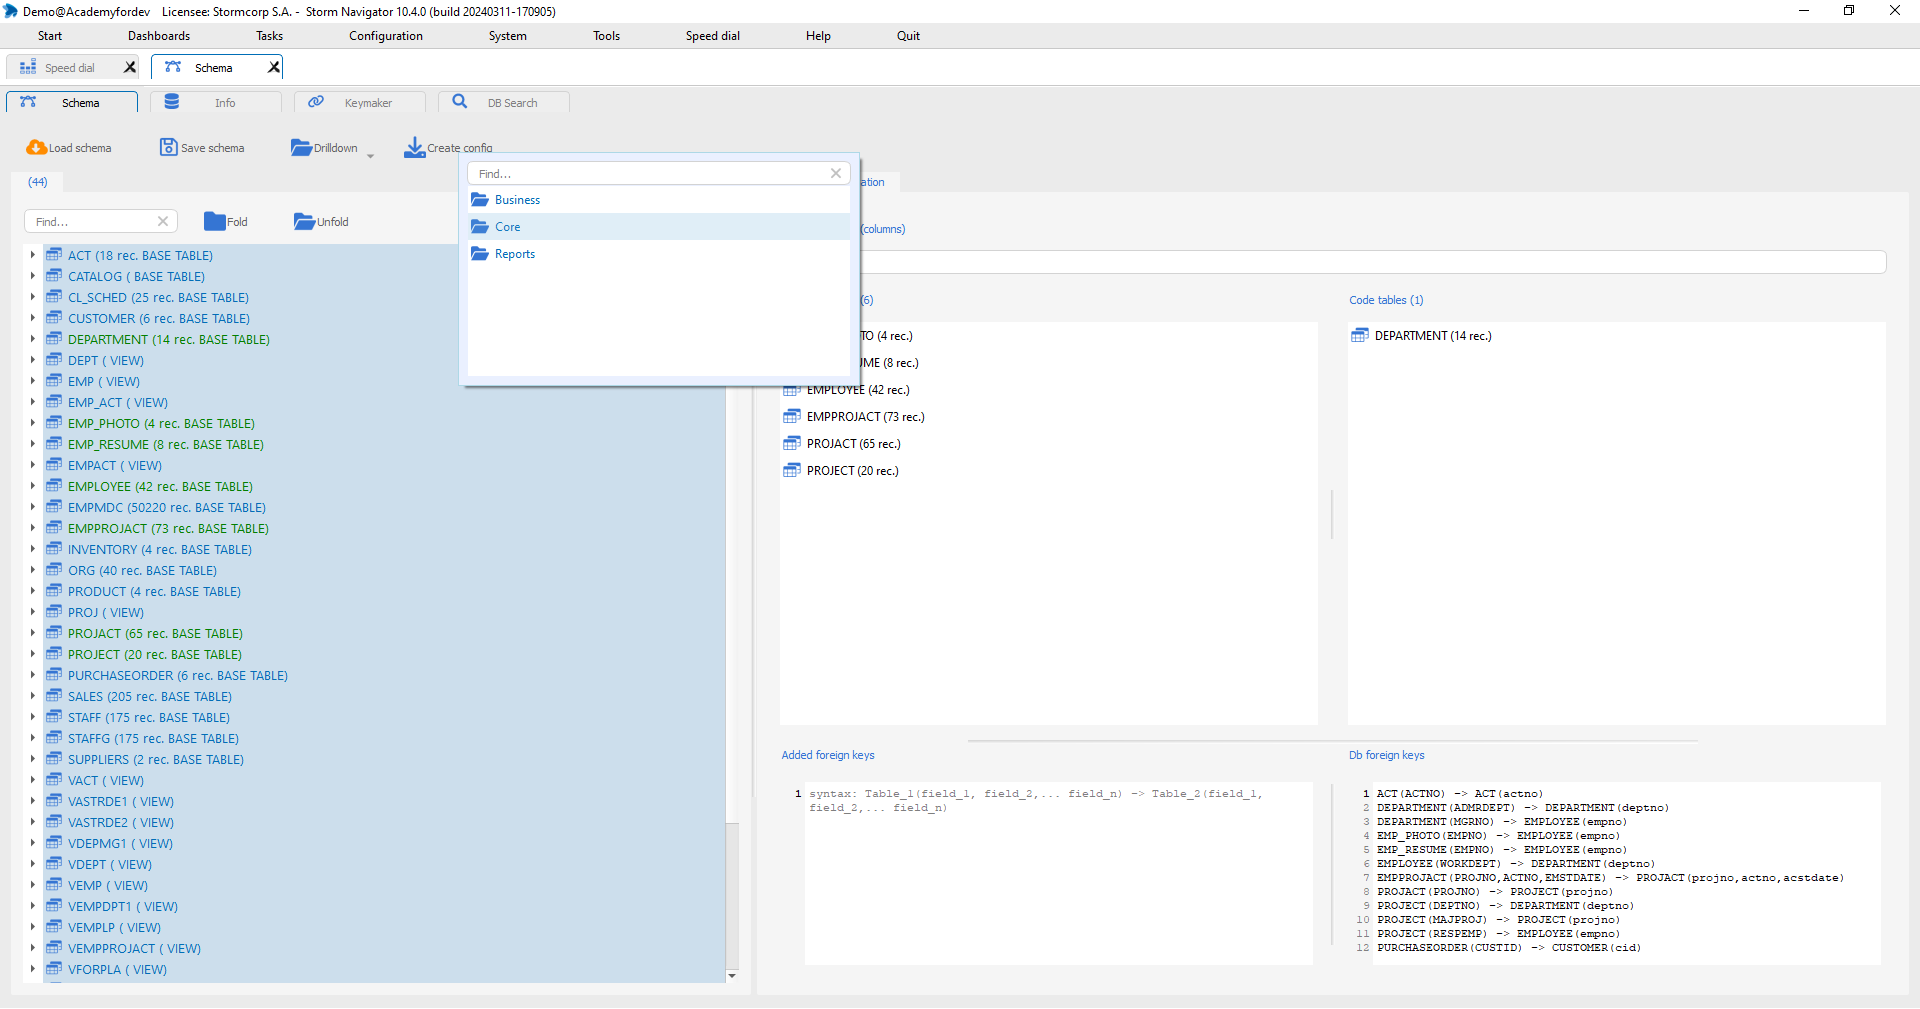
- Create config -> Select Core repository
- Exit and login again
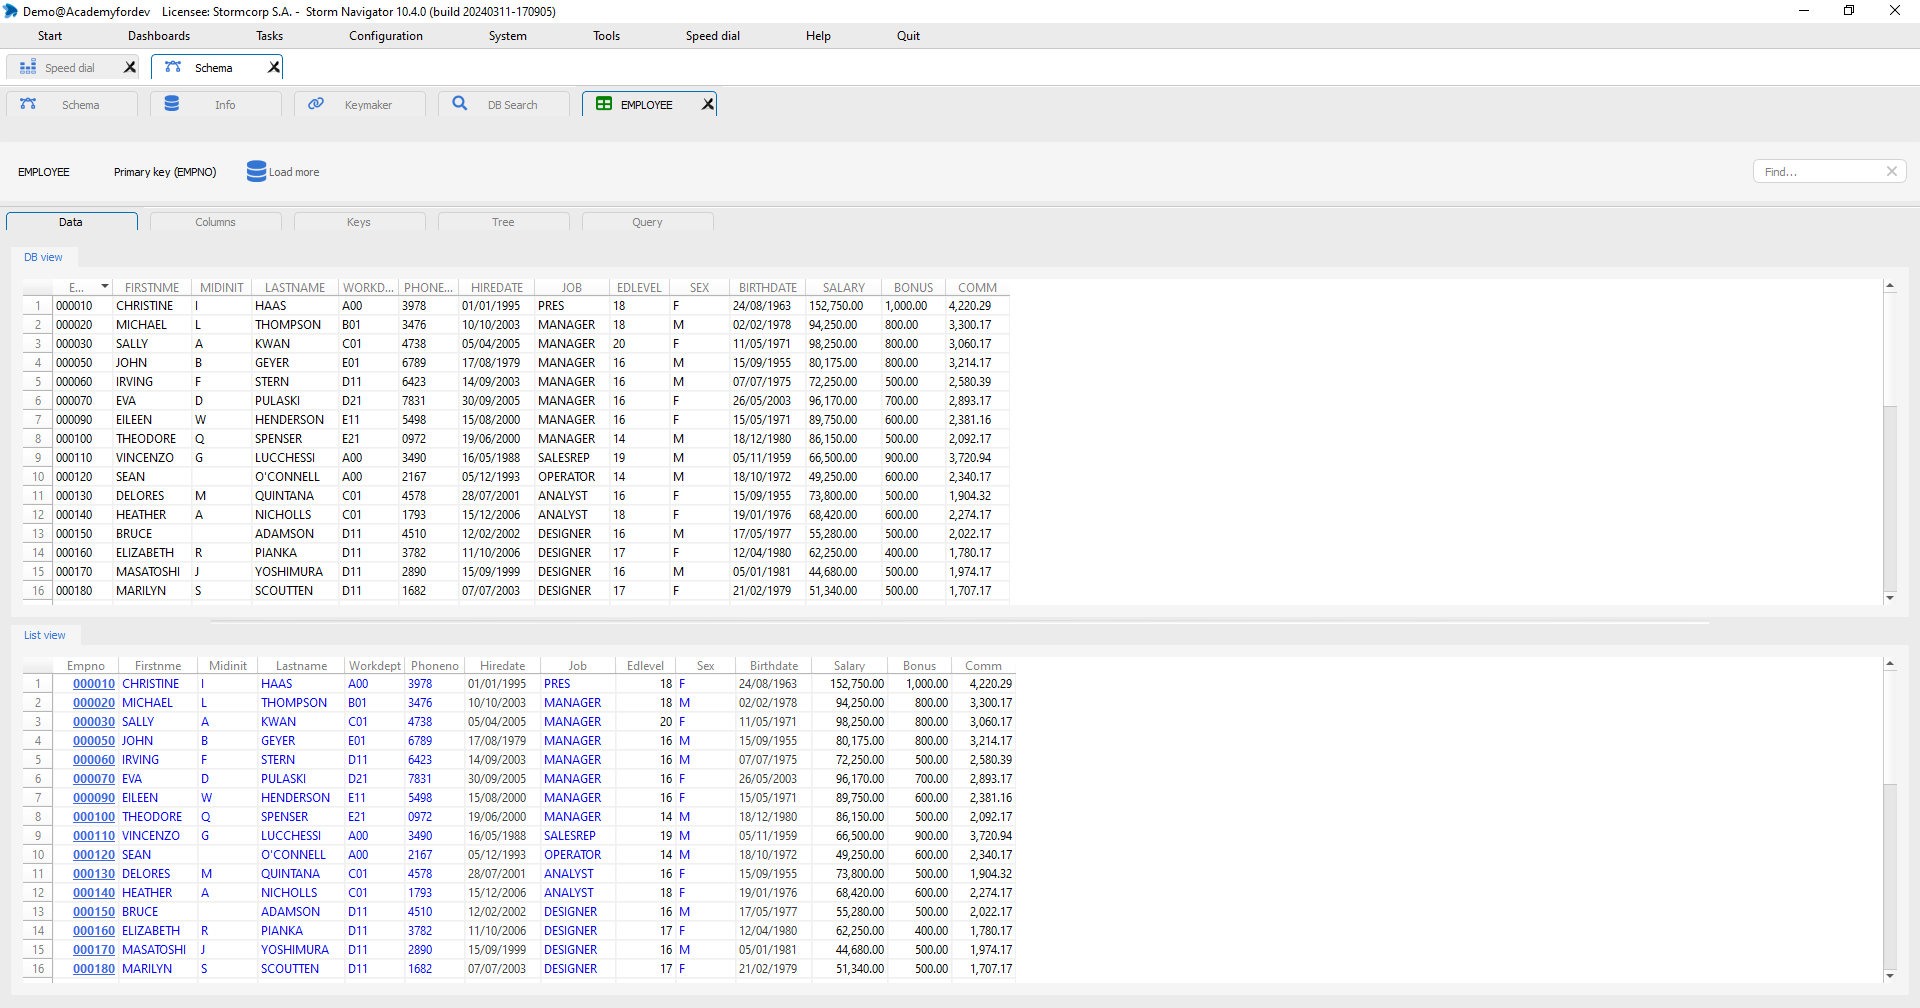
Inspect: data preview and meta data
Data:
- DB view: Non formated data.
- List view: Formated data with column name, according to factor definition.
Columns:
- Column: Table layout with meta data
- Keys: Formated Foreign and Drill down keys
Keys:
- Foreign keys: of current tables, with formated one
- Drill down keys: of current table, with formated one
Tree:
- Drill up: Tree from current table
- Drill down: Tree from current table
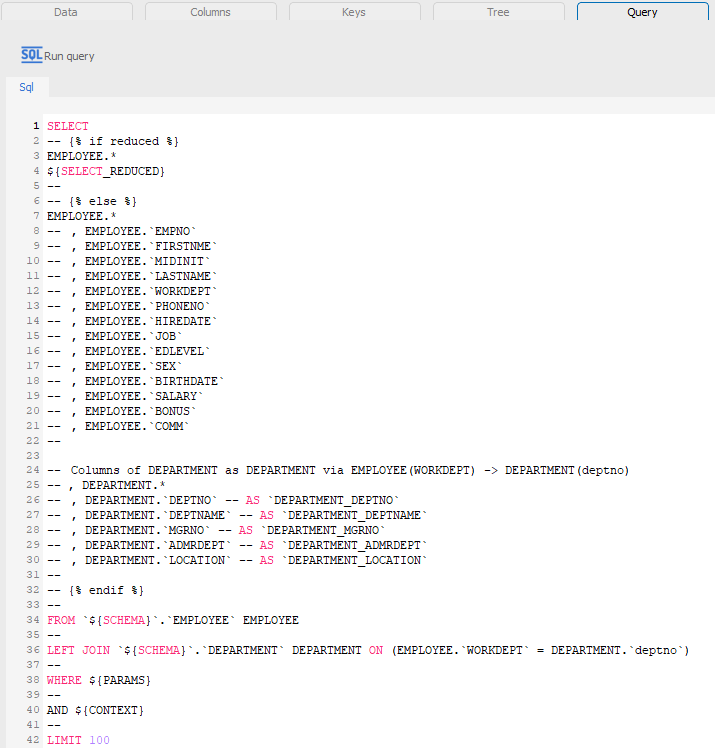
Query:
- Sql: Query template with JOIN to father tables
- Run query: to execute it
Steps
- Select a table with Right-click -> Inspect
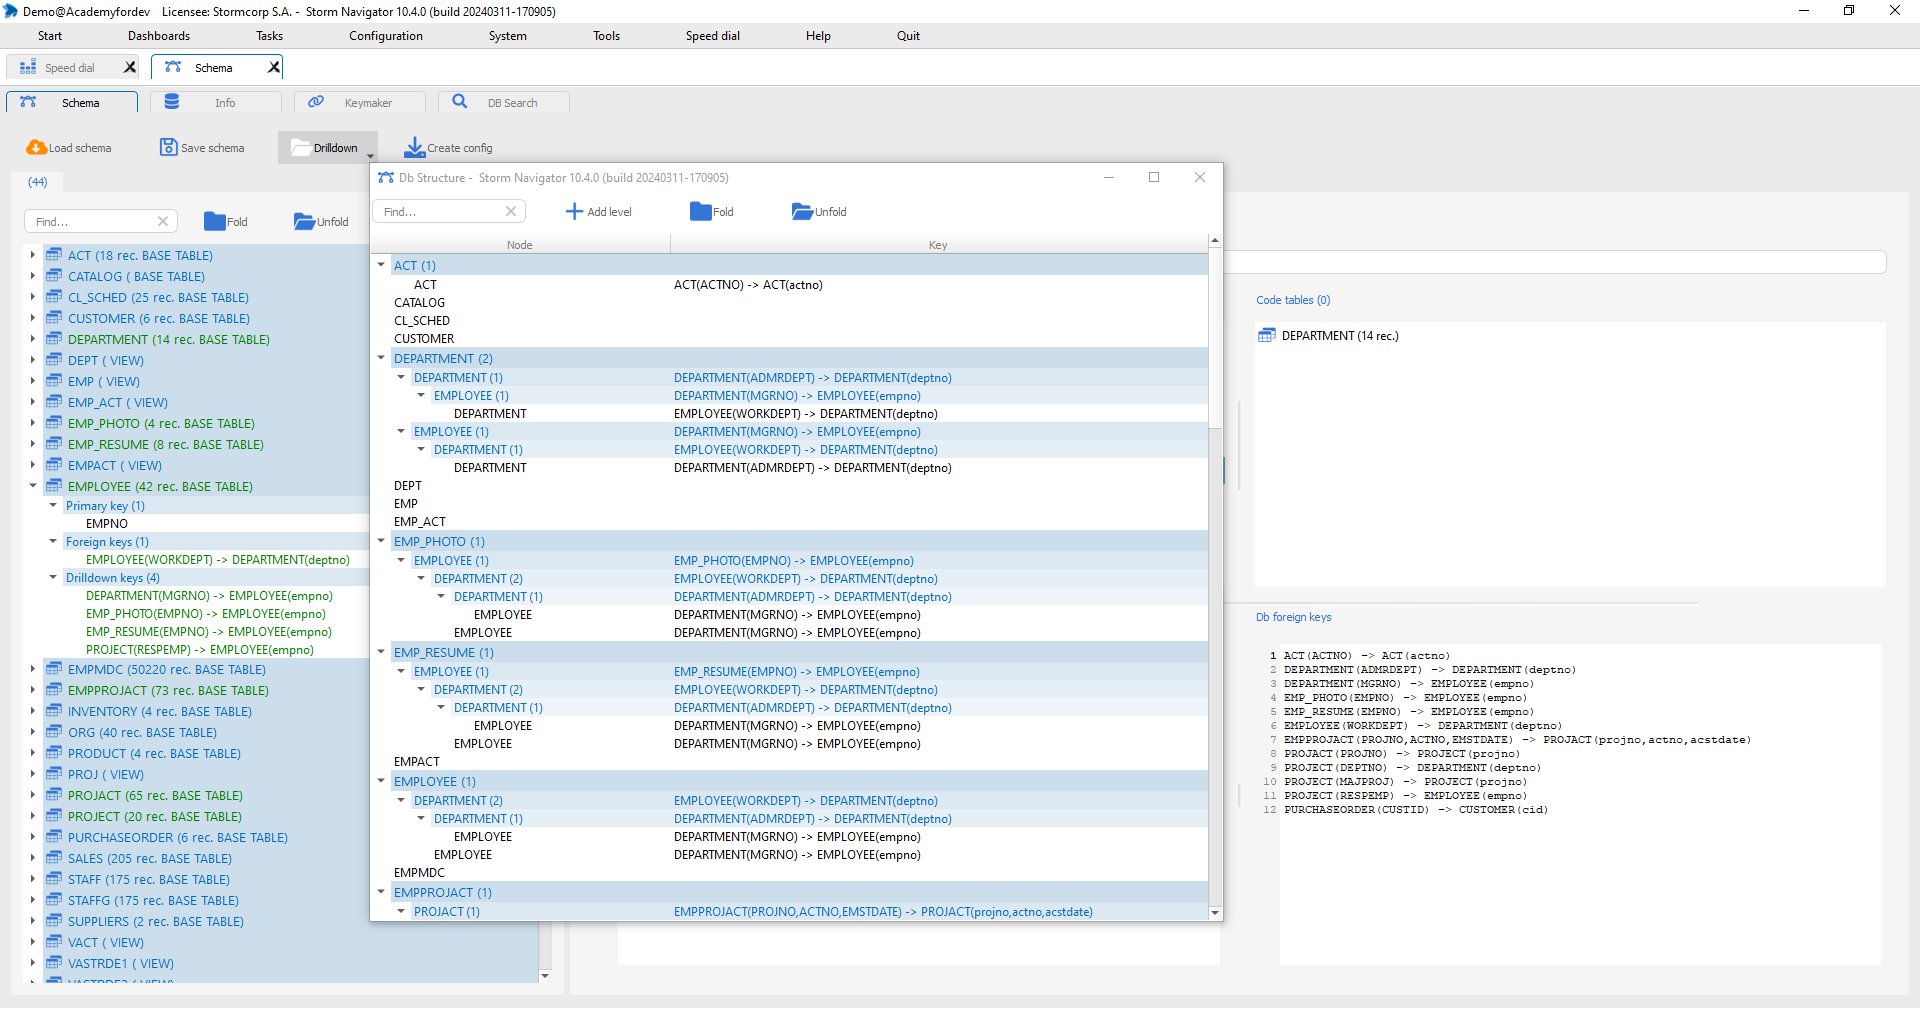
DB structure: hierarchy of the database as a tree
For each table, foreign key pointing to primary key tables are displayed.
Depending on database size and complexity, this tree can be huge. By default we display only one level, but it can be expand.
Click on:
- Add level, to add one level
- Fold / Unfold to colaps / expand tree
Drag and Drop:
- Drag and drop a node in the Drilldown table, to select the entire hierarchy below that node
Shift + roll over:
- To get tips with preview of data
Steps:
- Drilldown -> DB structure
- + Add level (tree can become huge)
- Drag and drop a node in the Drilldown table
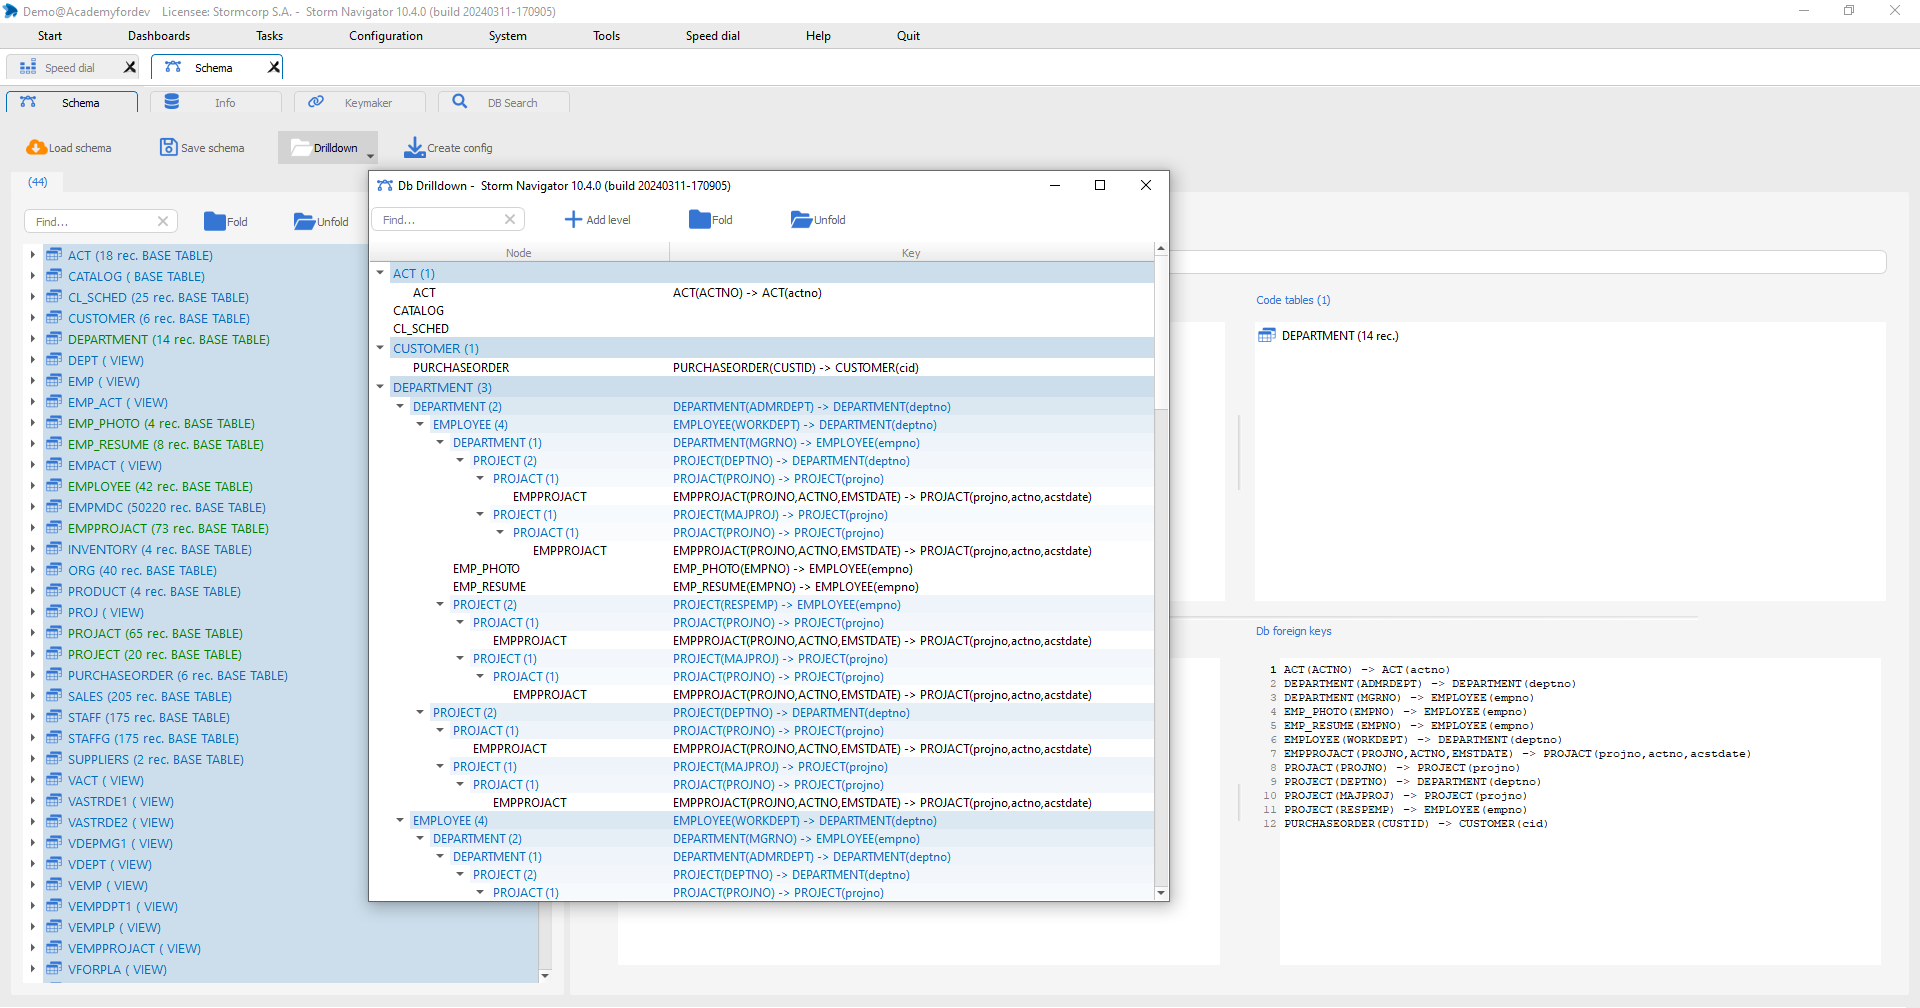
DB drill down: database drill down in tree form
Display fathers top tables of database, and related childs tables where to drilldown.
Depending on database size and complexity, this tree can be huge. By default we display only one level, but it can be expand.
Click on:
- + Add level, to add one level
- Fold / Unfold to colaps / expand tree
Shift + roll over :
- To get tips with preview of data
Steps:
- Drilldown -> DB drilldown
- + Add level (tree can become huge)
- Drag and Drop a node to Drilldown table,
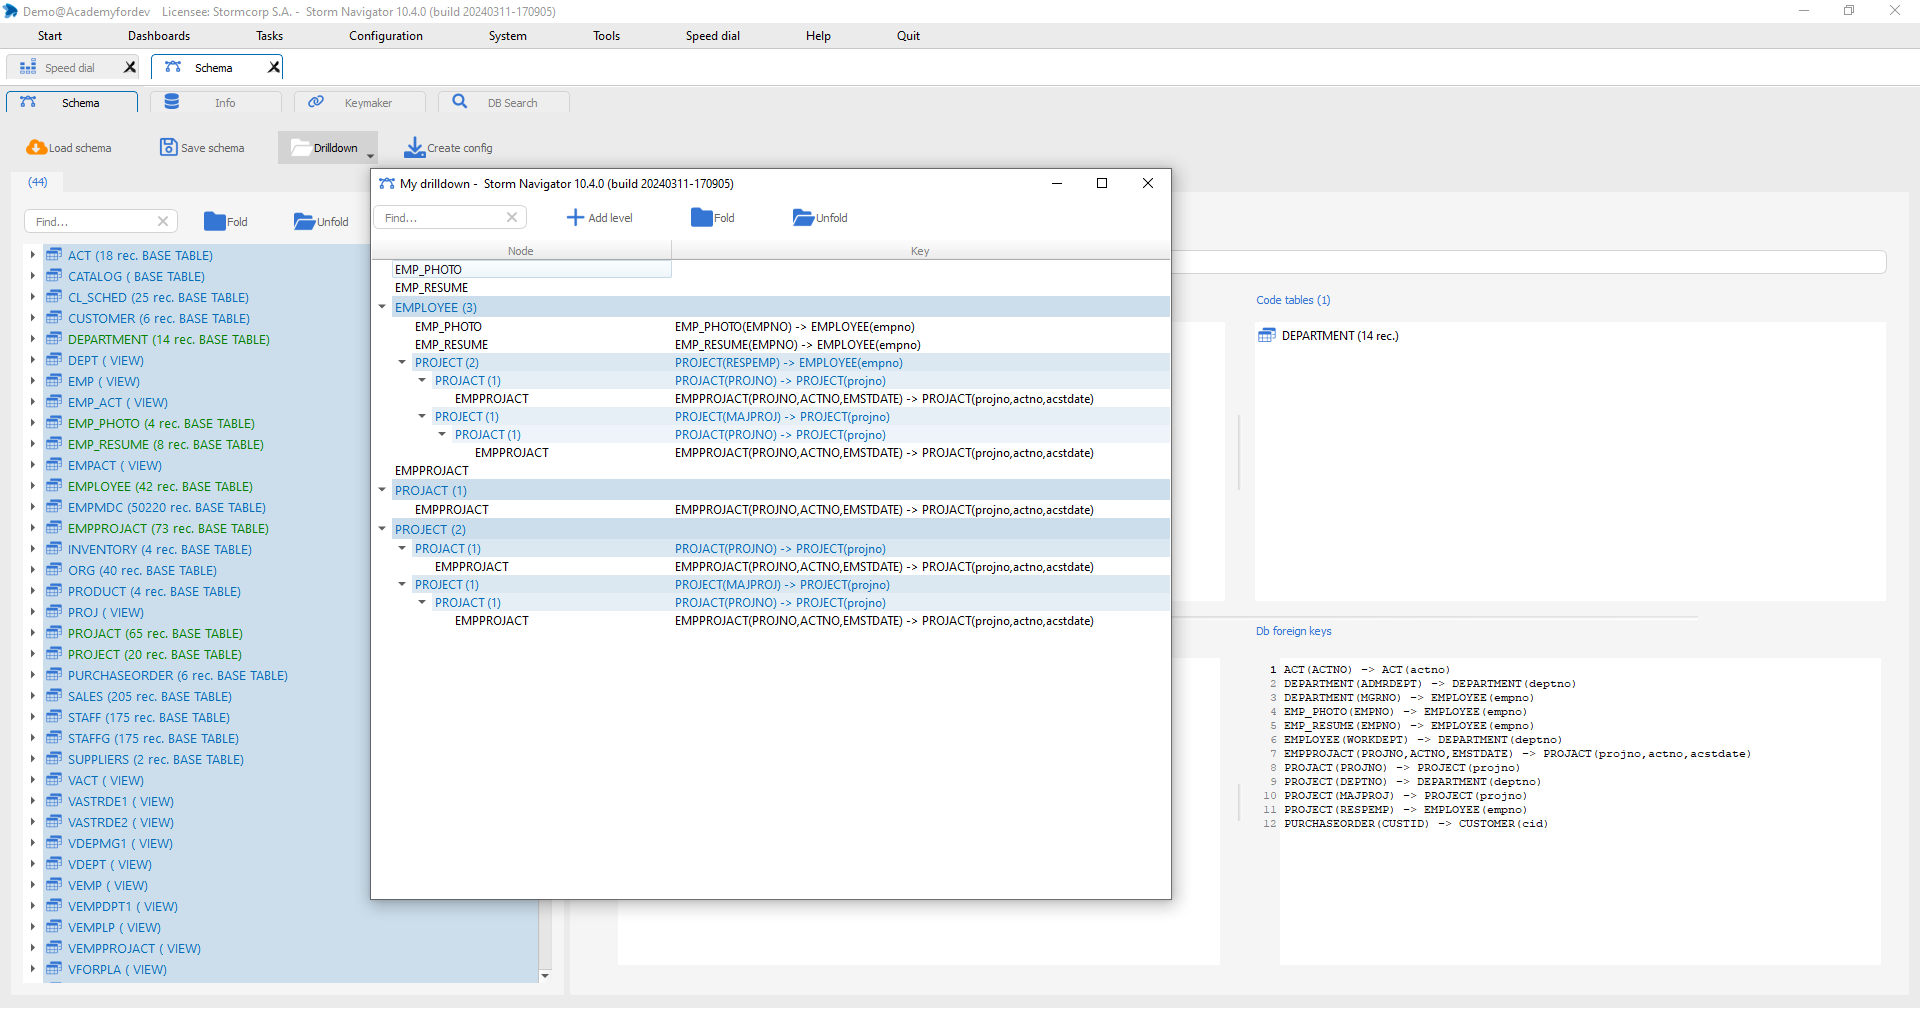
My Drill down: drill down for selected tables as a tree
Display fathers top tables, and related childs tables where to drilldown.
This hierarchy must be validated before to Create config.
Depending on database size and complexity, this tree can be huge. By default we display only one level, but it can be expand.
Click on:
- + Add level, to add one level
- Fold / Unfold to colaps / expand tree
Shift + roll over :
- To get tips with preview of data
Steps:
- Check that the Drilldown tree corresponds to the desired business logic
- Click on Create config
Create config: generate configuration
A configuration is a set of XML source files stored in repositories, mainly in Core.
Incremental Create config will not erase previous updated objects.
The following main objects are created:
- Dashboard
- Dataset
- Paramset
- Query
- Factor
- ..
Steps:
- Tools -> DB Schema
- Create config to generate all objects
- Exit
- Login again to load generated config
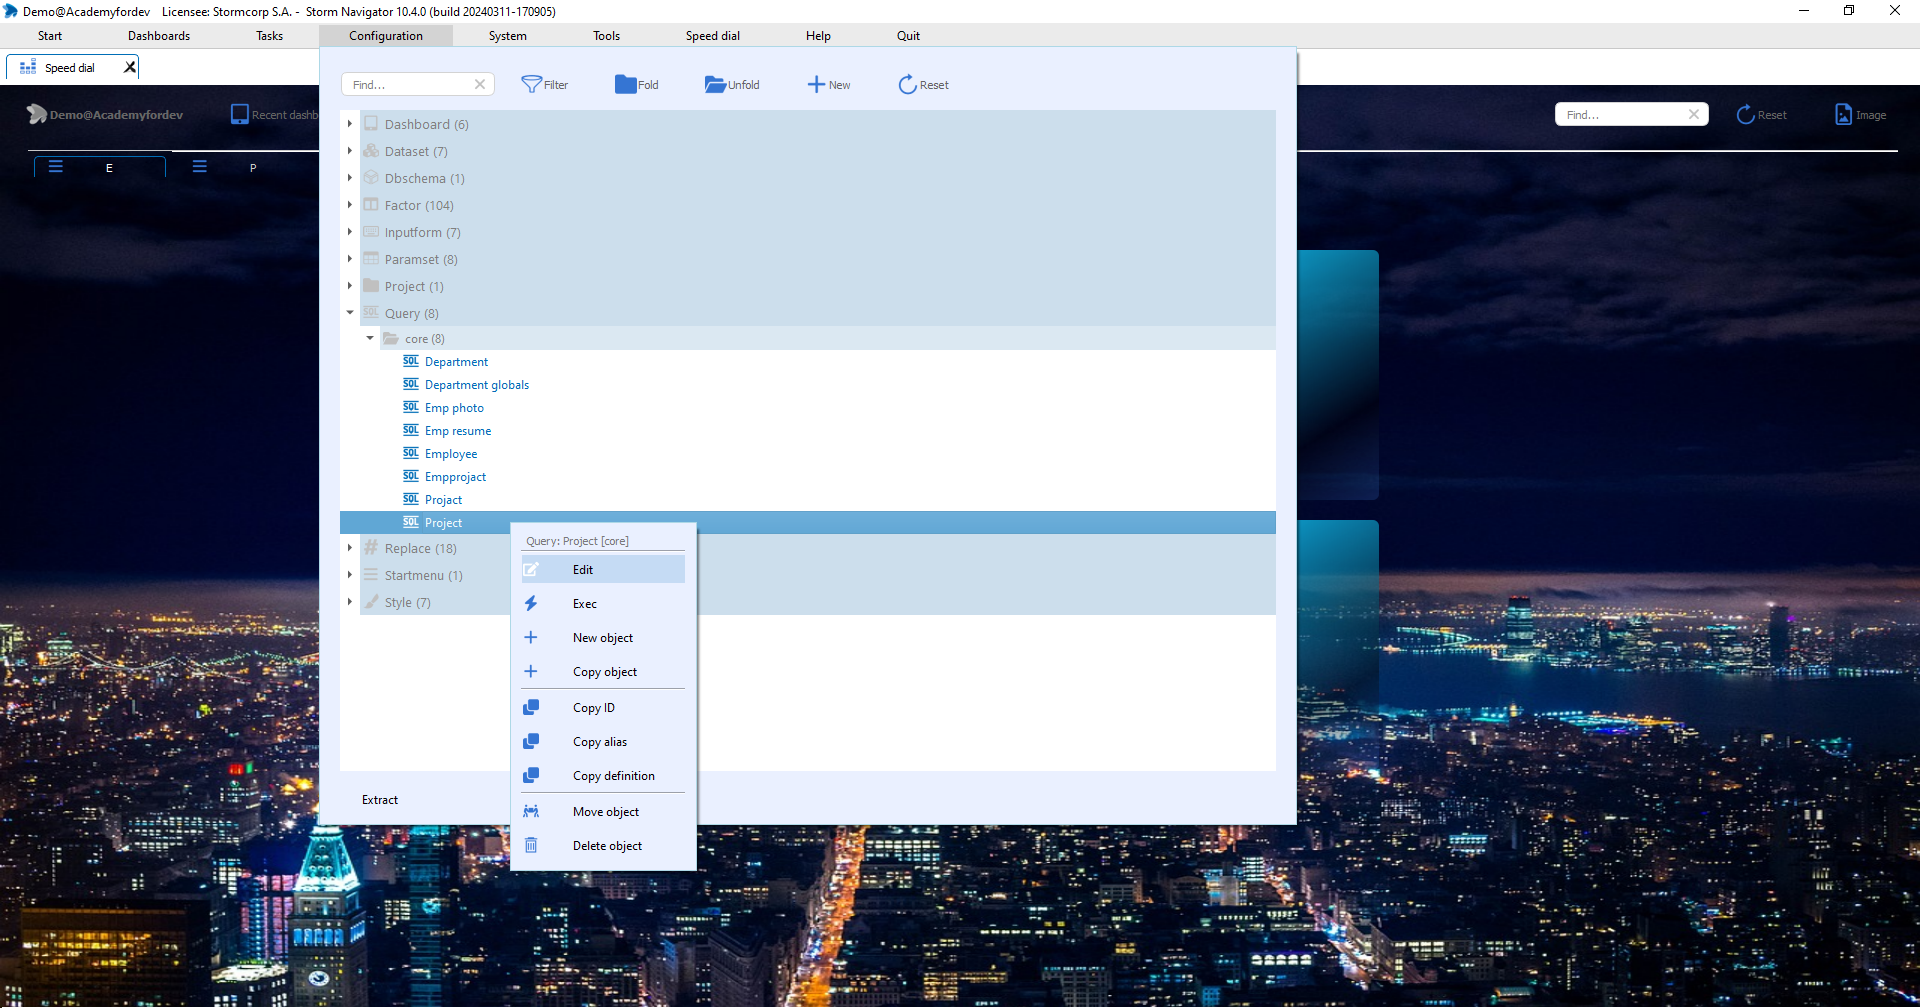
- Configuration display generated objects
- Right-click Edit object
Configuration : Objects stored in repositories
An object is *.xml source code.
There are 2 categories of objects:
- System objects: Developers objects
- Widget objects: Users objects.
Objects locations:
In general, system objects and standard widget objects are stored in the …\Core repository.
User-defined widget objects and user-customized dashboards are stored in a dedicated repository.
Steps:
- Project: Add specific repositories
- User: Allow repositories to end-user
System objects : Developers objects
These objects are not visible to end users. They are generated by Create config or manually by a developer.
The main System objects are:
- Project: Database, folders, dataserver options, locale, SMTP
- User: Authentication, permissions, startmenu
- Startmenu: Available dashboards grouped by business need
- Dashboard: Document displaying data into widgets
- Dataset: Populated with queries result and filtered by paramset
- Paramset: Parameters for data loading:
- Query: SQL query template
- Factor: Data type, total and options
- Style: for factor
Additionnal System objects are:
- Dbschema: Tables for configuration, foreign keys, variables
- Replace: Placeholder source code (macro)
- Script: JavaScript functions
- Dictionnary: Static or query based translation
- Datagrid: Layout of details windows
Steps:
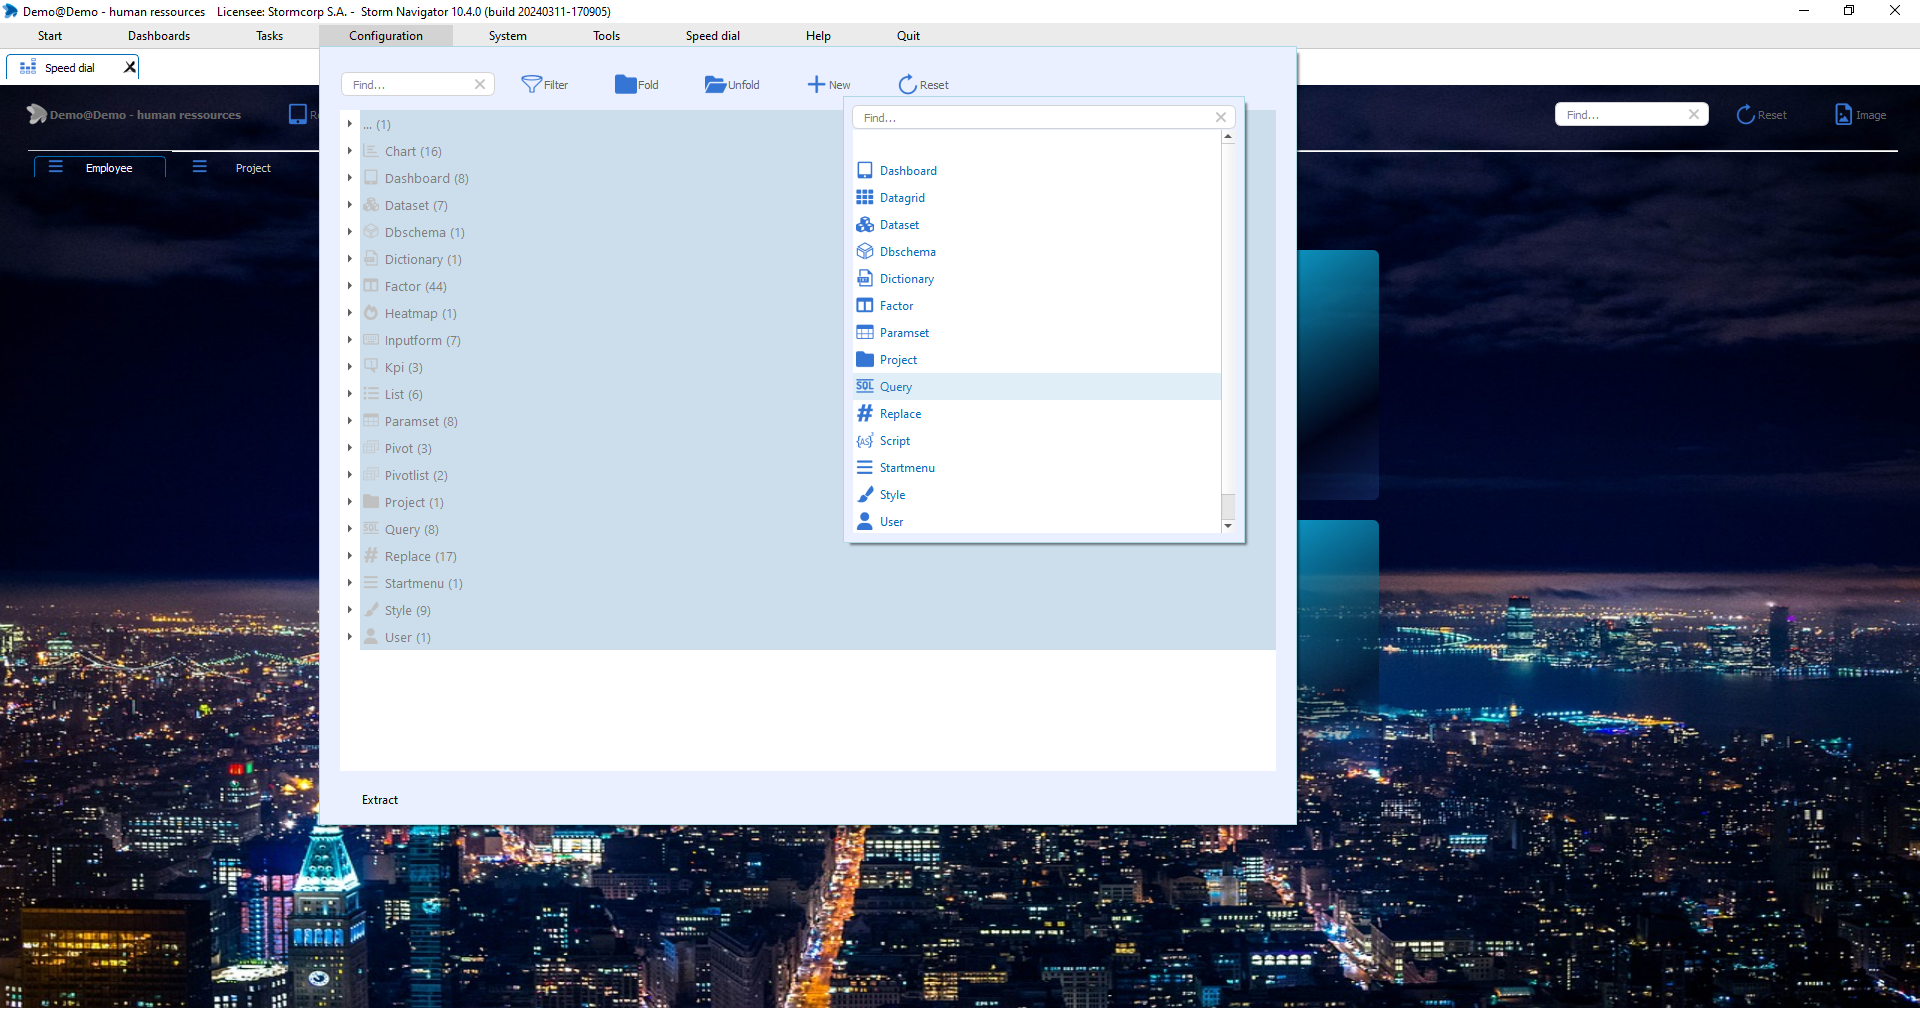
- Configuration: Open an object type node
- Right-click -> Edit: on selected object
- +New: On object type
Widget objects: Users objects
These objects are intended for end users. Initial objects are first created by developers, then managed by end-users.
The main Widget objects are:
- Kpi: Key paramaters indicator
- List: Rows and columns with totals
- Pivot: Tree with distributed columns
- Pivotlist: Combination of a pivot with a list
- Chart: Different type of charts
Additionnal Widget objects are:
- Report: Design with NCReportDesigner
- Geomap: World map
- Heatmap: Map with
- Htmlapp: Html pages with placeholder for variable
- Notepad: Editor to format text
- Textapp:
- Label:
Steps:
- Configuration: Open an object type node
- Right-click -> Edit: on selected object
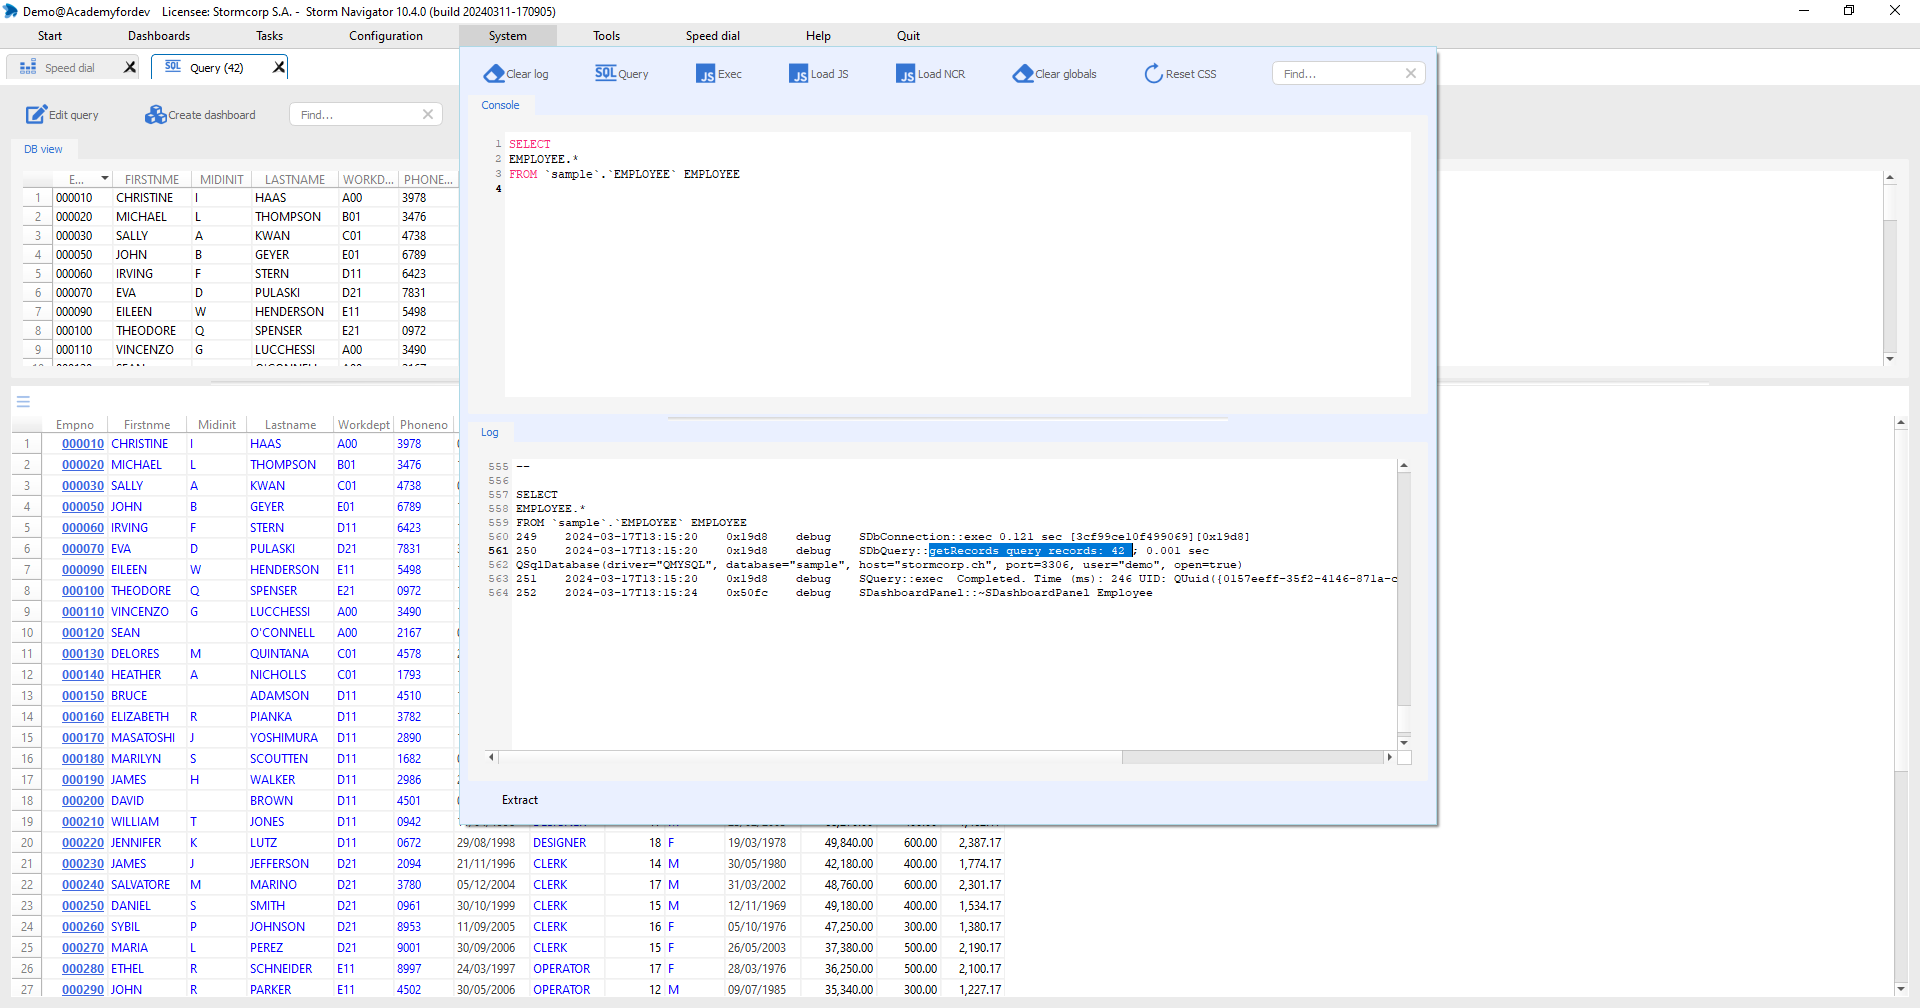
Console: Execute SQL statement with log
Copy/past source code from Log, or enter it manually.
SQL key word are highlighted.
Console:
SQL statement: Enter or copy/past SQL native source code
SQL Query: Execute query on database engine
Log:
Log: History of database and Storm message.
Log are per user, per login, per day and are stored in folder:
-
- ..\storm.log
Query tab:
Displays data query result twice
- DB view: non formated data.
- List view Formated data, according to factor definition
Click on:
- Console: Past or enter SQL statement
- Clear: Clear log
- SQL Query: Execute SQL statement on database
- Edit query: Manage query object
- Create dashboard: Create a new dashboard, with all related objects
Query: SQL template
Query template are generated by Create config, or can be created manually.
The reserved spaces (placeholders) are enriched by the query compiler, depending on the loading parameters.
Placeholder:
Placeholders are variables replaced by values. The standards are as follows:
- ${SCHEMA}
- ${PARAMS}
- ${CONTEXT}
- ${LIMIT}
Placeholders are also macro replaced by source code. The standards are as follows:
- ${REPLACE_Table_SELECT}
- ${REPLACE_Table_SELECT_REDUCED}
- ${REPLACE_JoinTable_JOIN(JoinTable)}
Query template structure:
SELECT
— {% if reduced %}
The following macro will be inserted when we click on the corresponding Drill down tree node, this to obtain the number of records.
Selecting smaller columns set speeds up response times and reduces network traffic.
${ReducedColumnsOfTableA}
— {% else %}
Those macros will be executed when we click on Load.
We have one macro per join table, this to select at only one place the needed joins columns.
${ColumnsOfTableA}
${ReducedColumnsOfTableJ1}
— {% endif %}
FROM
${SCHEMA}.TableA TableA
Lest join to father tables are inserted, up to top father table.
LEFT JOIN ${SCHEMA}.TableJ1 TableJ1 ON (TableA.PkColumn = TableJ1.FkToPkColumn
WHERE
Reserved keyword to generate the where condition, according to load param or selected context.
${PARAMS}
—
AND ${CONTEXT}
—
LIMIT ${LIMIT}
“- -” are separator to enclose code.
Enclosed source code will be activated only if corresponding macro is populated. It can be used both in SELECT or in WHERE condition
Check list of your source code:
- Apply to run query and check for SQL error
- Tables must be prefix by ${SCHEMA}.YourTable
- Table must have an alias with the same name, this to be free of schema name in SELECT .., in ON (..), and also with Params machinery
- In Macro, select only needed fields, this to speed-up your query
- Feel free to add ORDER BY, despite that sorting is easily done in List widget
Macro: Pieces of source code used in many places
Macros are generated by Create config, or can be created and then inserted manually anywhere in the template.
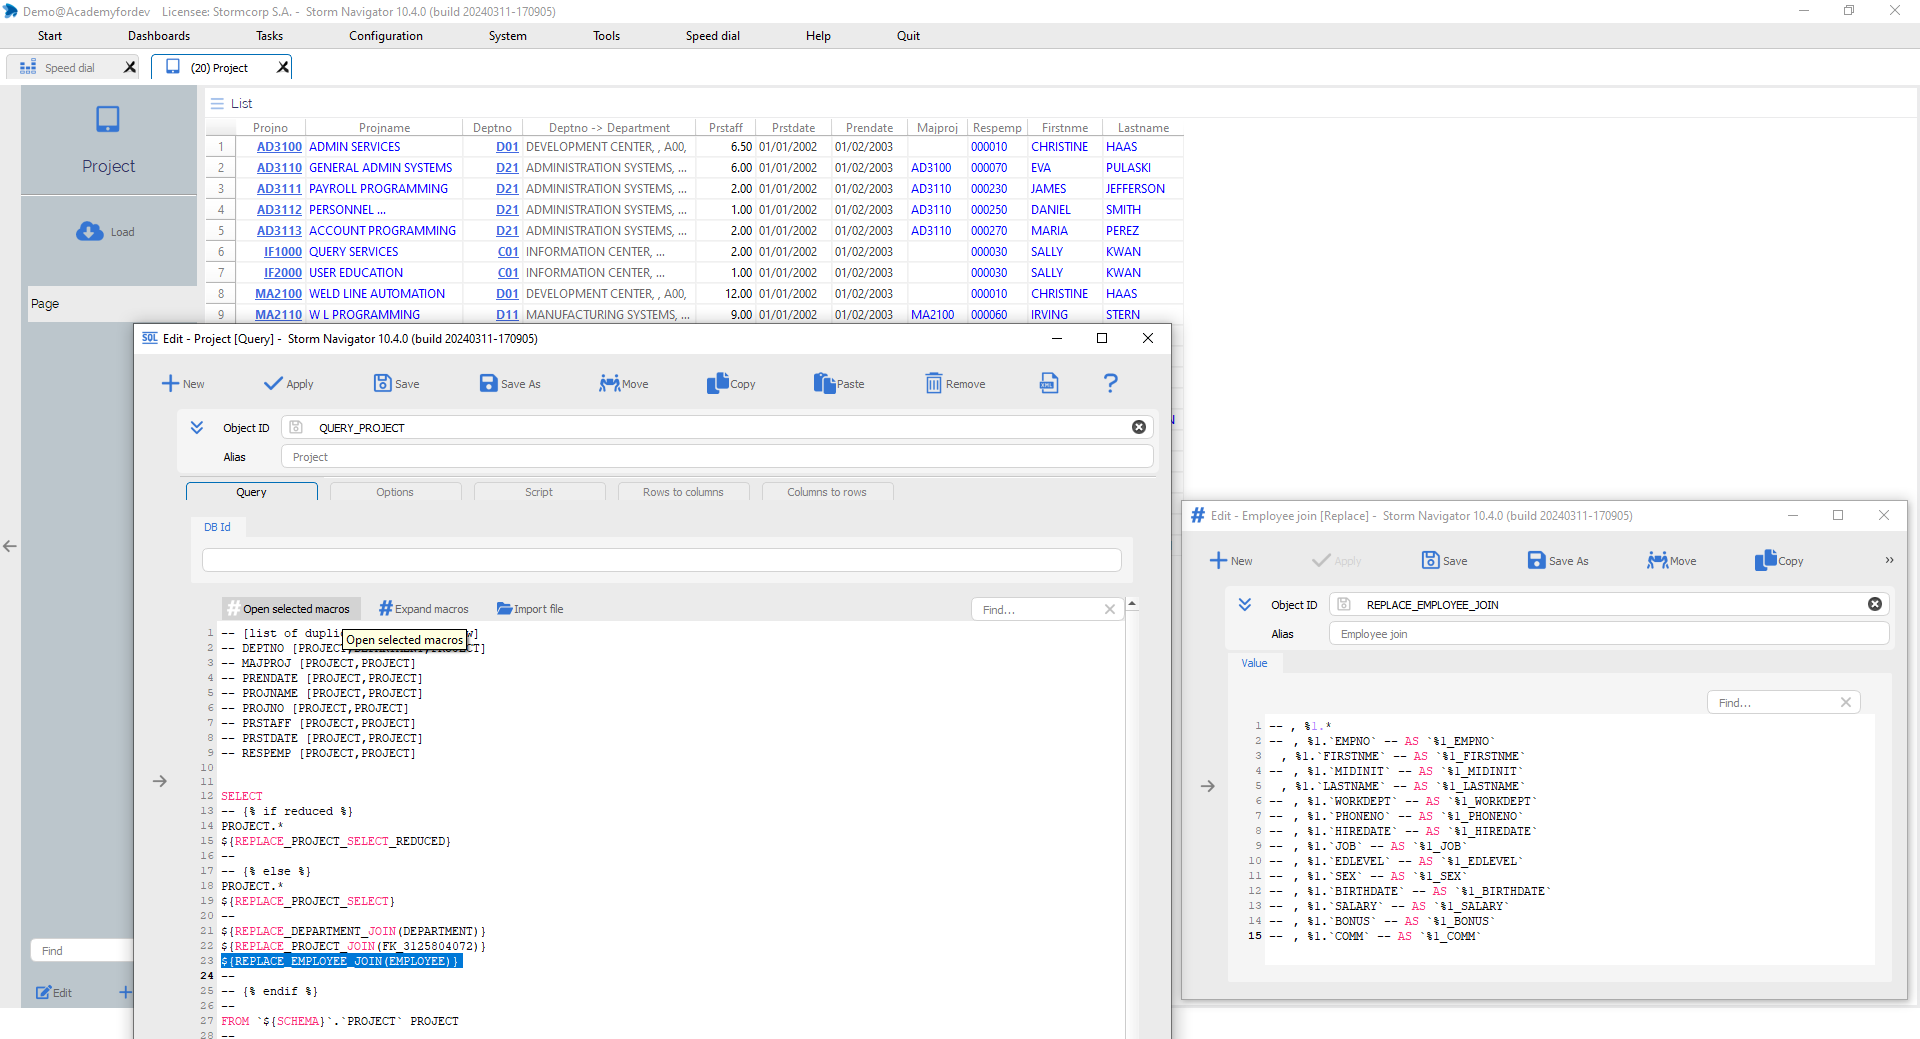
Macro:
By default, Create config does not select foreign table fields in macros.
In macros, they are all commented with: – –
To select fields, just uncomment them and press Save in macro editor:
, %1.`FIRSTNME`
, %1.`LASTNAME`
In the case of duplicate columns in several tables, it is important to precede the field name with the table name. To do this, uncomment this piece of code in the macro.
AS `%1_ColumnName`
Steps:
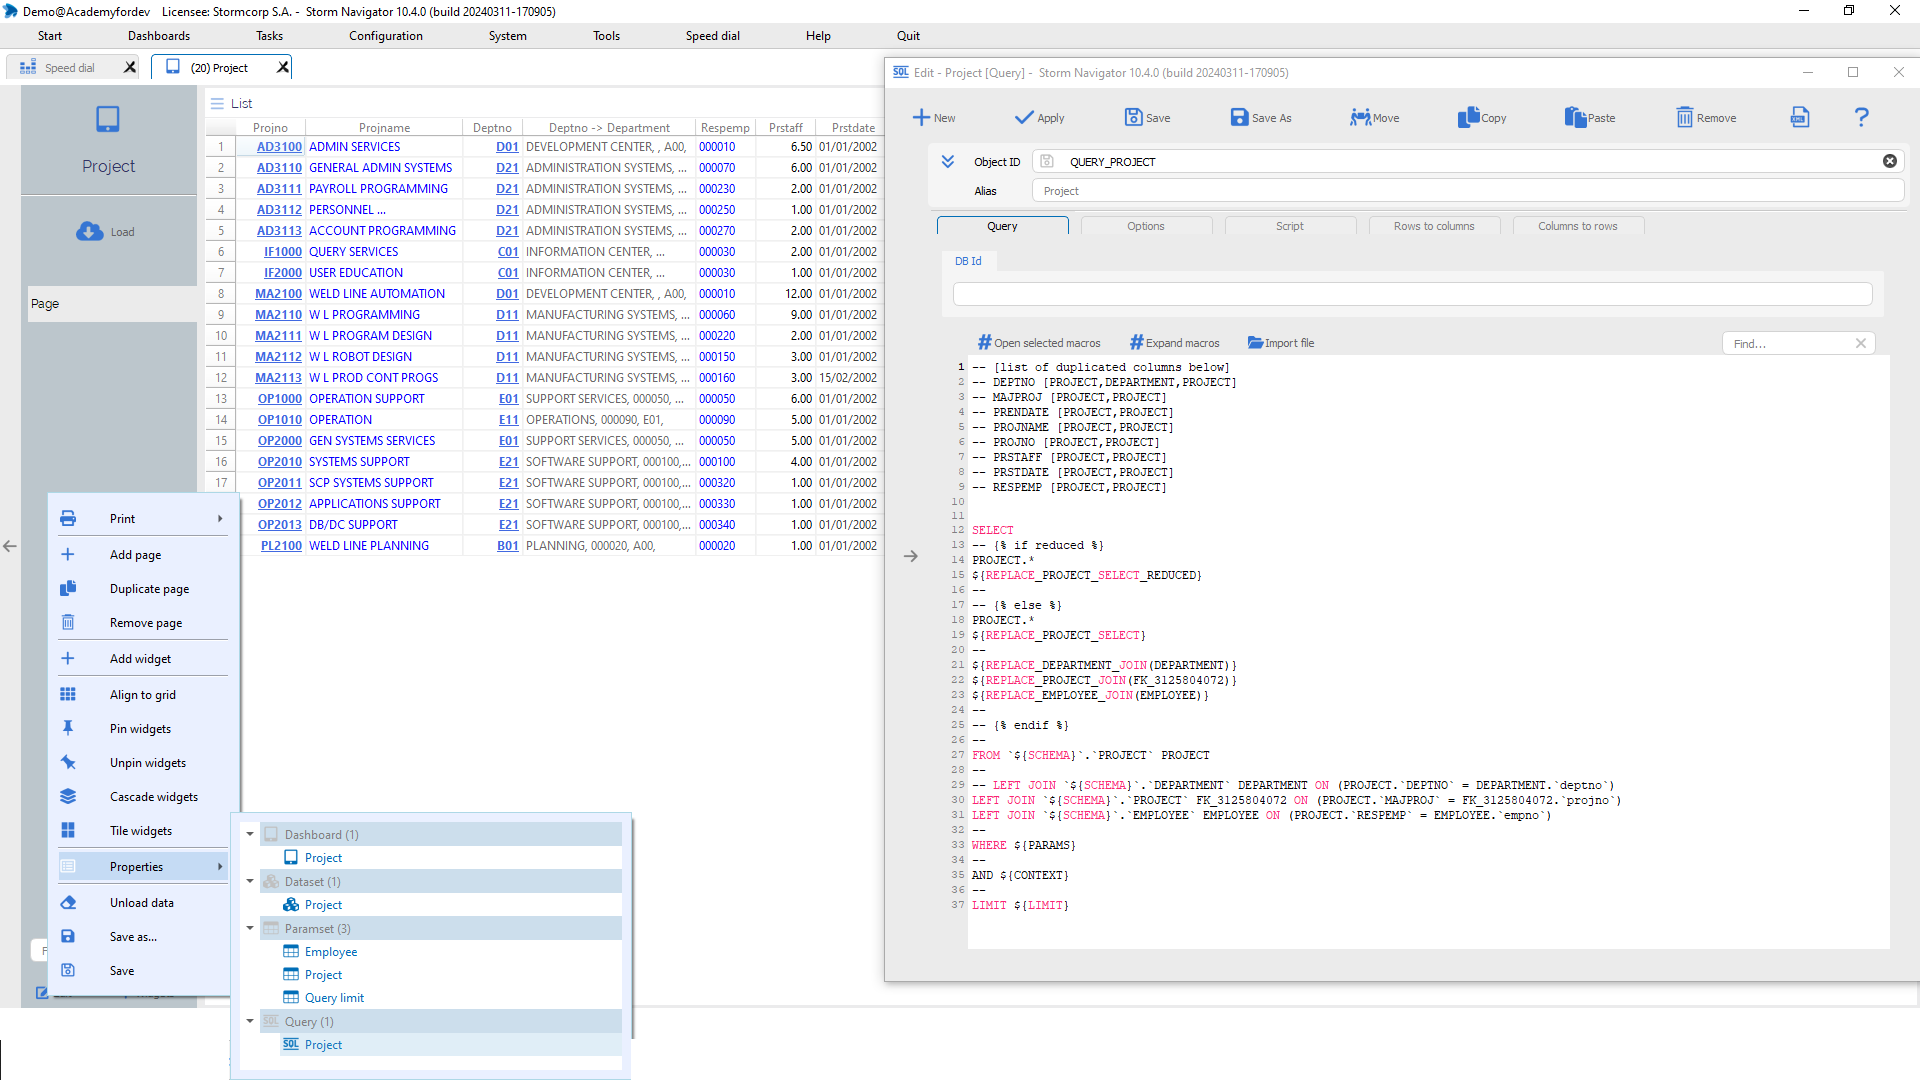
- Dashboard -> Edit -> Properties-> Query,
or, Configuration -> Query -> Right-click -> Edit - Apply to run query
- Open selected macro to edit Replace object, for exemple to activate employee columns
- Expend macro to replace macro with related source code (if really needed)
Globals: data loaded in memory
They are used to:
- Speed up Code resolution for static data
- Calculate global sum
Global data:
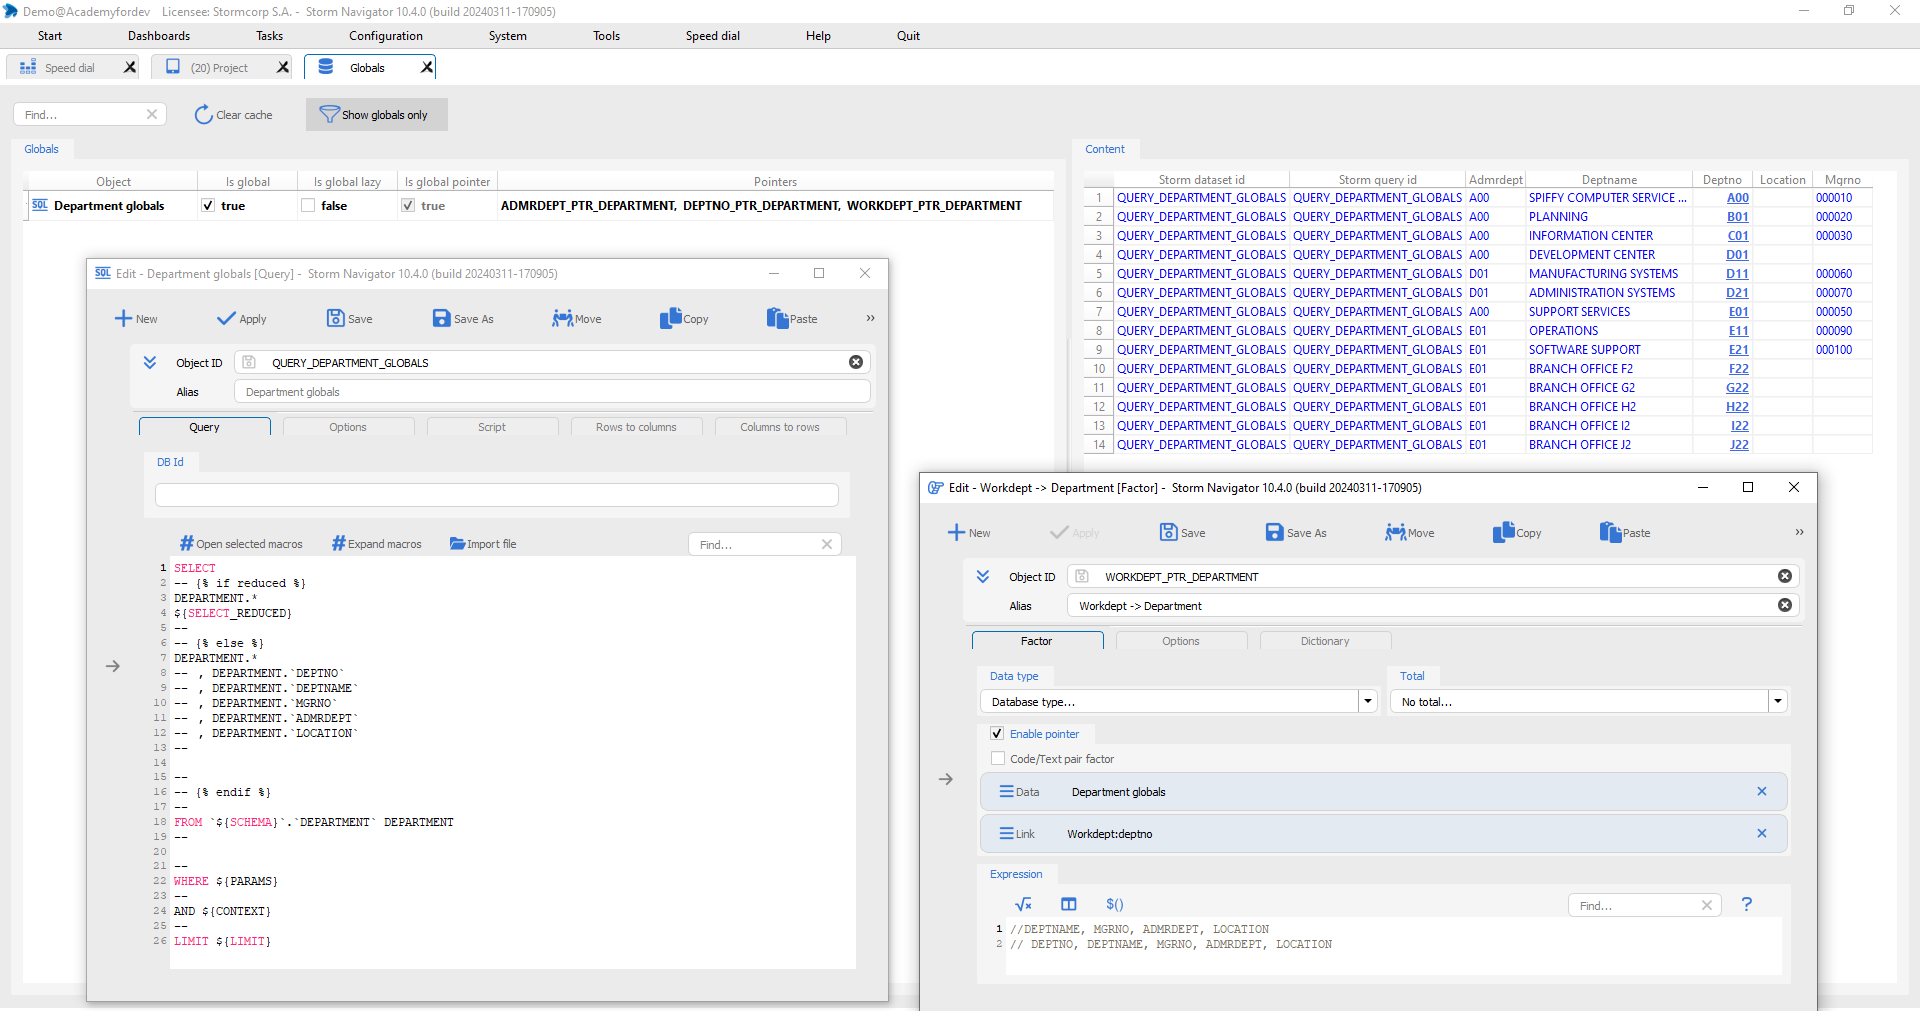
Global data is the result of queries executed during login. The data remains in memory. A periodic refresh can be defined in the project.
The advantage of global data is that static codes, such as the list of currencies, countries, etc., are read just once, considerably speeding up code resolution.
Queries for globals are generated without join or macro.
Language code, if exist, and text to be displayed must be adjusted in select statement.
Calculating global data can take time. To avoid slowing down login times, thoses queries will be marked as lazy.
A progress bar for loading globals is displayed during login.
Steps:
- Tool-> Schema: select code tables, before to create config
- Tools -> Globals -> Show globals only: Click on SQL object to see the data in memory
Factor: Pointer: Replacing the code with the corresponding text stored in a foreign table
When a foreign key field points to a table selected as a Code table, Create config generates a new factor to automatically display the corresponding code text.
Factor pointer:
Create config genarate a new factor with the following Object Id and Alias:
Object Id: FieldContainingCode_PTR_ForeignTableWithText
Alias: FieldContainingCode -> ForeignTableWithText
If the code is a commercial code, the Code/text factor box must be ticked, so that it is visible in the Tips (when you press Shift and move the mouse cursor over the cell).
Steps:
If code tables are select in Schema panel, Create config will automatically generate a new factor with the resolved code.
It can be done manually:
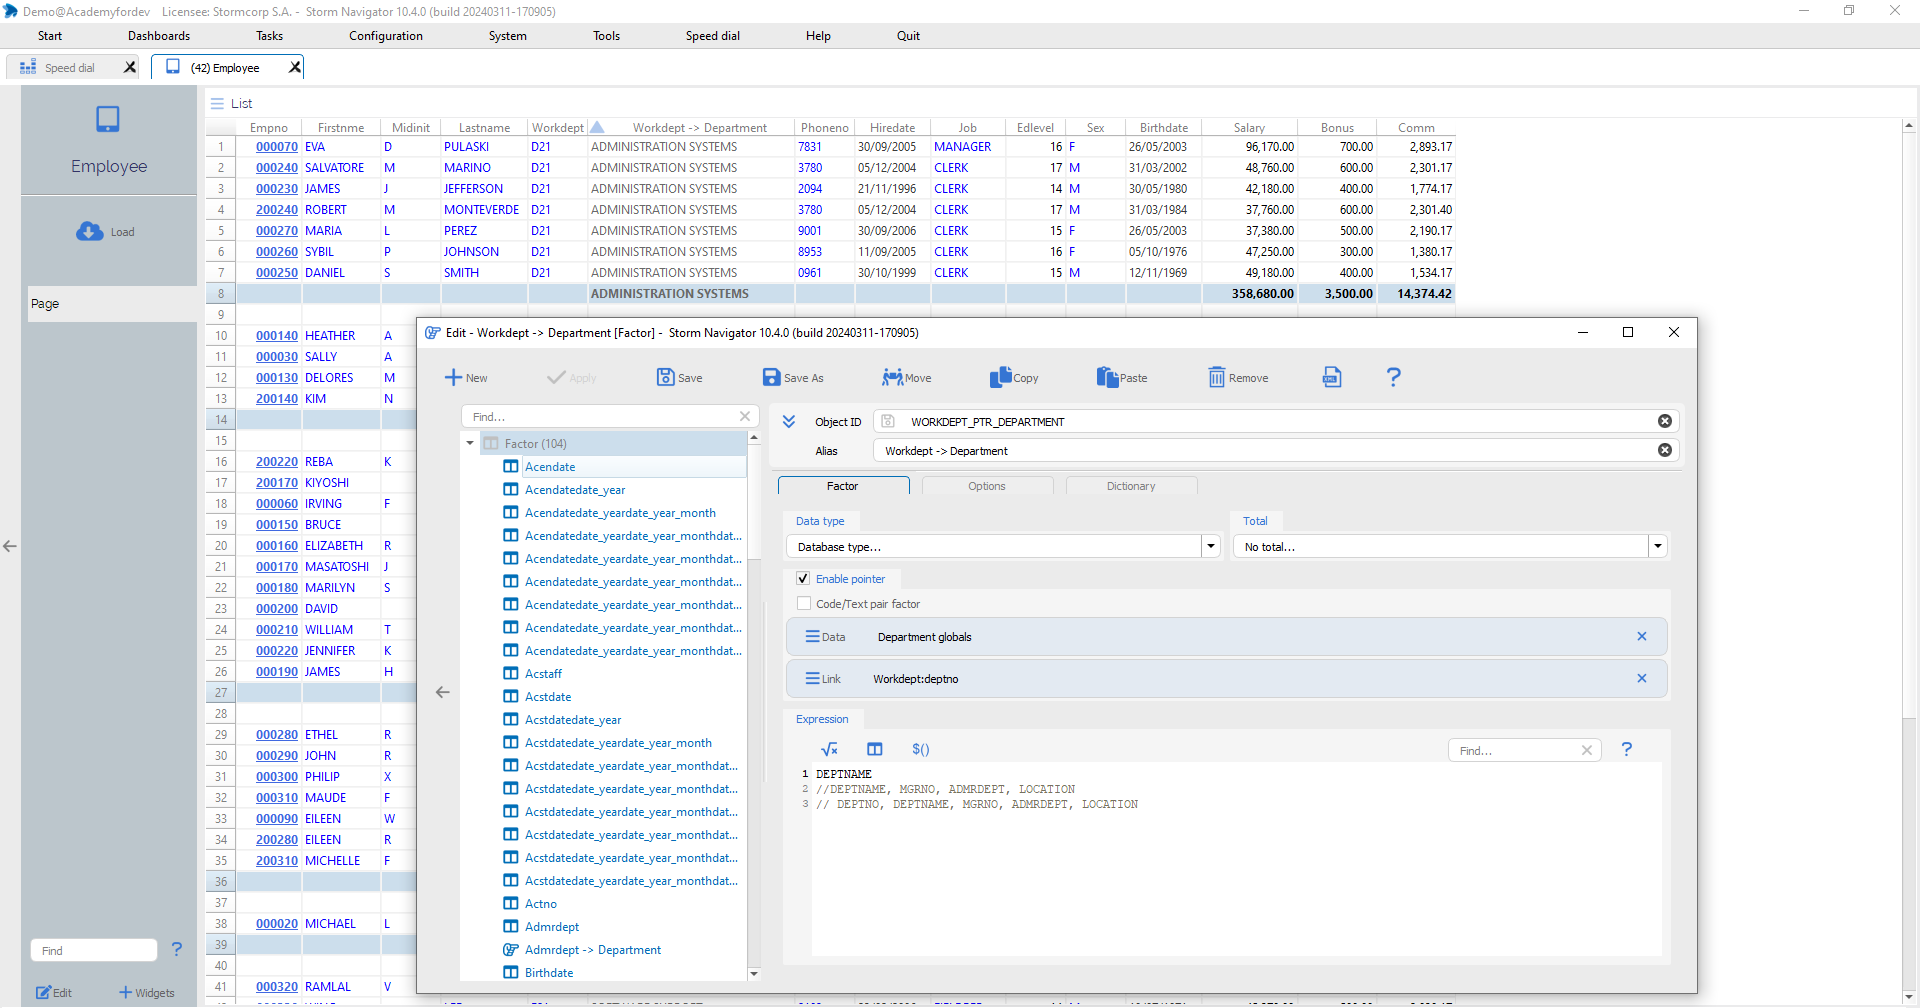
- Right-click on list column header -> Edit columns
- Enable pointer
- Datasource globals query must be selected
- Link is pair of fields, CodeField:PkOfForeignTable,..
- Click on Code/text pair factor, if Tips must display the code
- Expression to display the foreign text field
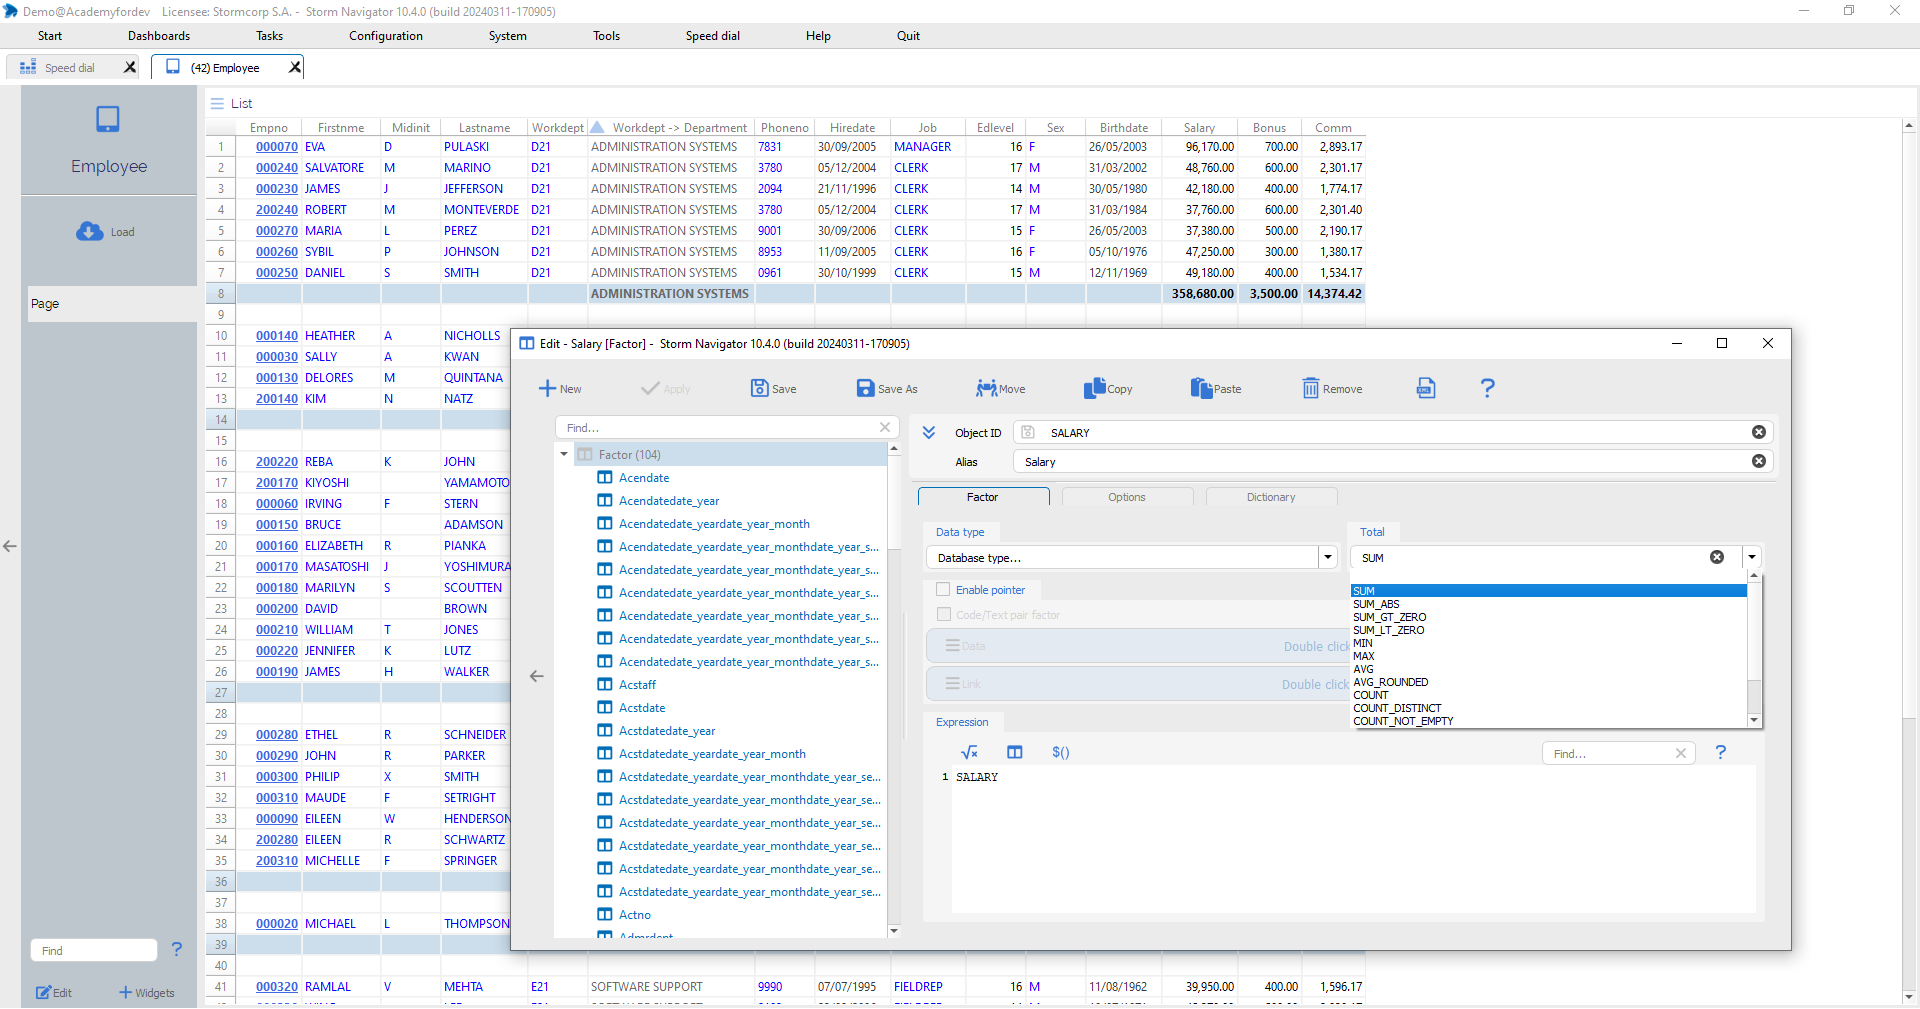
Factor: Total: Functions for total line
A set of functions are available for total line, such as: SUM, SUM_ABS,…
Total:
Select the desired function is the factor must be totalized.
Steps:
- Right-click on column header Salary-> Edit
- Total select SUM, or desired function
- Save
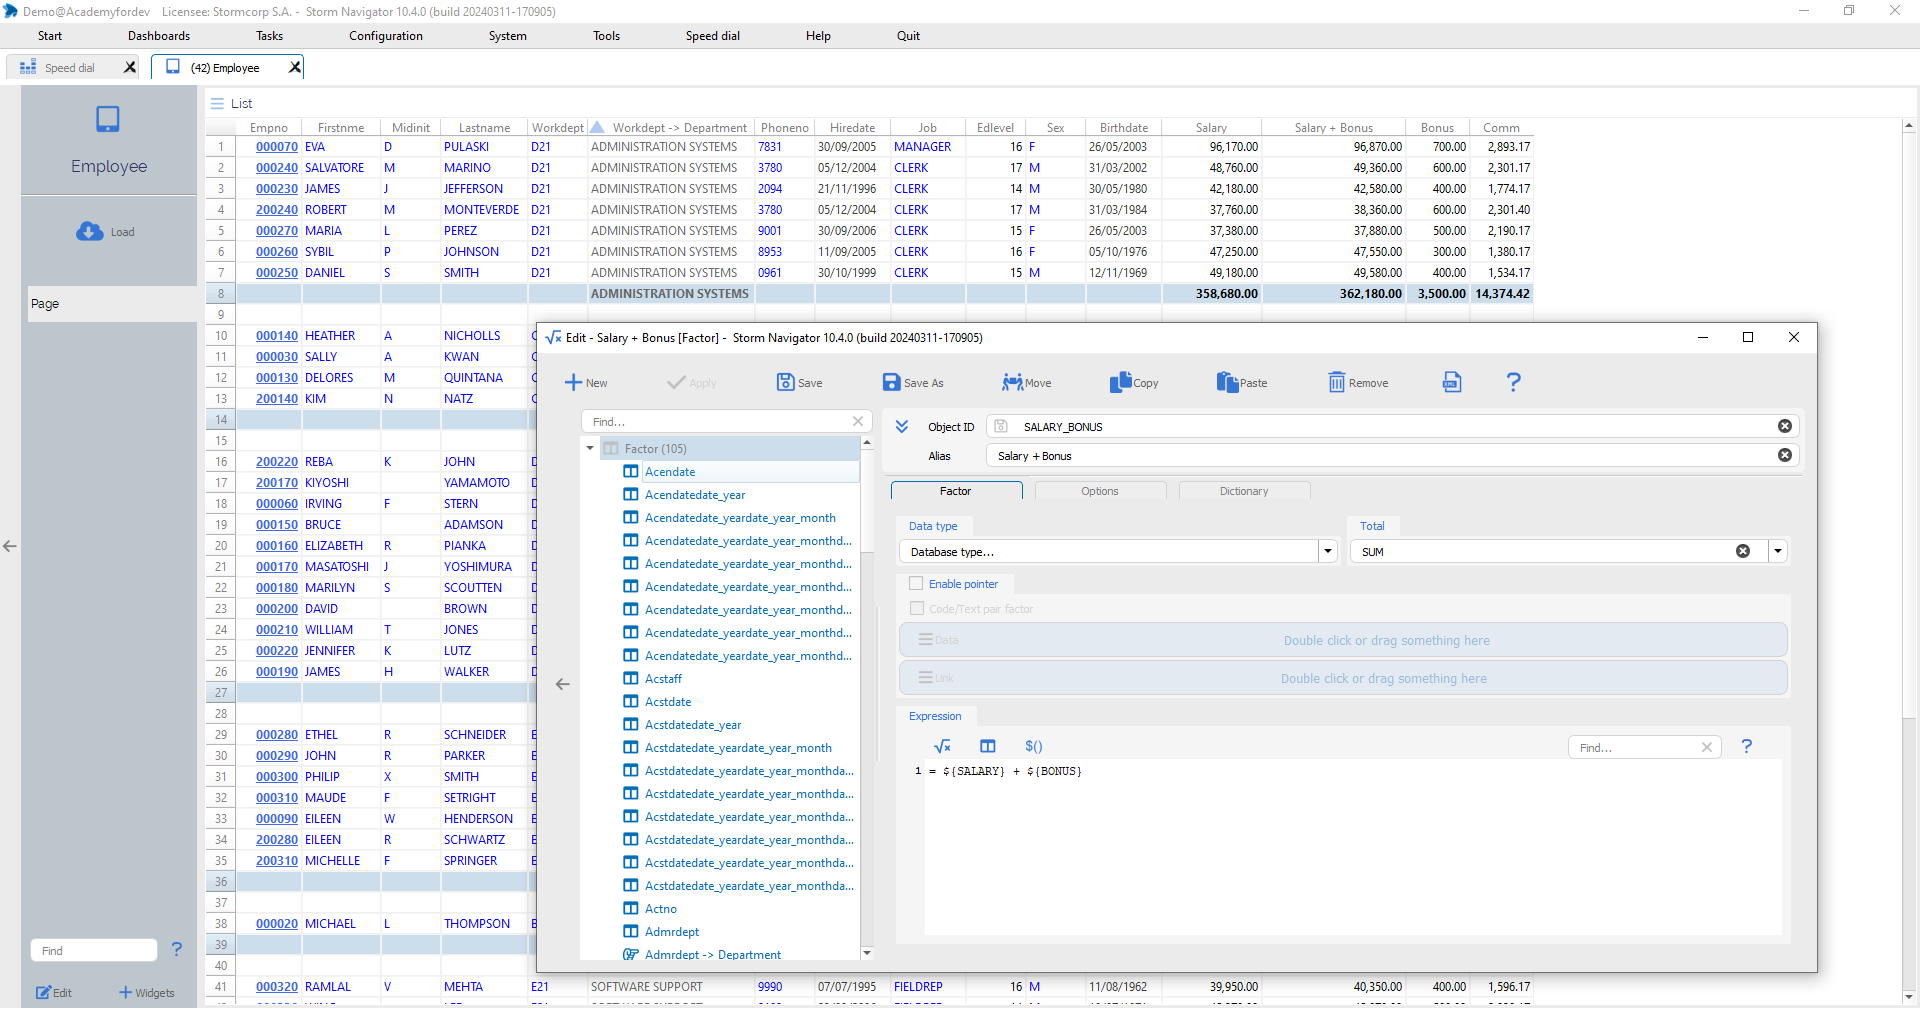
Factor: Expression: Field name to be displayed or JavaScript expression
Reference to factor value must be enclosed with: ${FactorID}
Expression:
Expression or Mathematical expression are defined using javaScript.
To know more about JavaScript:
Steps:
- Right-click on column header Salary -> + Insert
- Enter Alias to be displayed
- Enter expression
- Save as
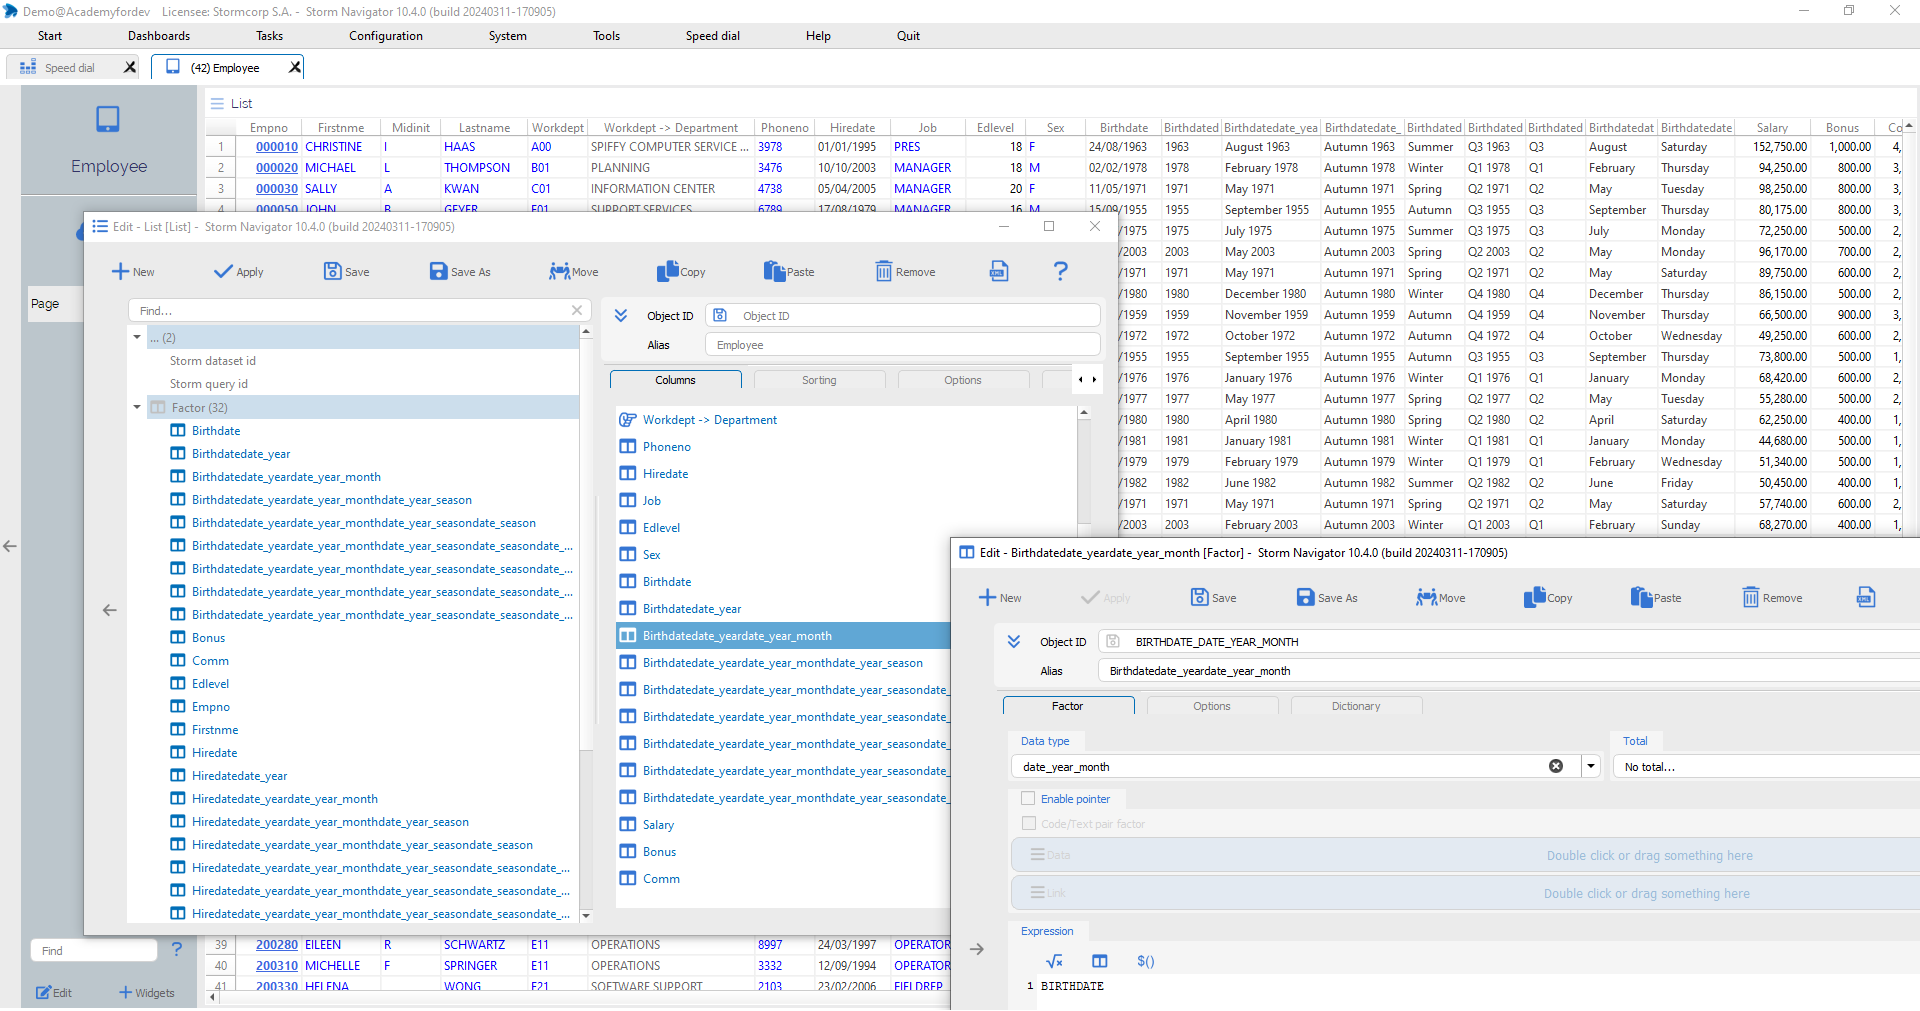
Factor: Date: For database date field , all date types are generated
Date:
For each date field in the database, Create config generates all kinds of dates.
If a field is not a date, but does contain one, you must first set the database type to Date in Factor Edit.
If the date storage is exotic, you can define the parse format:
- Factor Edit -> Option -> Date/Time parse format.
Steps:
- List edit: Drag and Drop desired dates
- Factor edit: Data type set to date_xxx
- Expression: must refer to original date
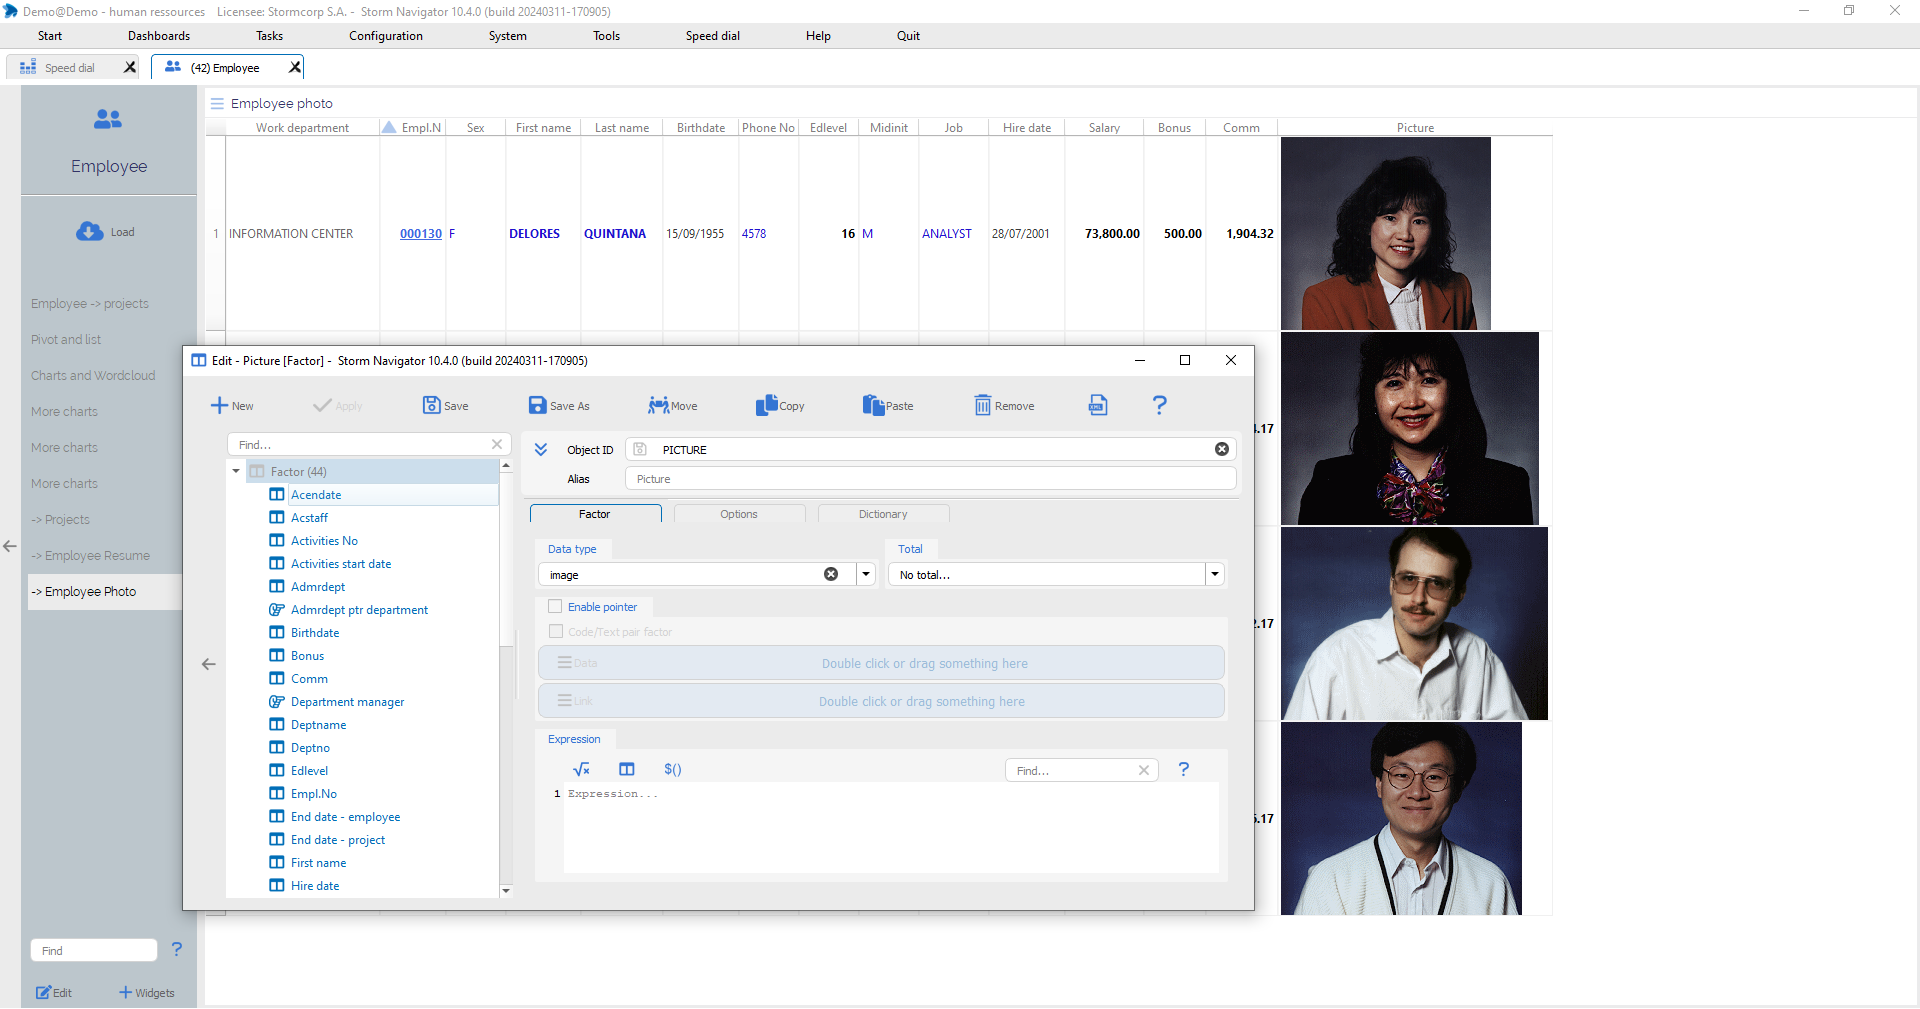
Factor: Image: If the field contain a image
Steps:
- Factor edit: Data type Image
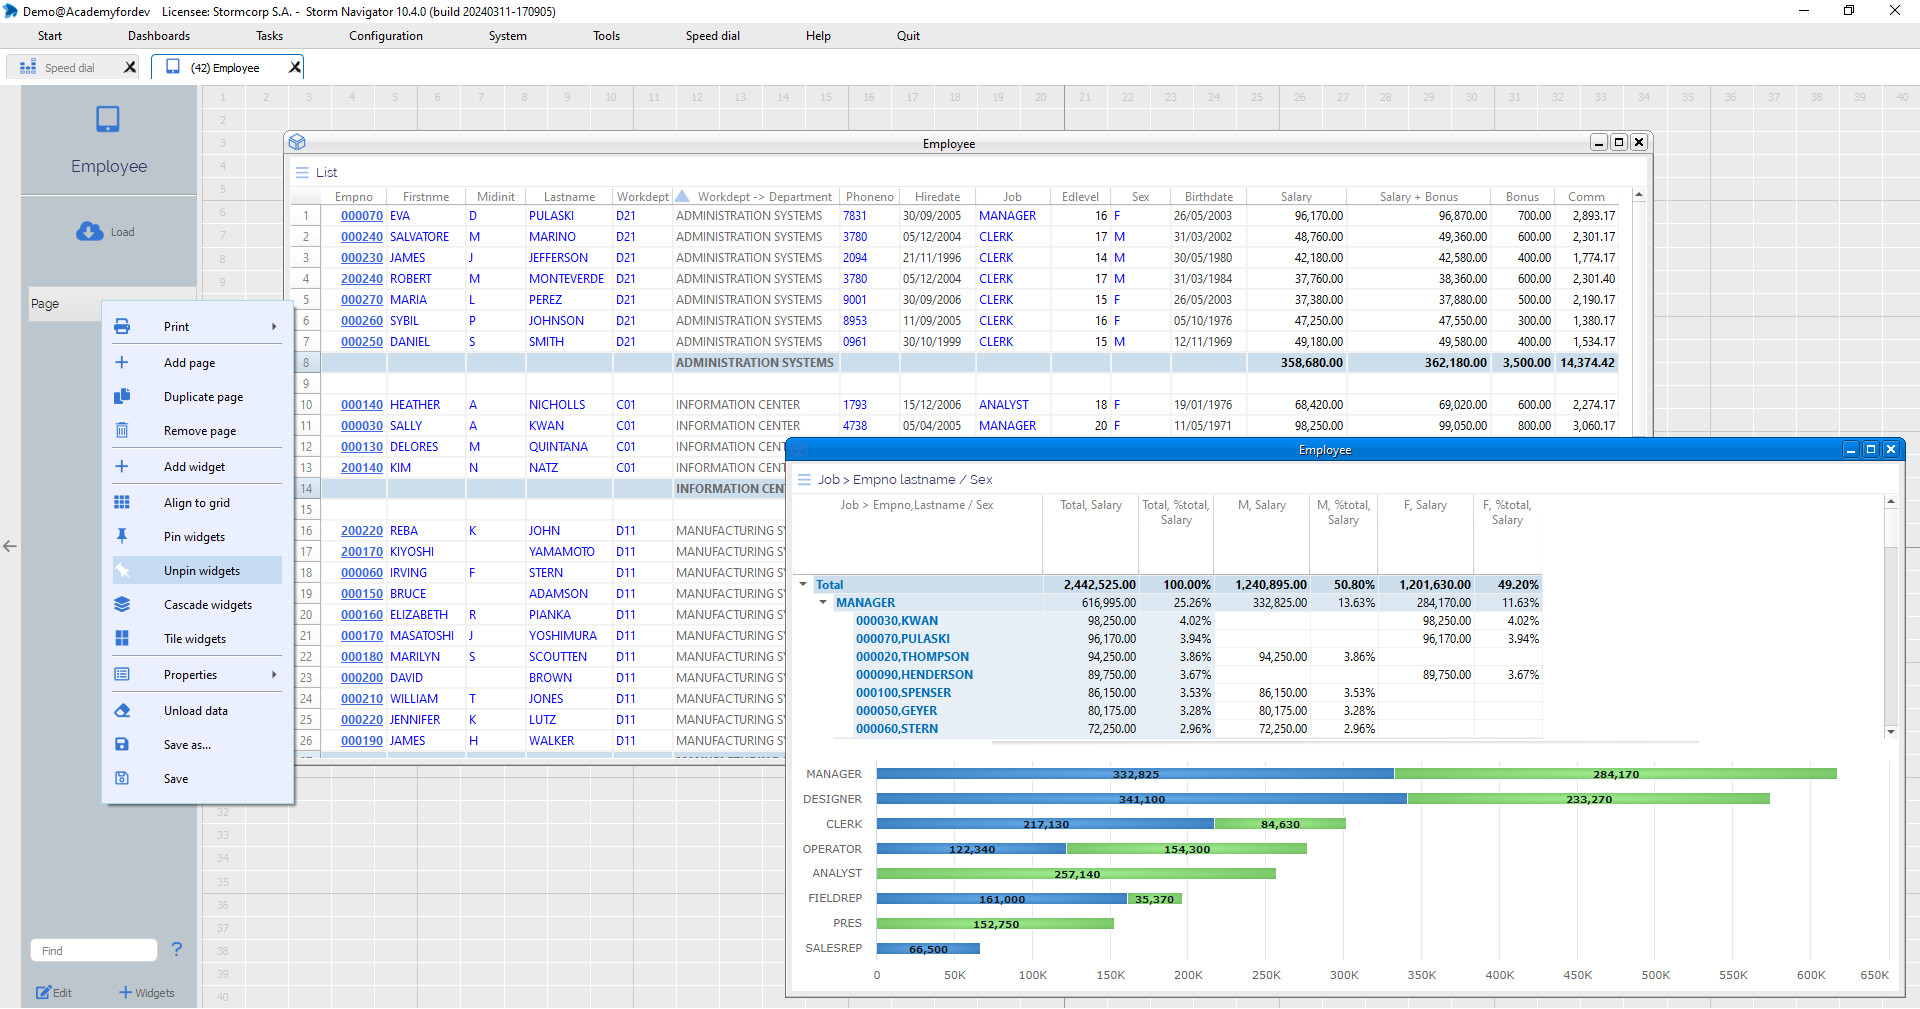
Unpin widgets: Drag and drop position and size
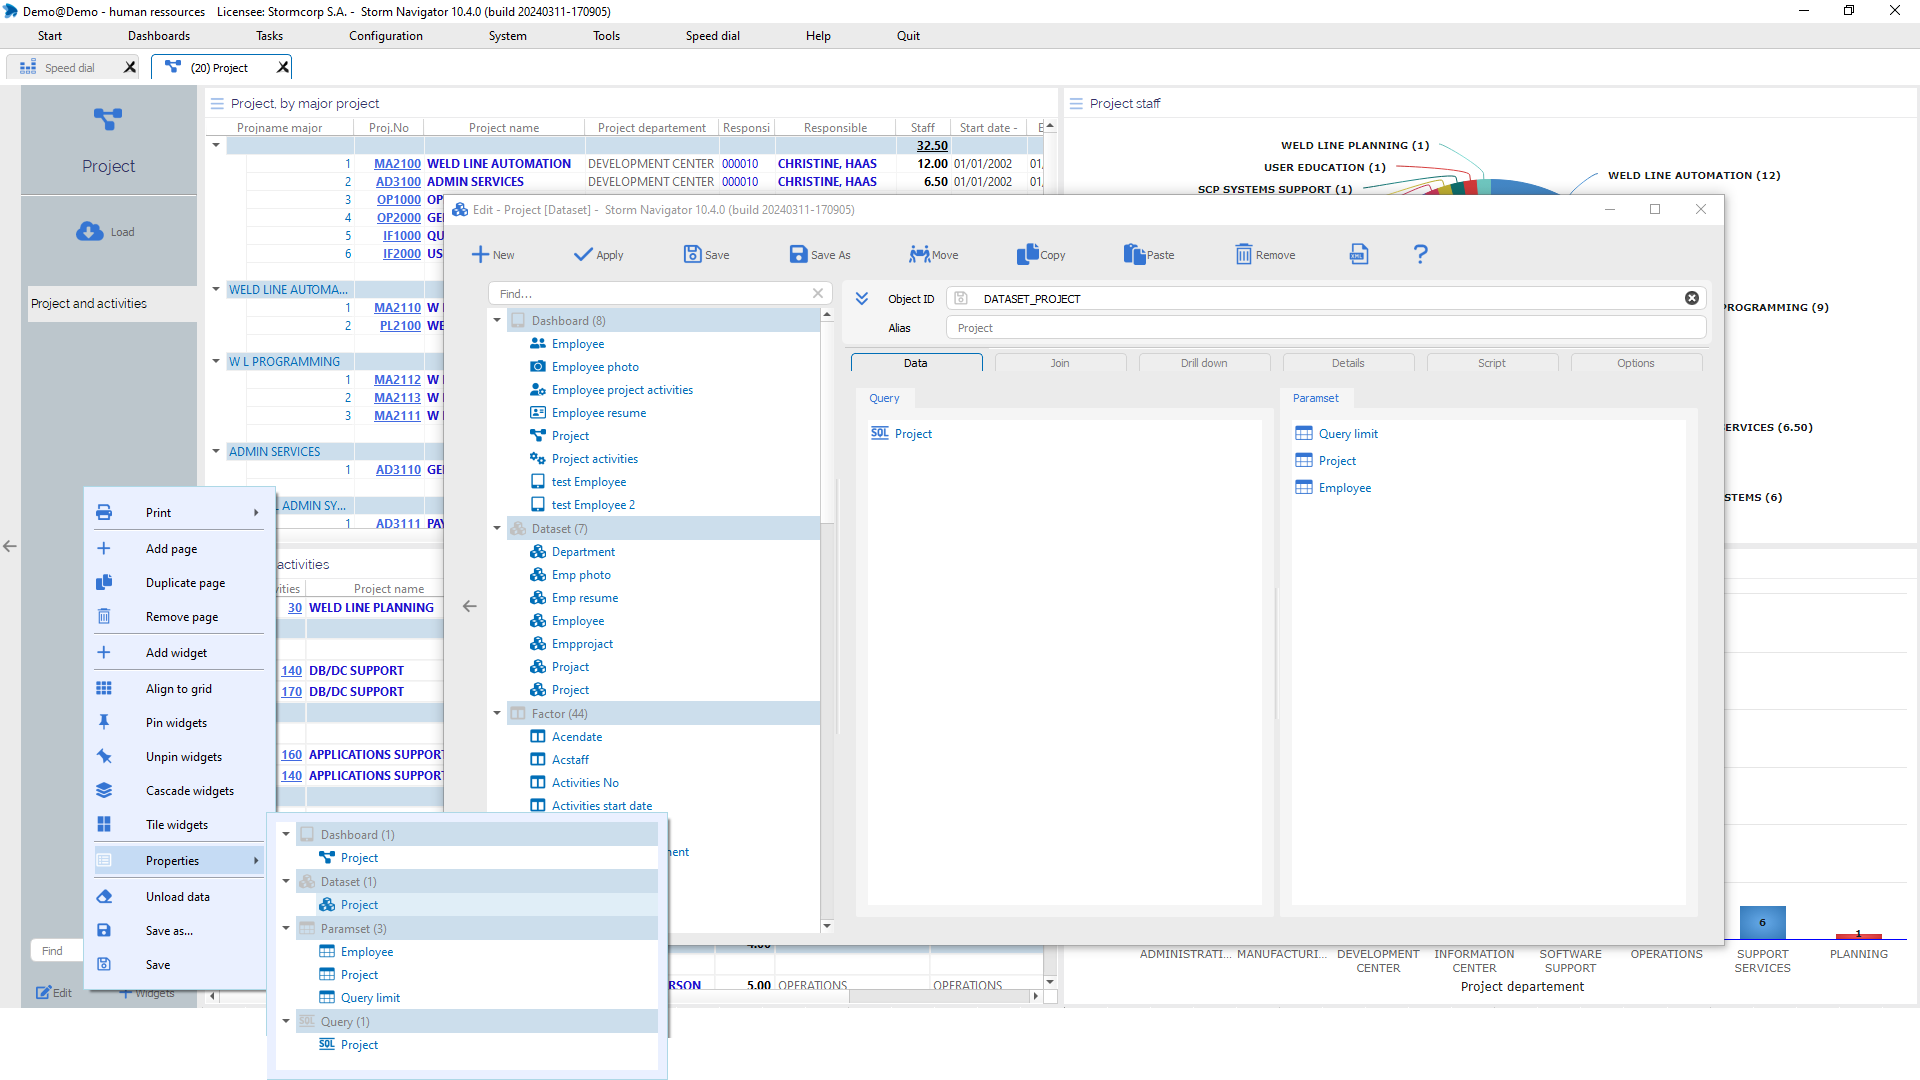
The content of the dashboard page can be defined, by modifying the position and size of widgets and adding new widgets with specific objects, for the current dataset or for a connected dataset (next drill down level).
Once the layout has been defined, Save the dashboard.
Click on:
- Allign to grid
- Pin widgets
- Unpin widgets
- Cascade widgets
- Tile widgets
- X to delete a widget
- Save dashboard layout
Double-Click on:
- Page name to edit it
Steps:
- Right-click on Page name -> Unpine widgets
- Drag and Drop windows header to move it on grid
- Drag and Drop bottom/right/corner to change size
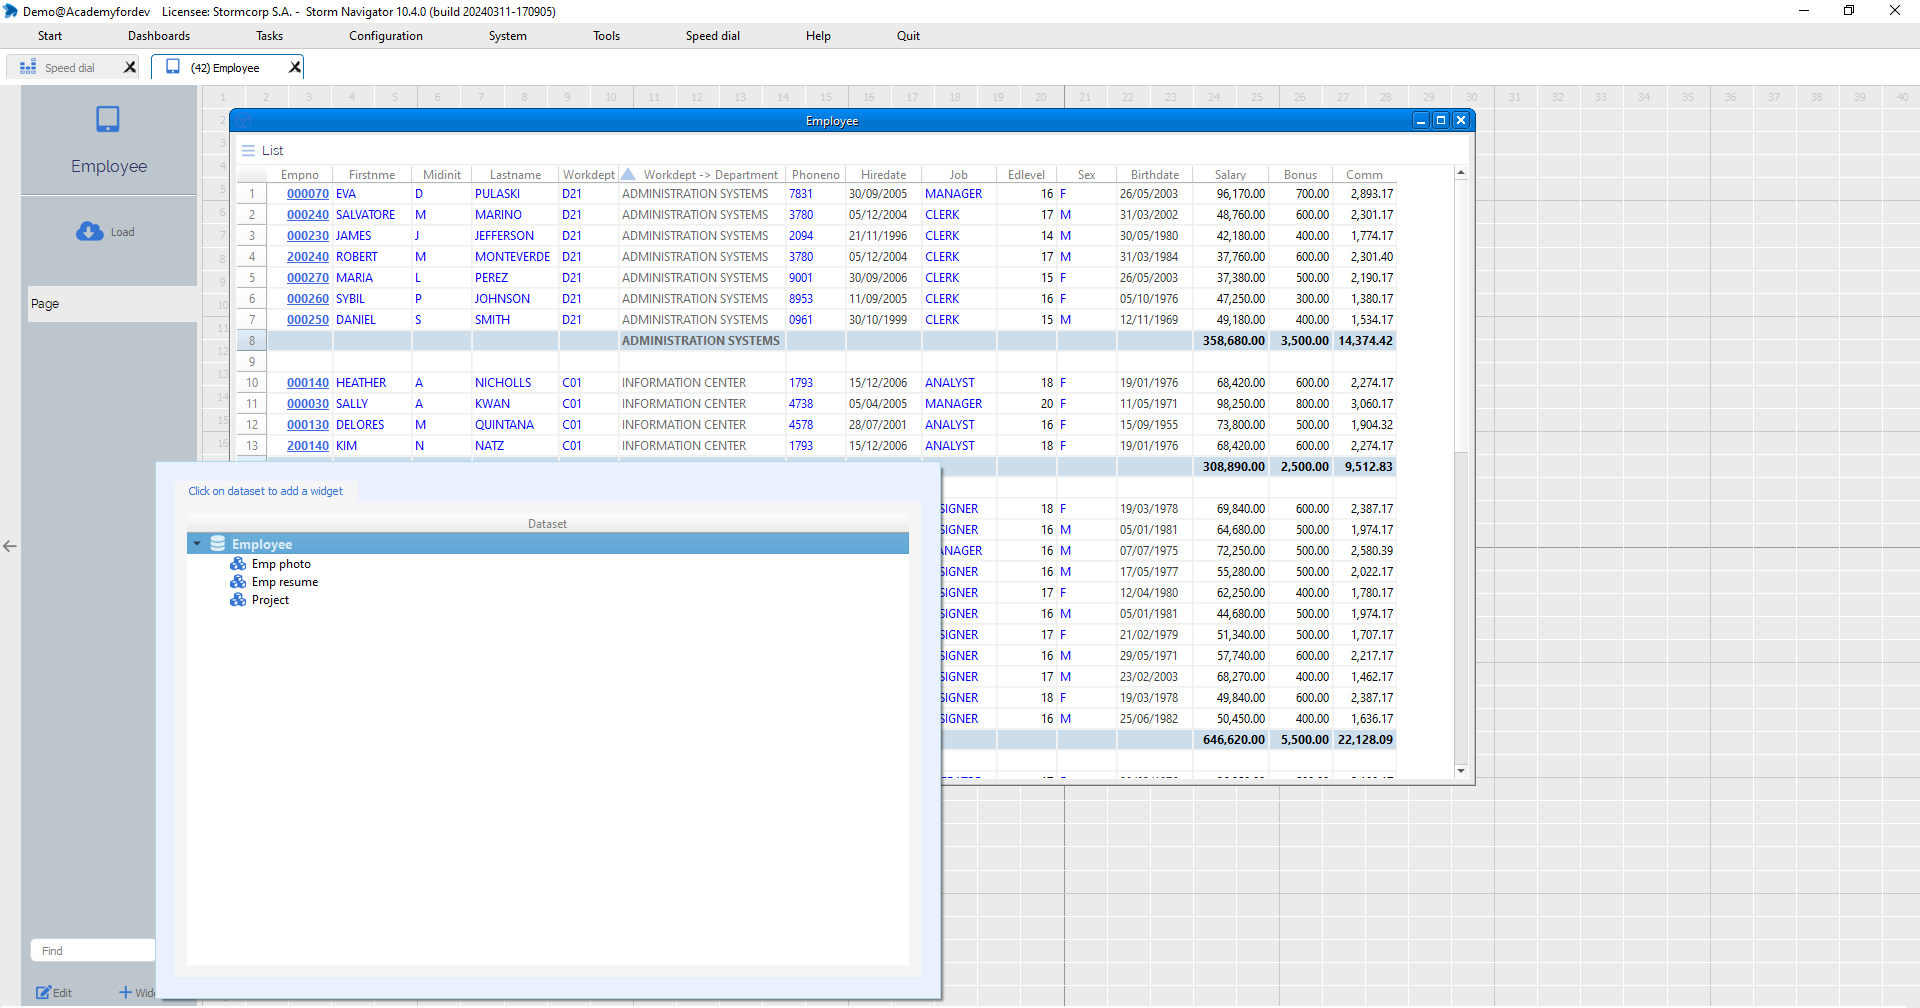
Add widgets: Select current or next level datasets
A widget is fed by a dataset.
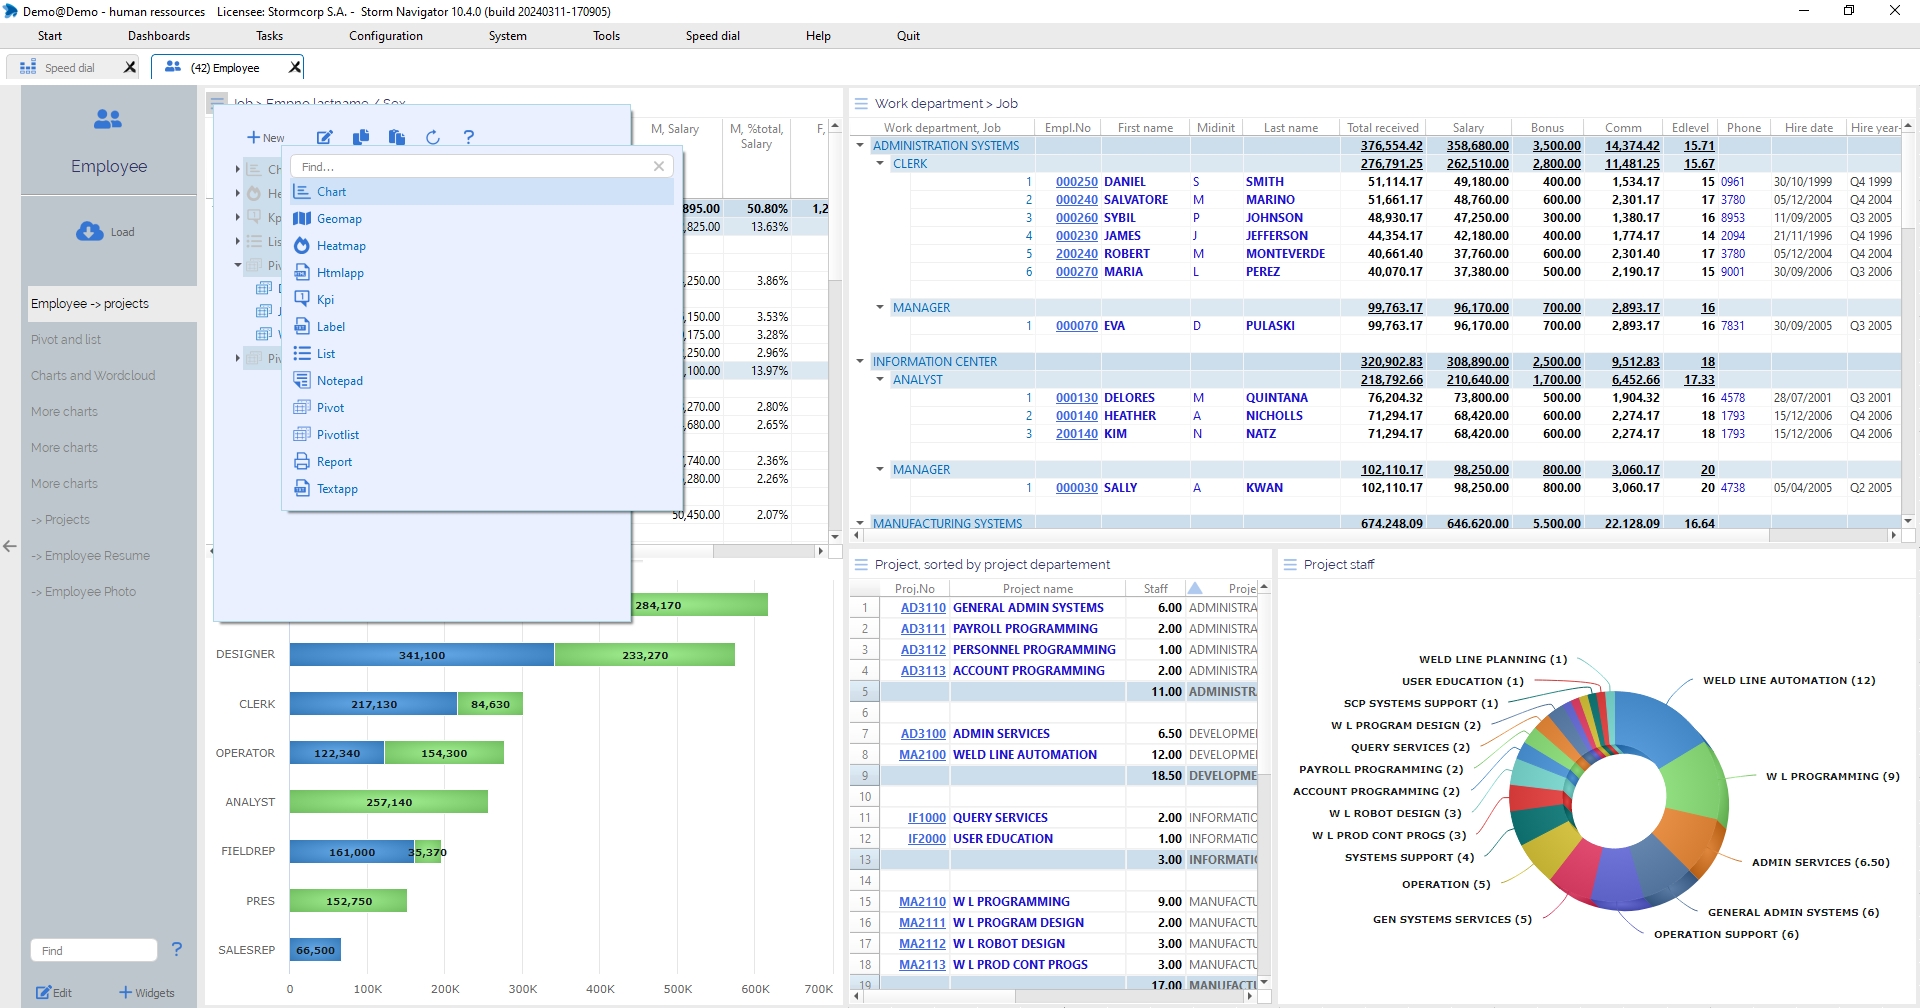
Adding a widget begins by selecting the current dataset or the next level. By default a List widget is displayed.
Steps:
- +Add widget
- Click on a dataset: the current dataset, or any next level
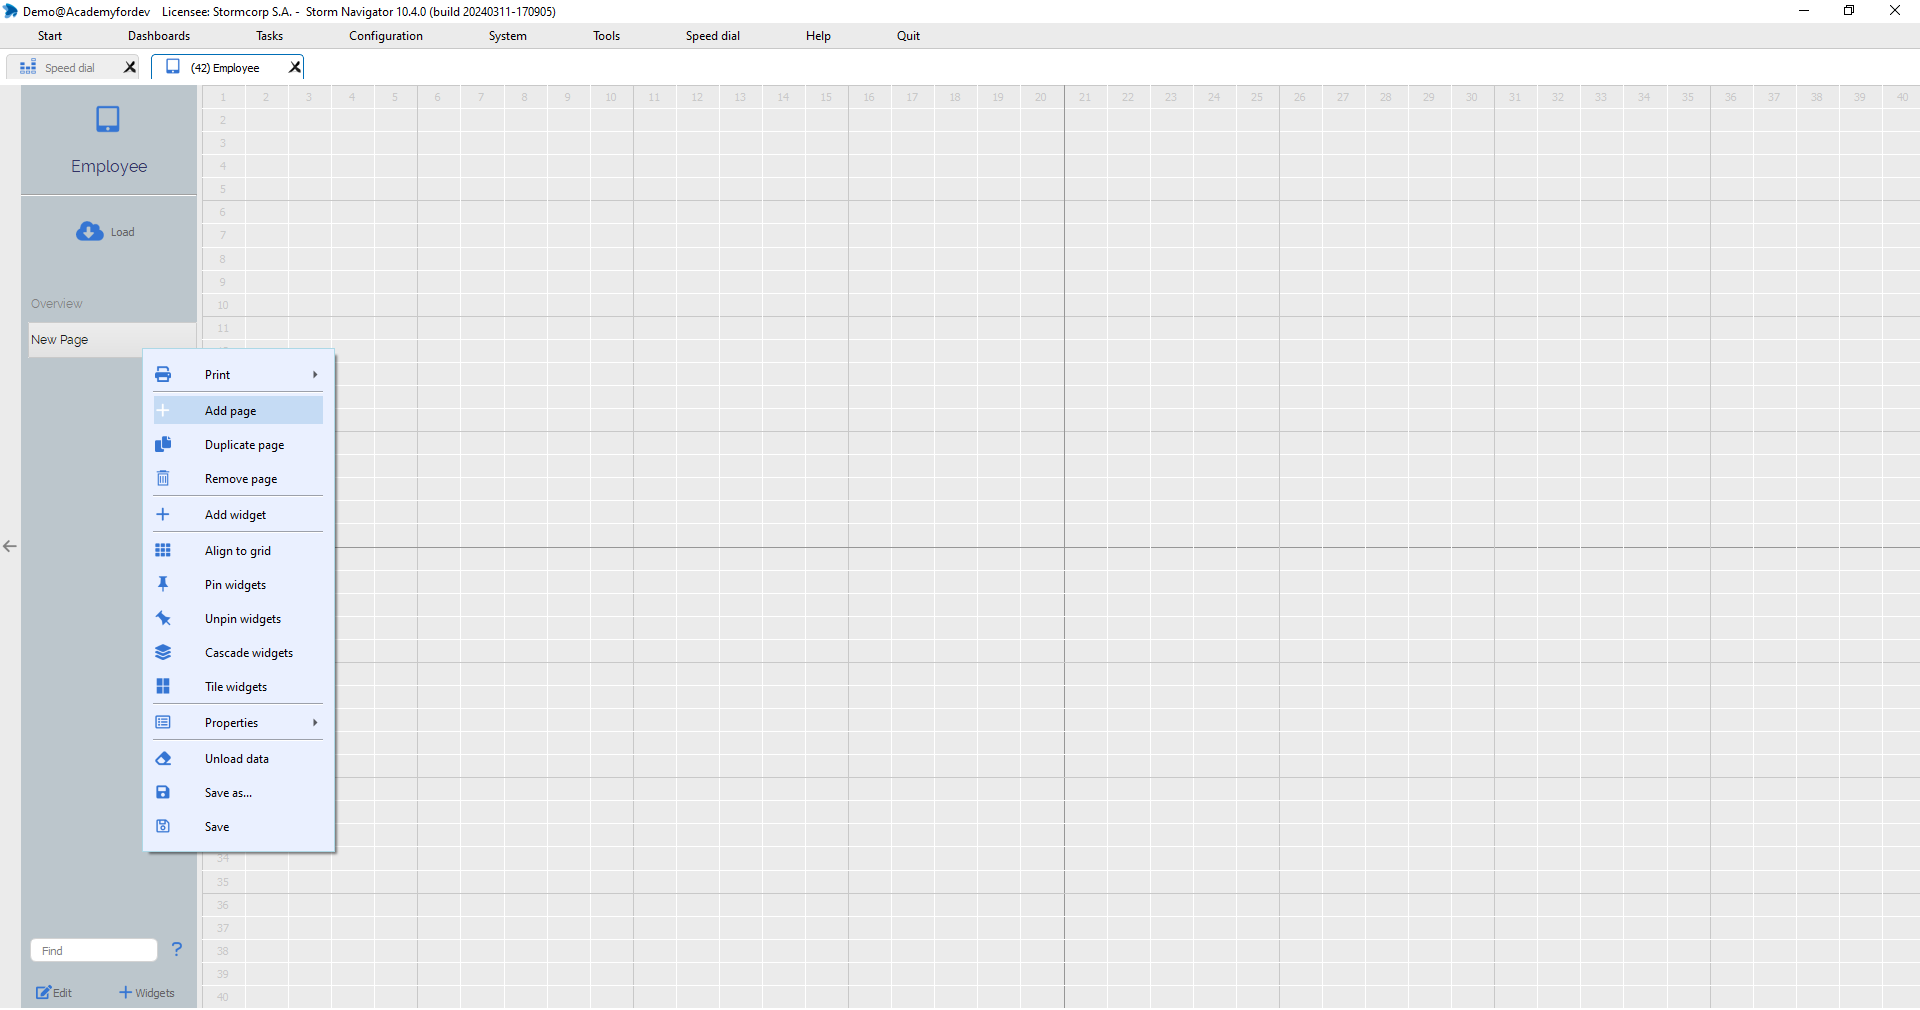
Add page: after current page
Add page after current one. Then page sequence can be changed.
Steps:
- Right-click on Page name -> Add / Remove page
- Drag and Drop Page name to change sequence
- Double-click on page name to edit it
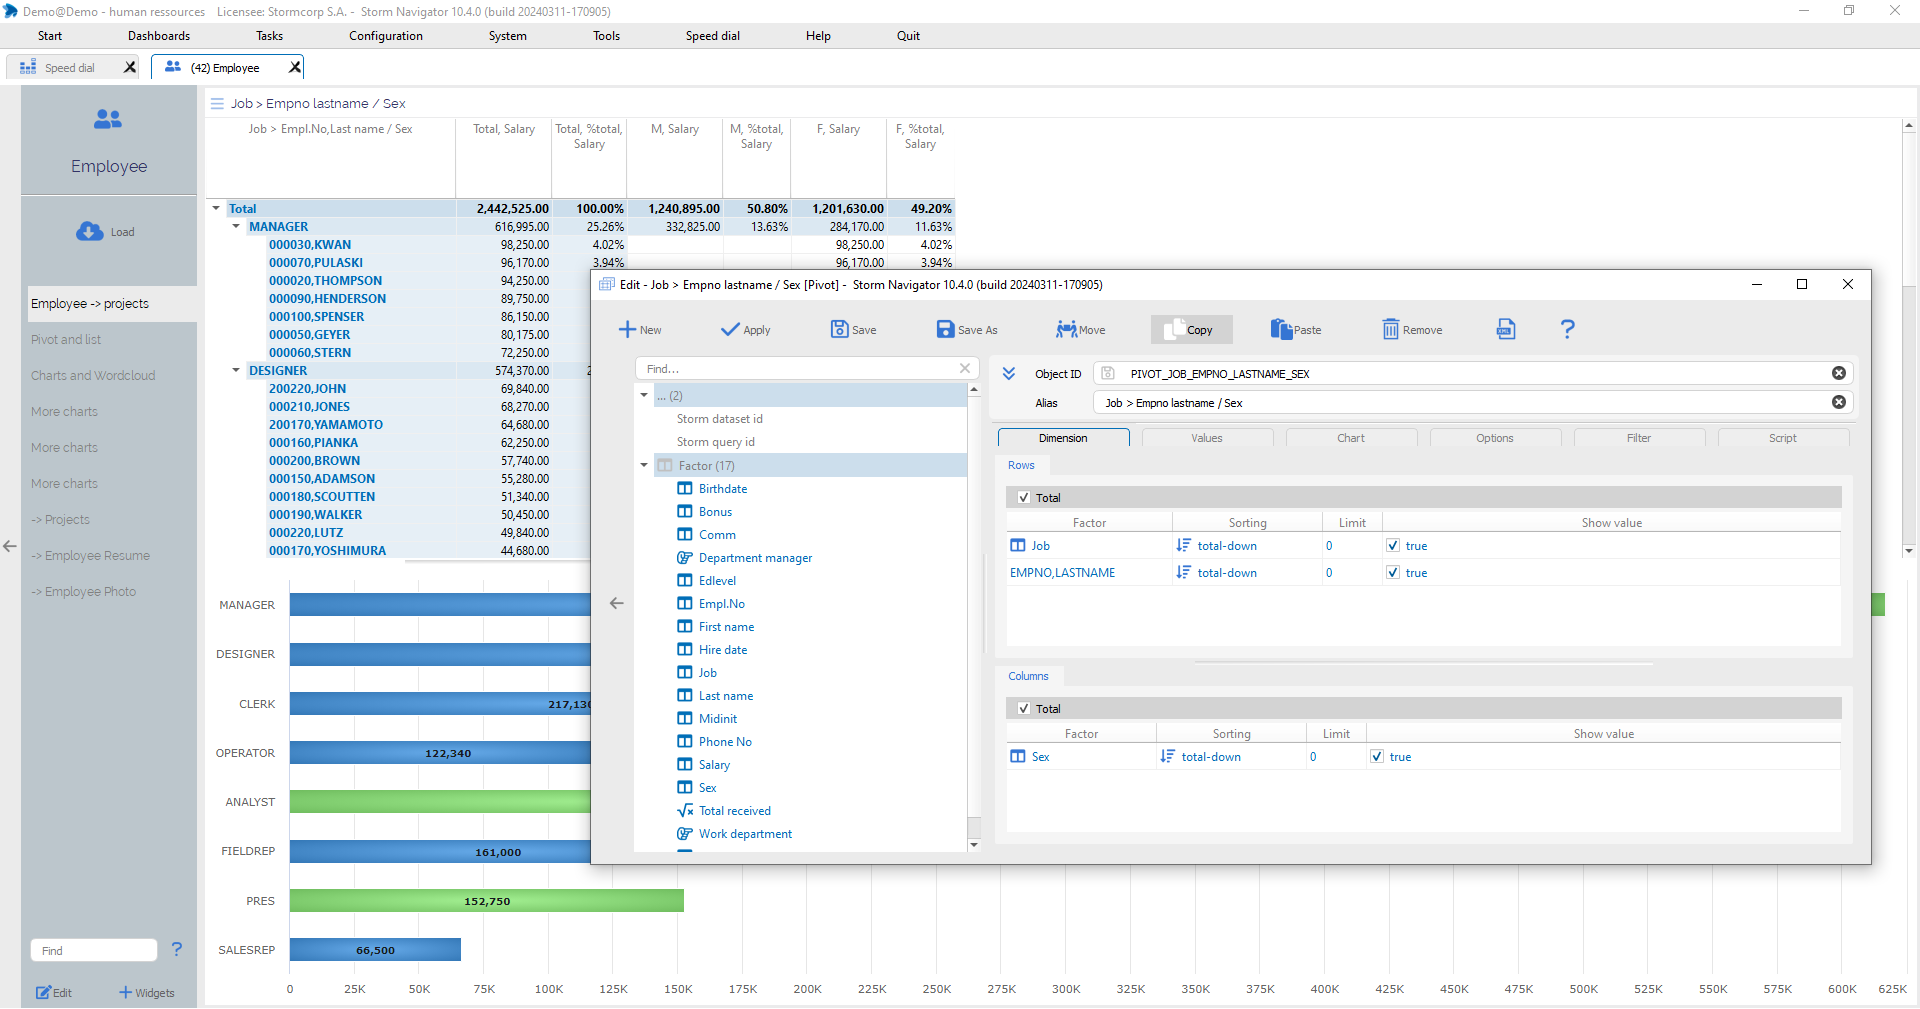
Copy / Past: Widget object
Copy Employee list widget object from Demo – Human resource, and Paste it to new project.
Steps:
- Sign in to Demo – Human resource
- Employee dashboard
- Page Pivot and list
- Edit of Employee, sorted by Department
- Copy
- Back to new project
- List Edit-> Paste -> Apply
- Save -> Create new List -> Core -> Finish
Dataset: is populated by one or several Query and filtered by one or several Paramset
Dataset:
Query: Populating the dataset.
Paramset: Build Load window, with one paramset per JOIN table.
Join: Join queries are executed after dataset queries. The results of SQL queries are the parameters of join queries. Data will be merged in memory. Join query results become additional columns.
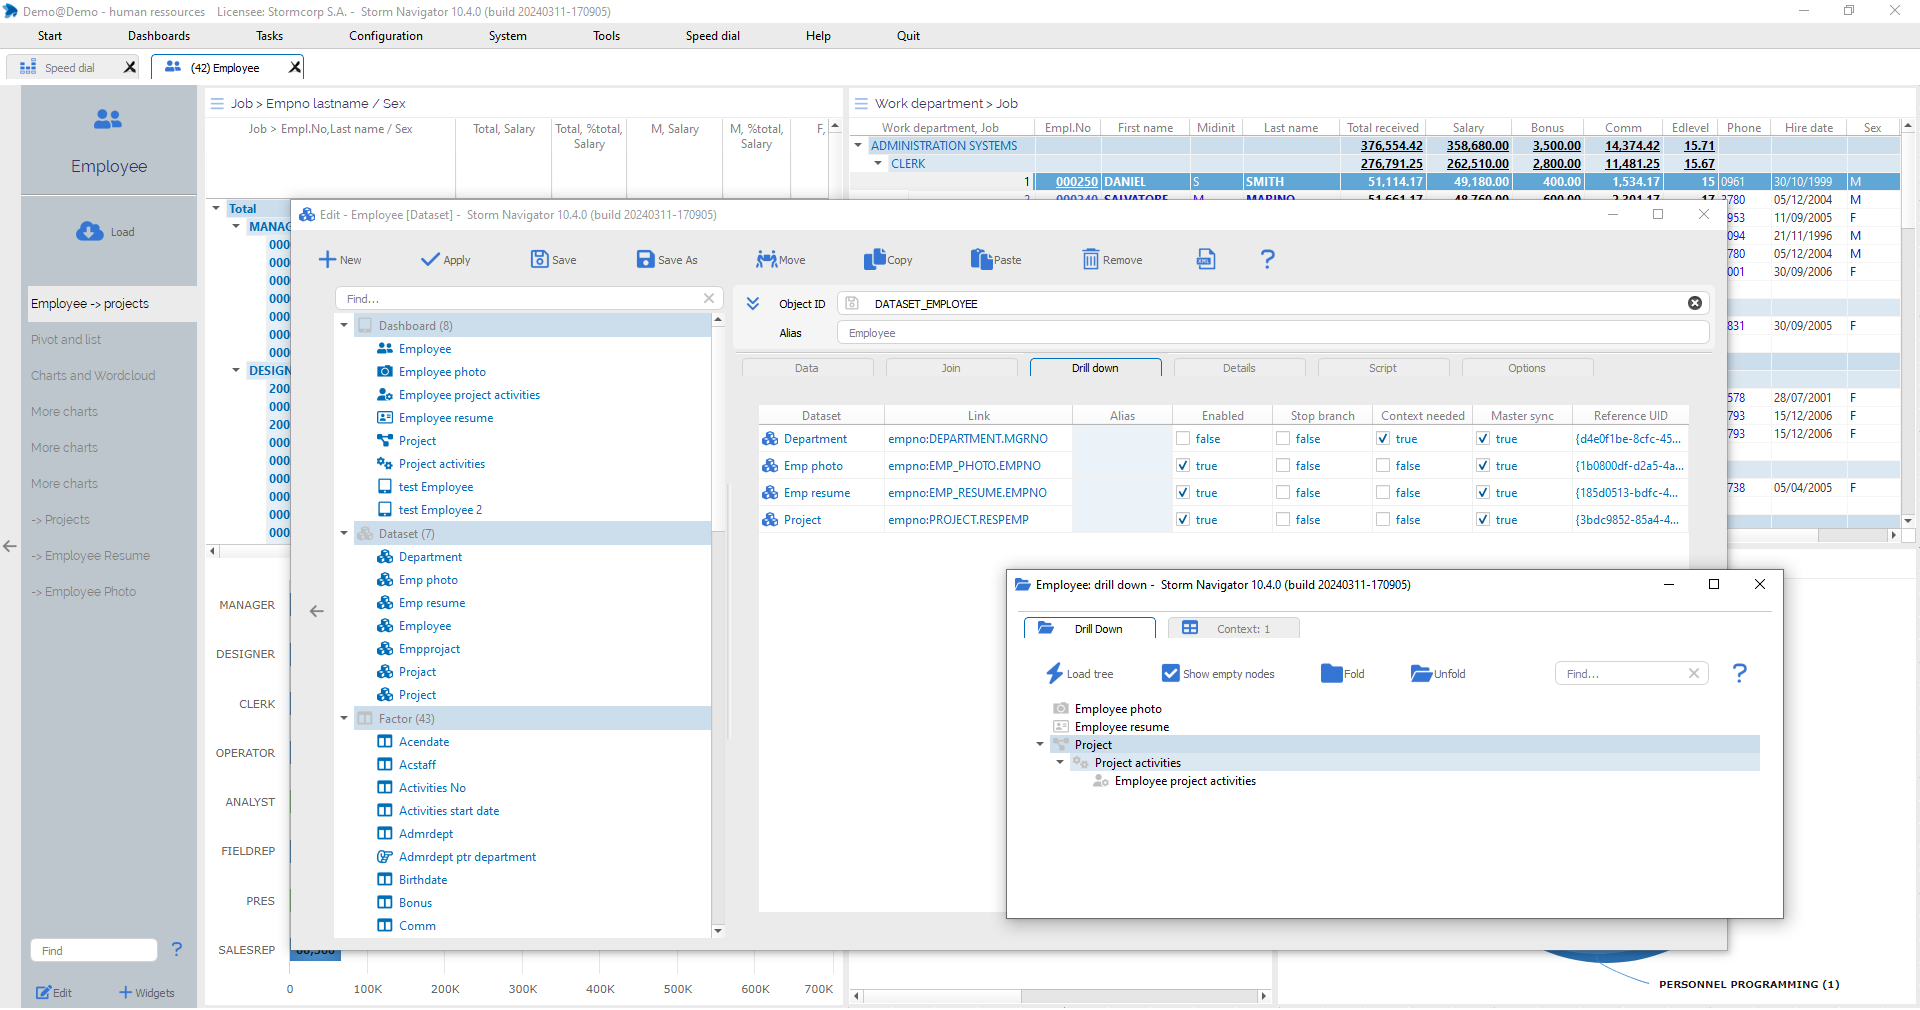
Drill down: to next level are defined.
Details: windows are defined.
Script: can be executed for data transformation.
Options:
Steps:
- Click on Edit -> Properties -> Dataset -> Dataset name
Dataset: is populated by one or several Query
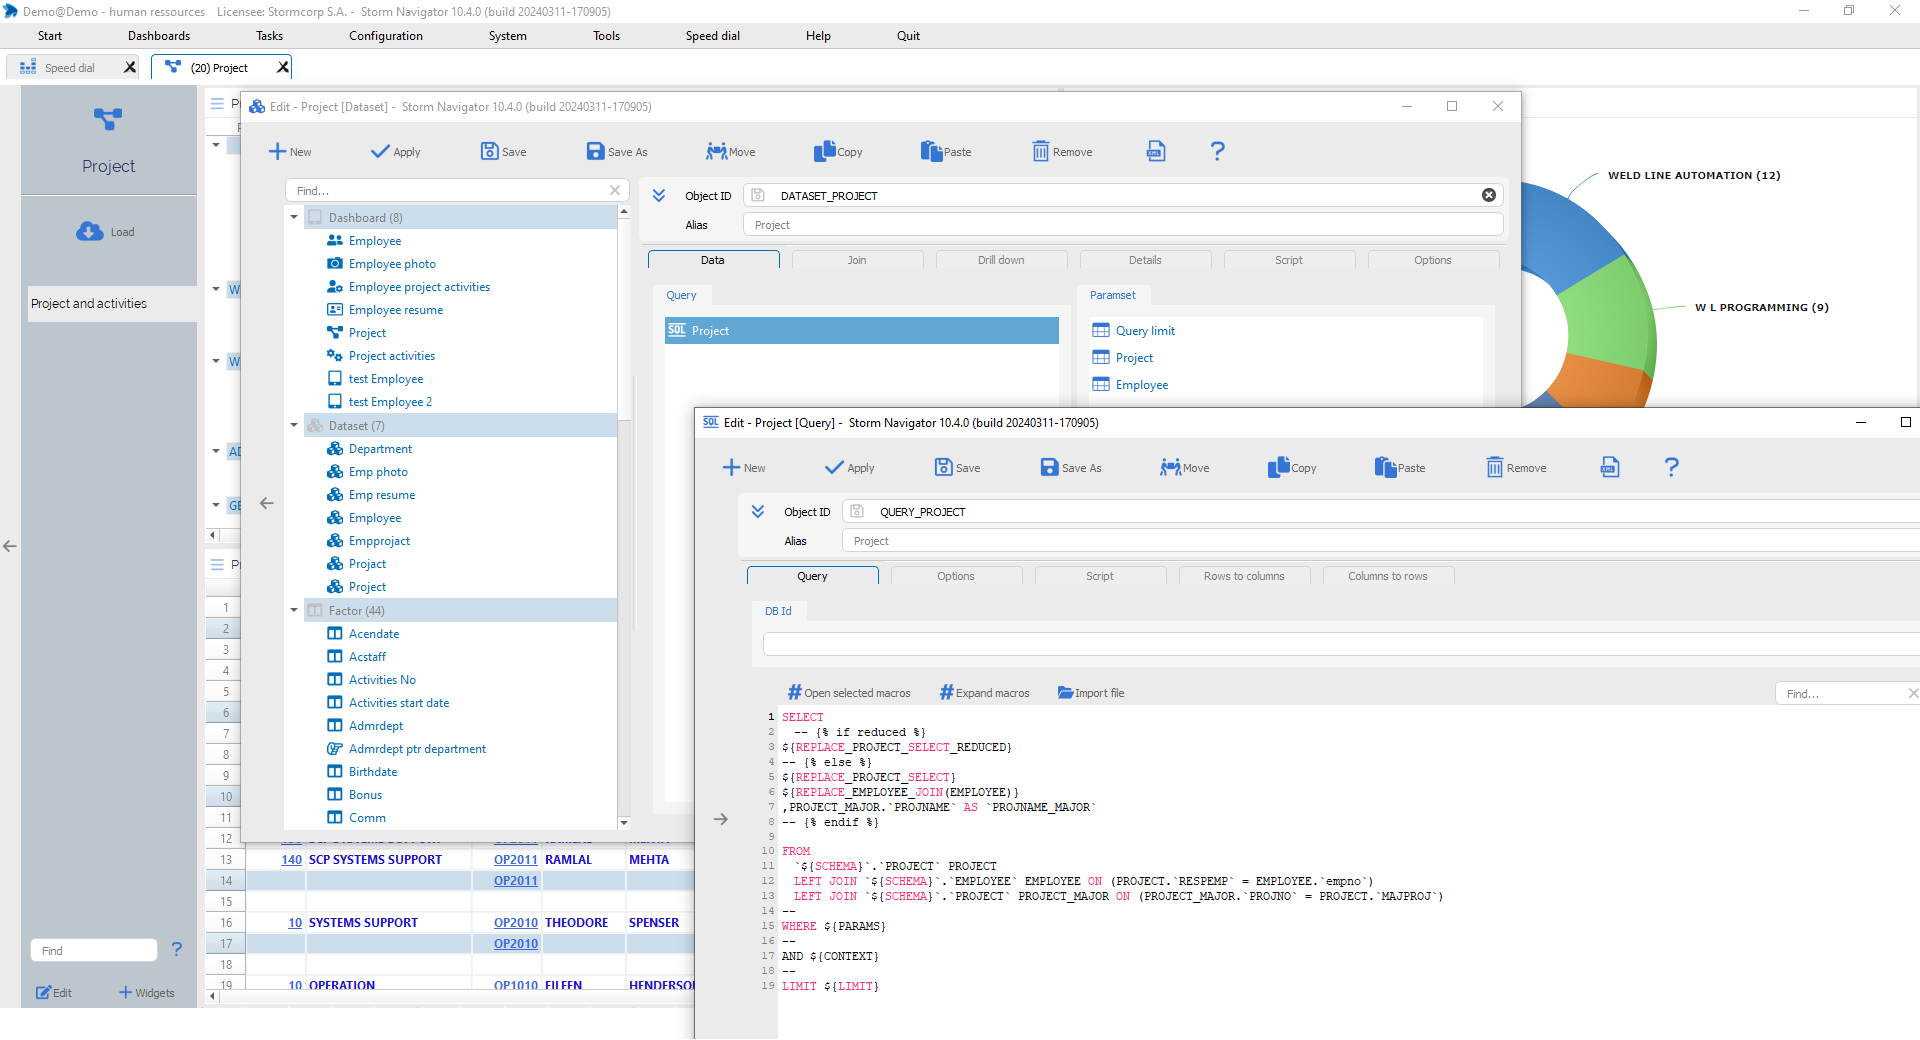
In Demo – Human ressources, for Projects query, Create config generated a SQL left join with the employee table, because the employee table is a parent table.
As a result, we can Load projects with project parameters, but also with employee parameters.
Steps:
- Right-click on a Query -> Edit.
- Drag and Drop a query object to Datasource
Dataset: is filtered by one or several Paramset
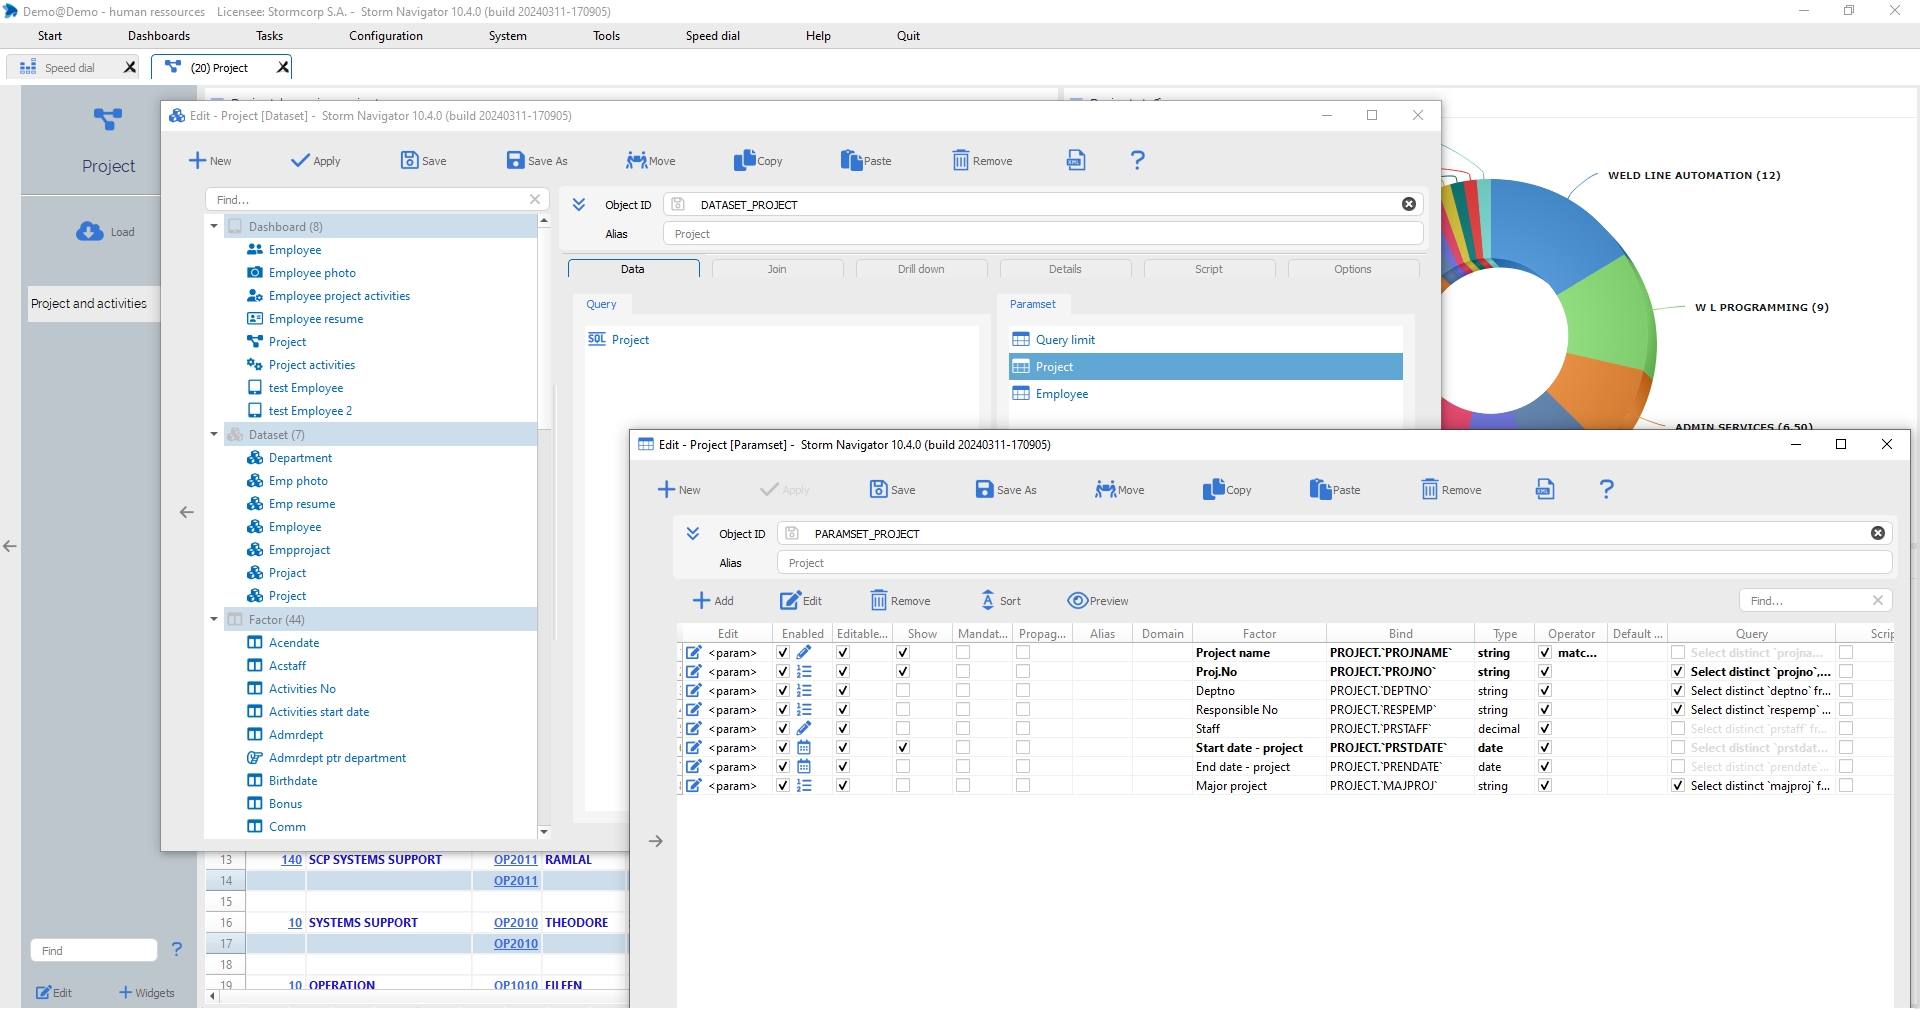
In Demo – Human ressources, Create config has also generated project and employee Paramset.
Create config does not generate parameters when we have a second join on the same table. If necessary, it can be added manually.
Steps:
- Right-click on a Paramset -> Edit.
- Drag and Drop a query object to Datasource
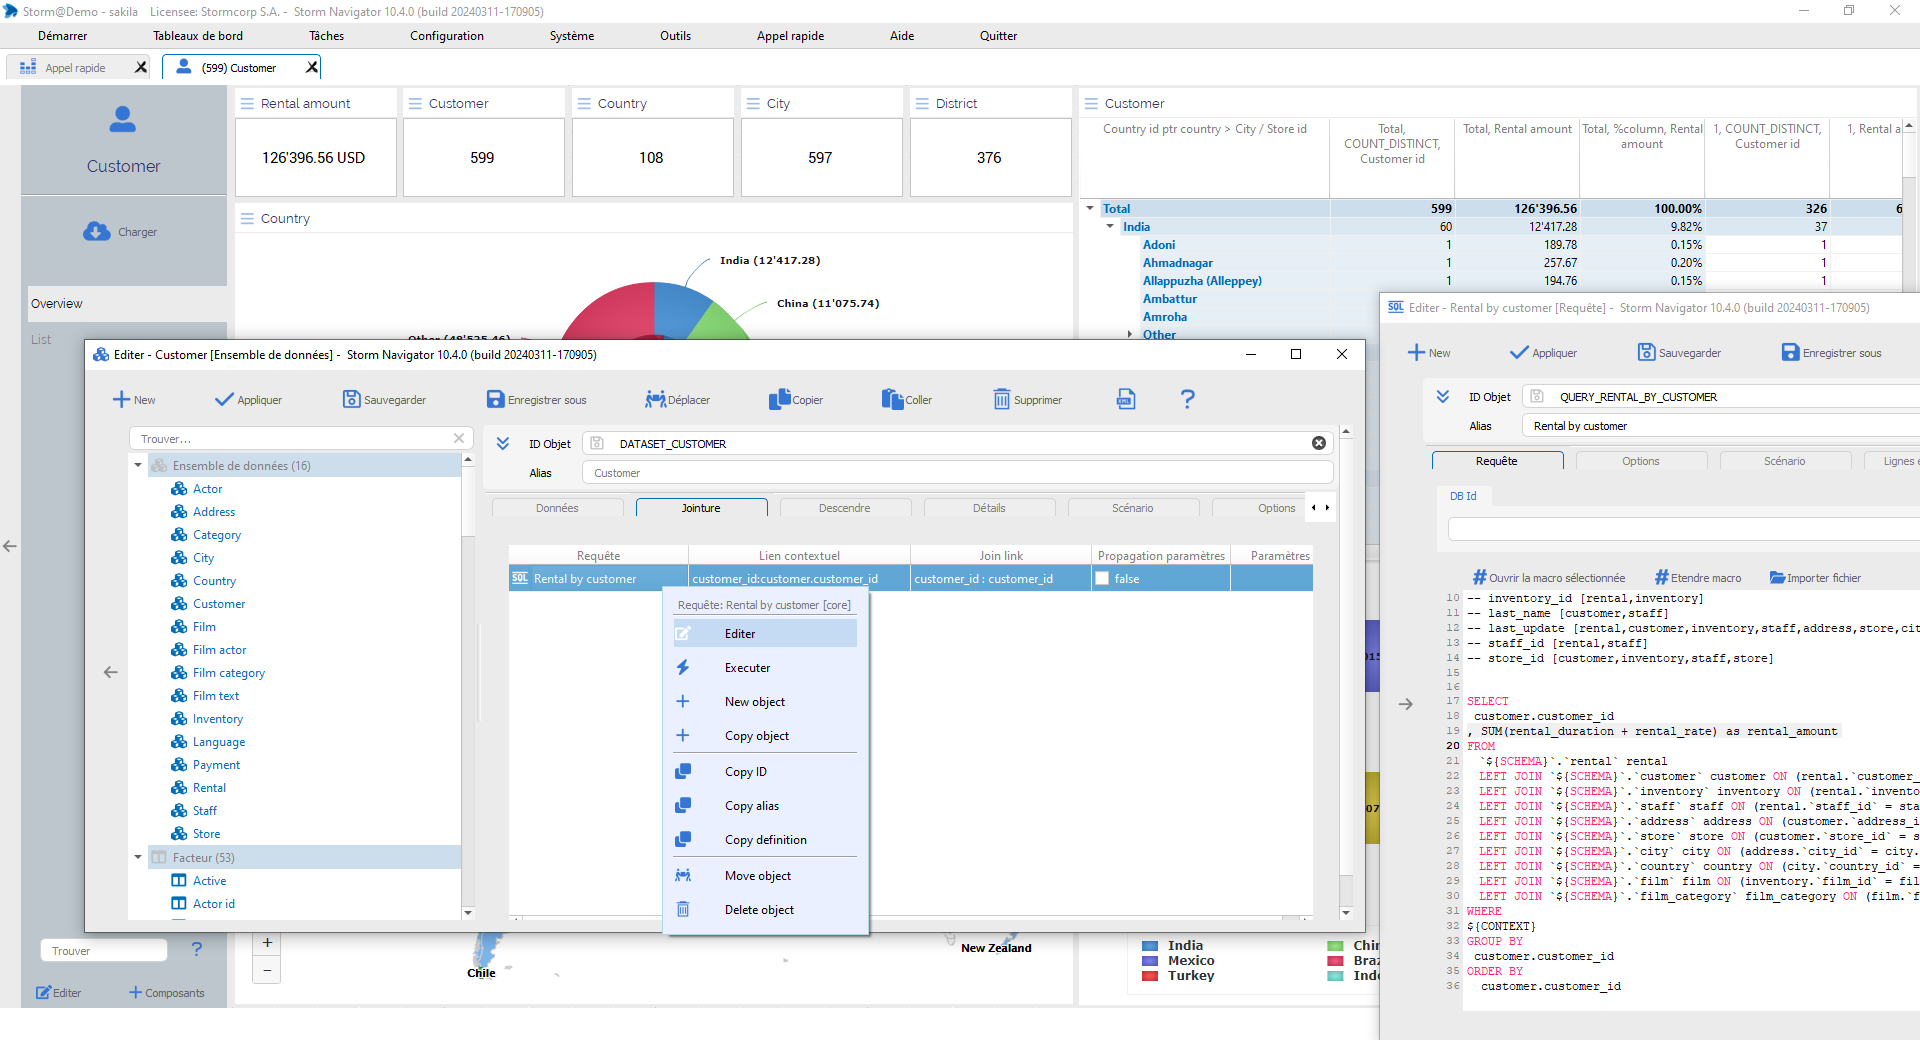
Dataset: Join to merge additionnal query result with the initial result set
Join:
Query: Join query wich will be executed with loaded data as parameters.
Contextual link: To define the link between current field value and sql where condition
Join link: To define the merge in memory
Propagate param: …
Param: .
A Join query is used to read additional data for the initial result set and merge them as additional columns.
In Demo – Sakila configuration, in the dashbpoard Customer, we have a Join query responsible to calculate the sum of rental per Customer.
Steps:
- Right-click on a Query -> Edit.
- Set the Contextual link and the link.
Dataset: Drill down Next level dataset where to Drill down
According to database drilldown key calculated by Storm, Drill down display the next level possibilities where to Drill down.
It can be compared to a car driver arriving at a traffic circle. The exit roads are the possible routes down to the next traffic circle.
Drilldown:
Dataset: Connected dataset for drilldown
Link: CurrentKeys_A, CurrentKeys_B,.. : ForeignKeys_A, ForeignKeys_B,..
Alias: Instead of default dashboard name
Enable: A drilldown can be desactivated
Stop branch: It will be the last possible drilldown
Context needed: Populate slave widget only if a context exist
Master sync:
Steps:
- Drag and Drop Dataset.
- Define the Link
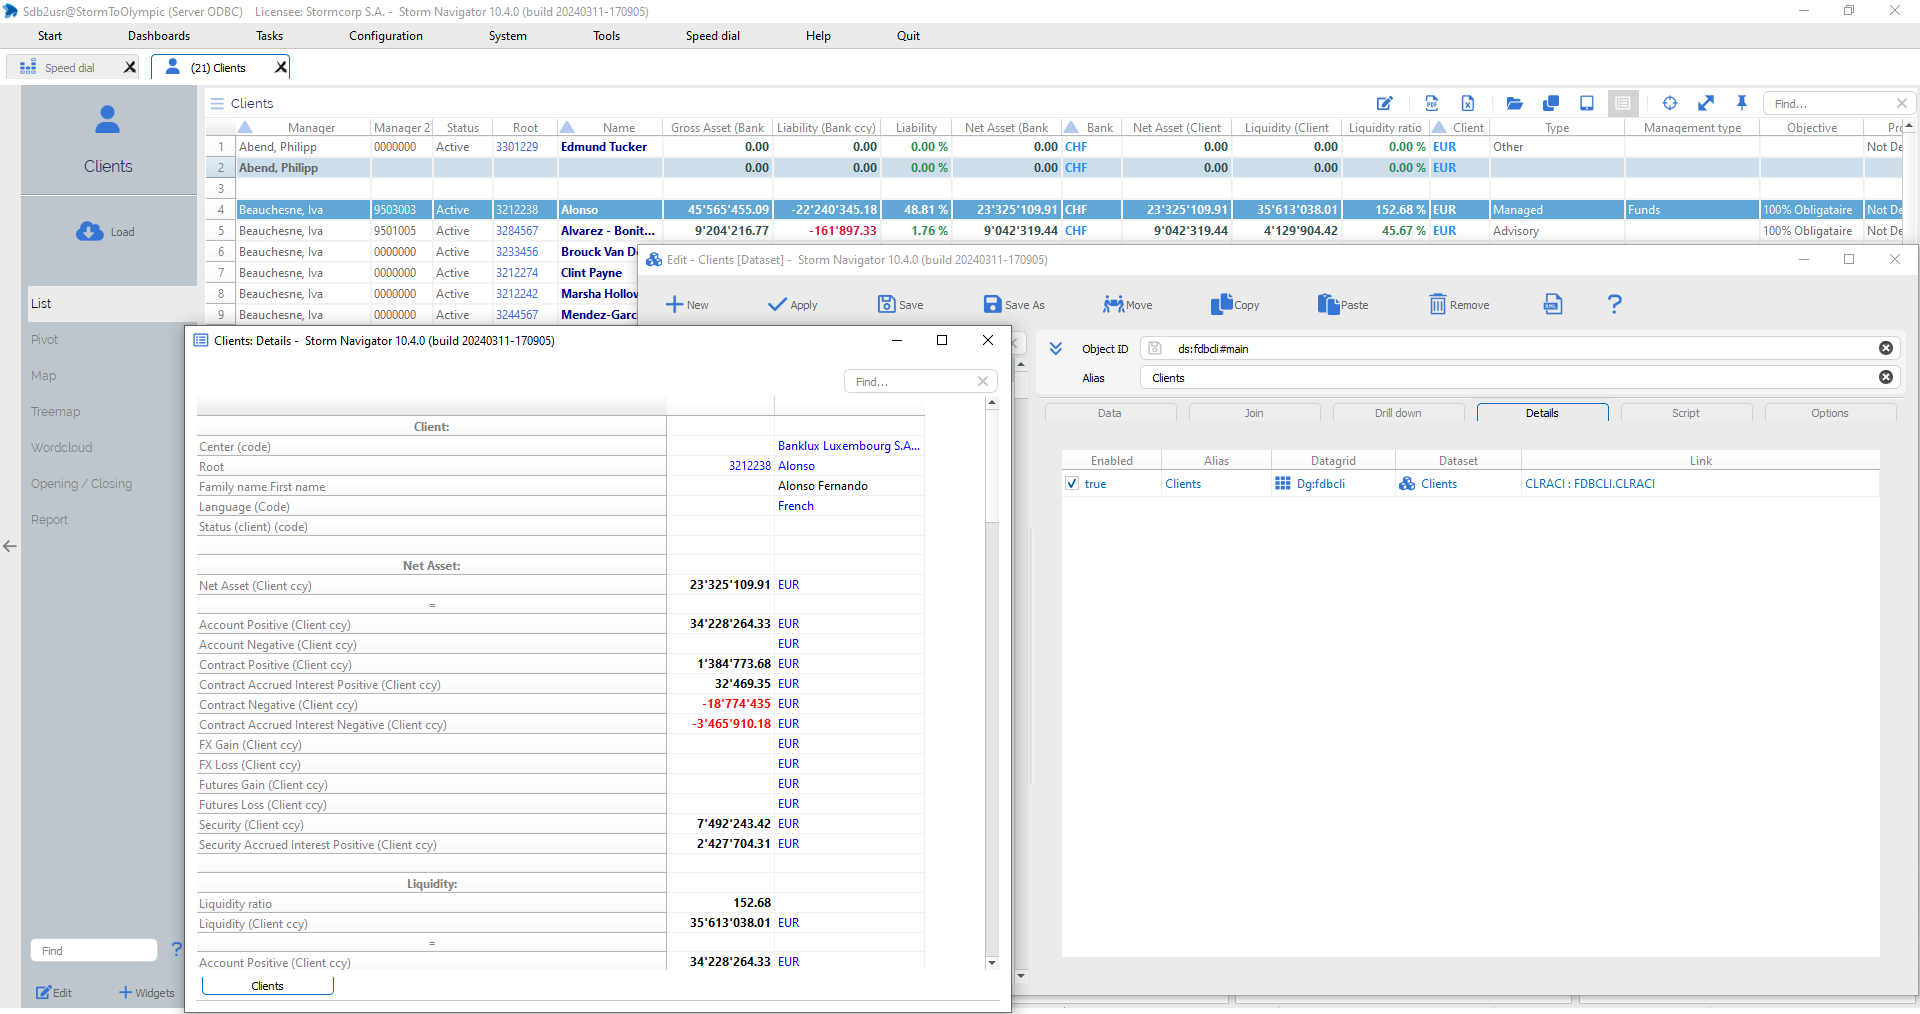
Dataset: Details Display details of selected records
It’s possible to display Details windows of current dataset, but also of all to father dataset.
Details:
Enables: A details windows can be disable
Alias: Specific name
Data grid: Datagrid object id
Dataset: Connected dataset for details windwos
Link: CurrentKeys_A, CurrentKeys_B,.. : ForeignKeys_A, ForeignKeys_B,..
Steps:
- Drag and Drop Dataset.
- Define the Link
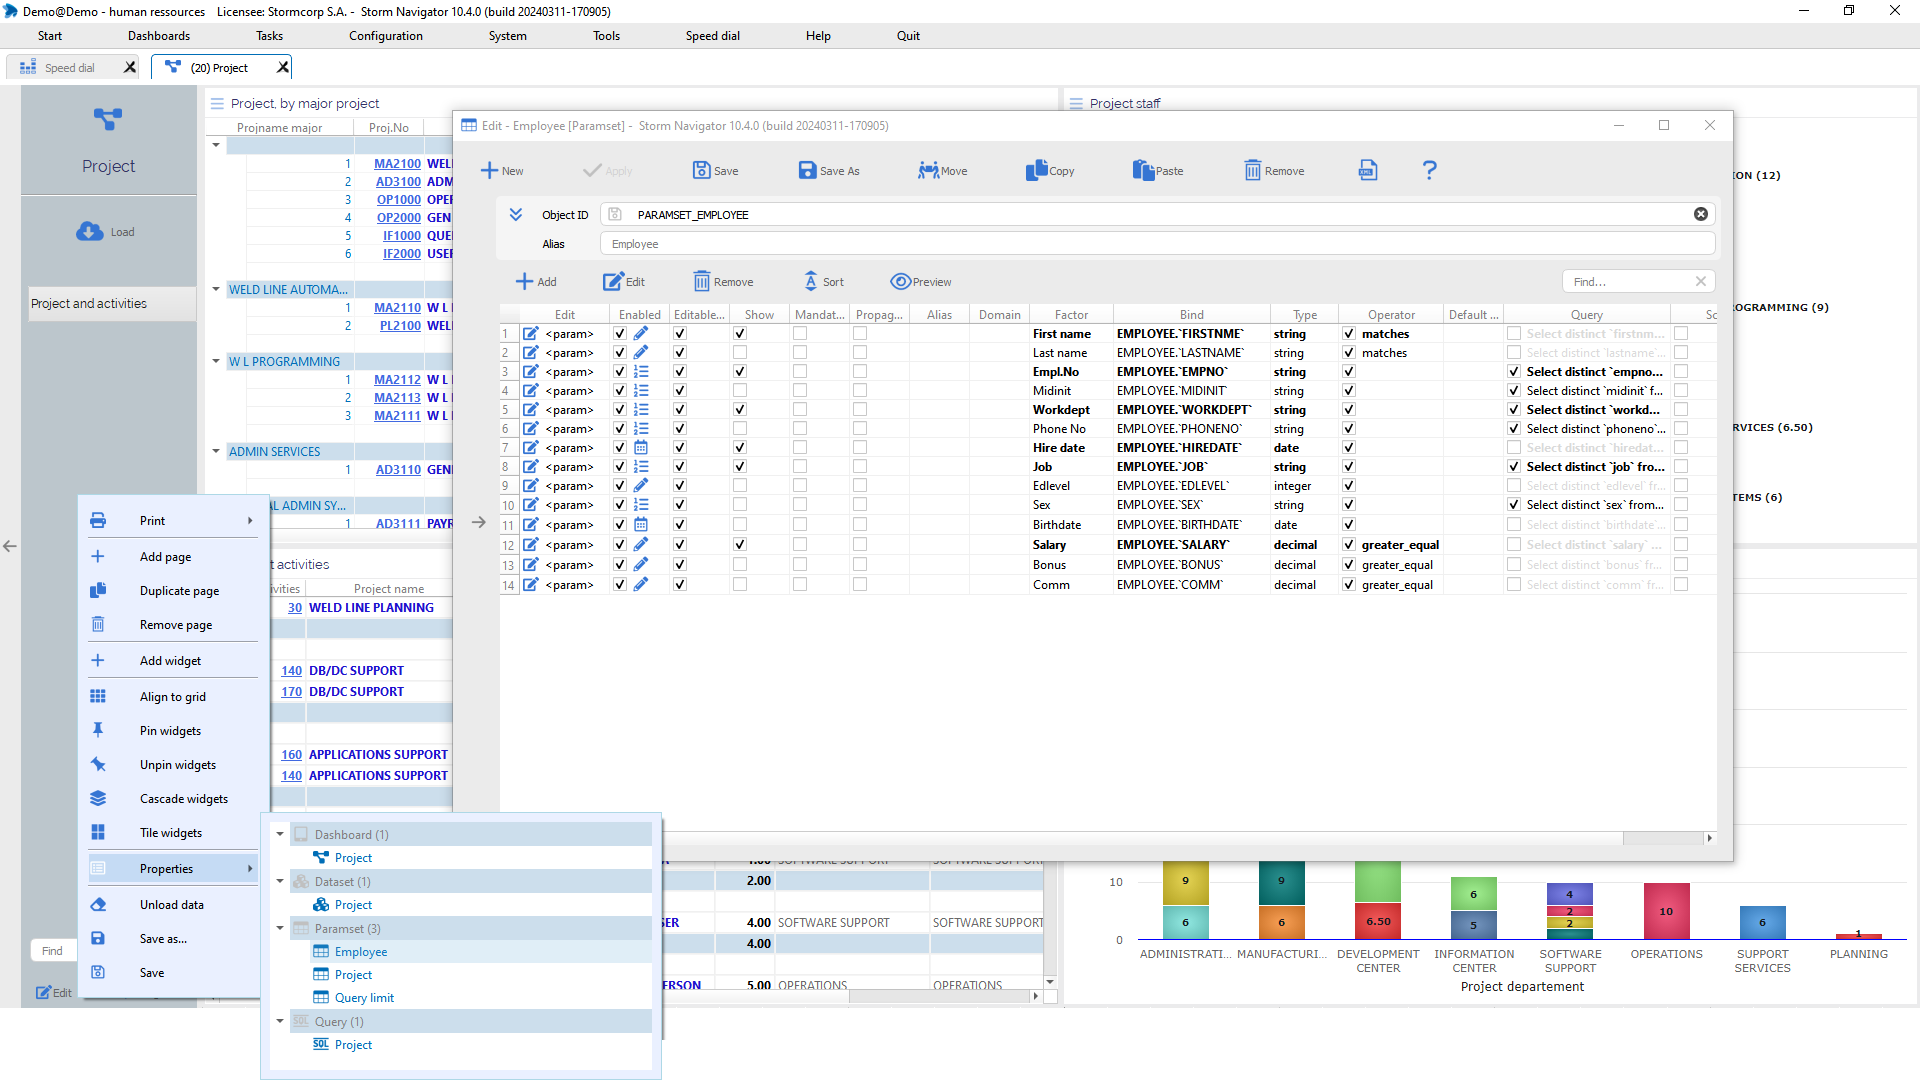
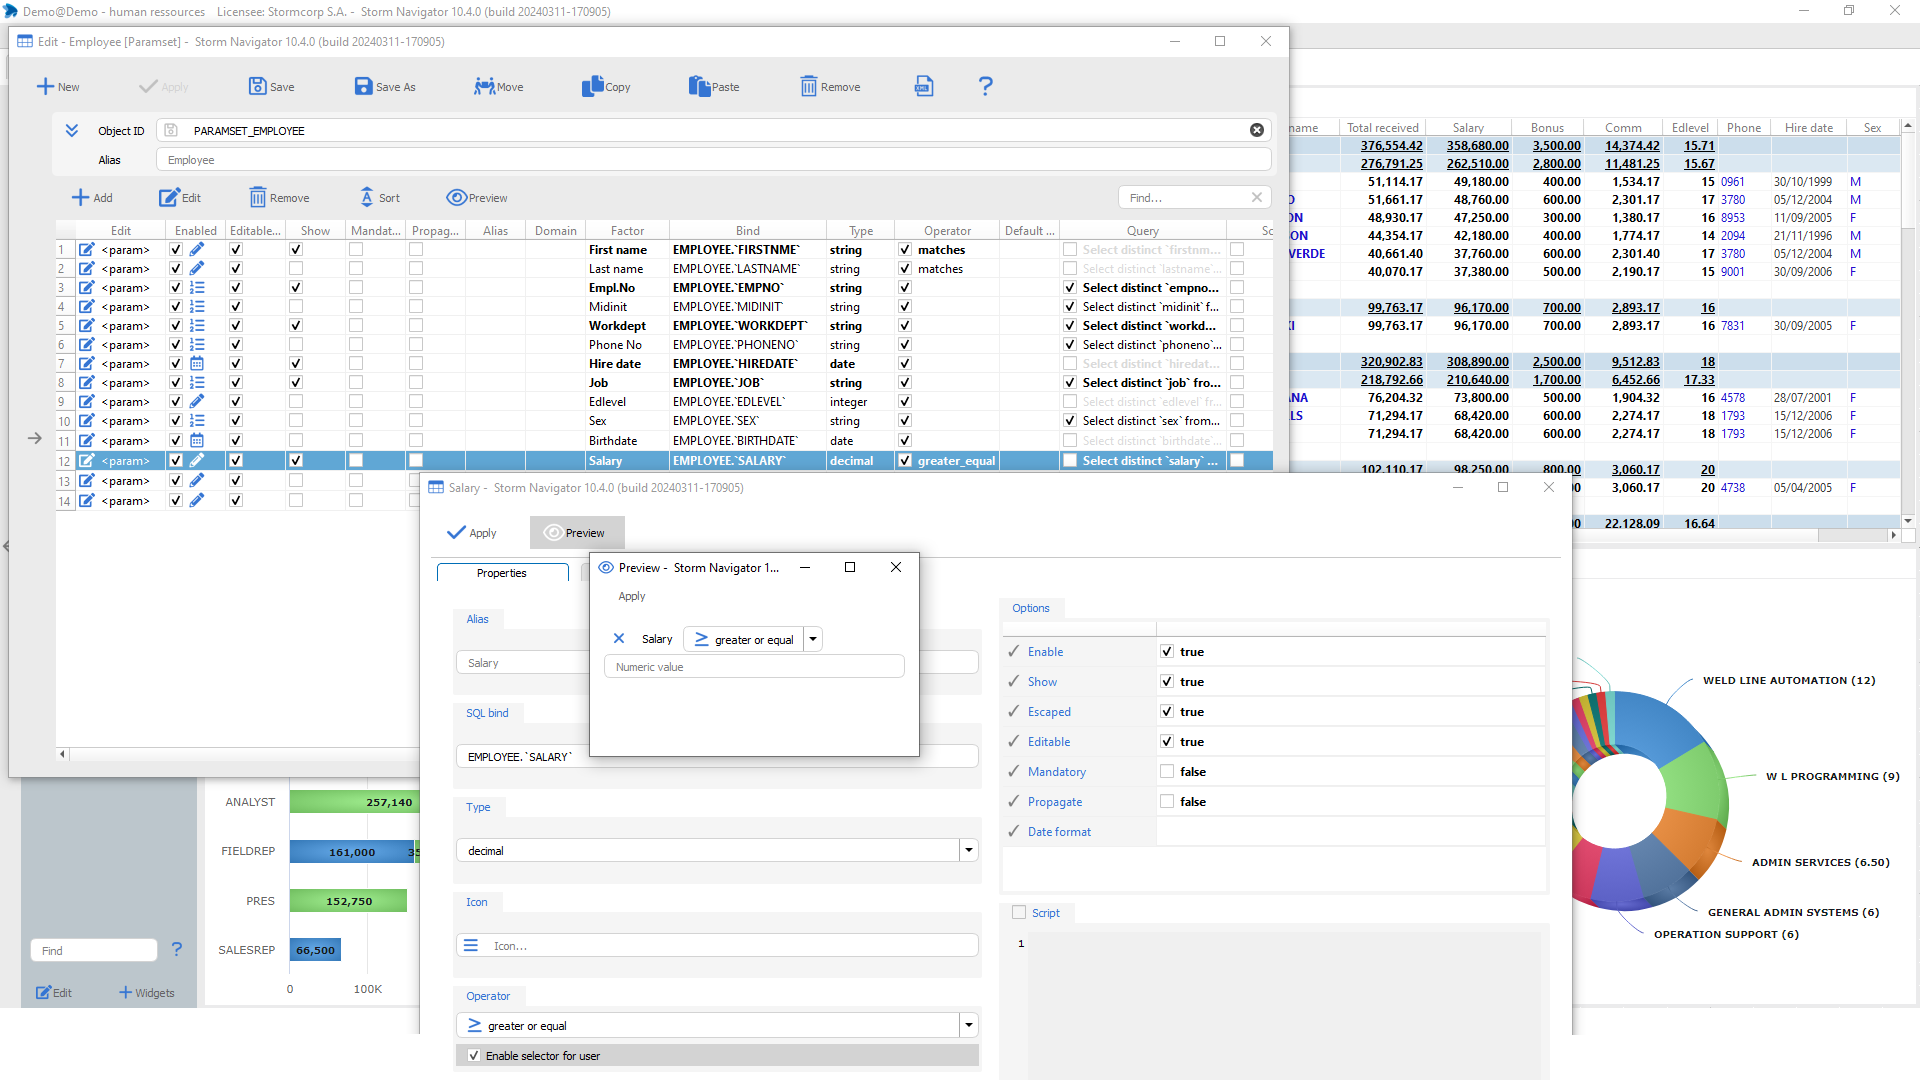
Paramset: list of Load params for underlying tables
Create config generates Paramset, with one Param per field.
Paramset:
- Field with a foreign key: it generates a “select distinct” query to obtain the list of elements to be selected in the loading dialog box. It also displays the resolved column in the Columnset.
- Date: Date selector
- Decimal: Numeric value
- String: String value
Bind: A factor to an SQL field. The SQL field is prefixed by the table name.
Operator: A default logical operator can be set.
Steps:
- Edit -> Properties -> Paramset …
+Add: a new param
Edit (or right-click Edit): current param
Remove: selected param
Sort:
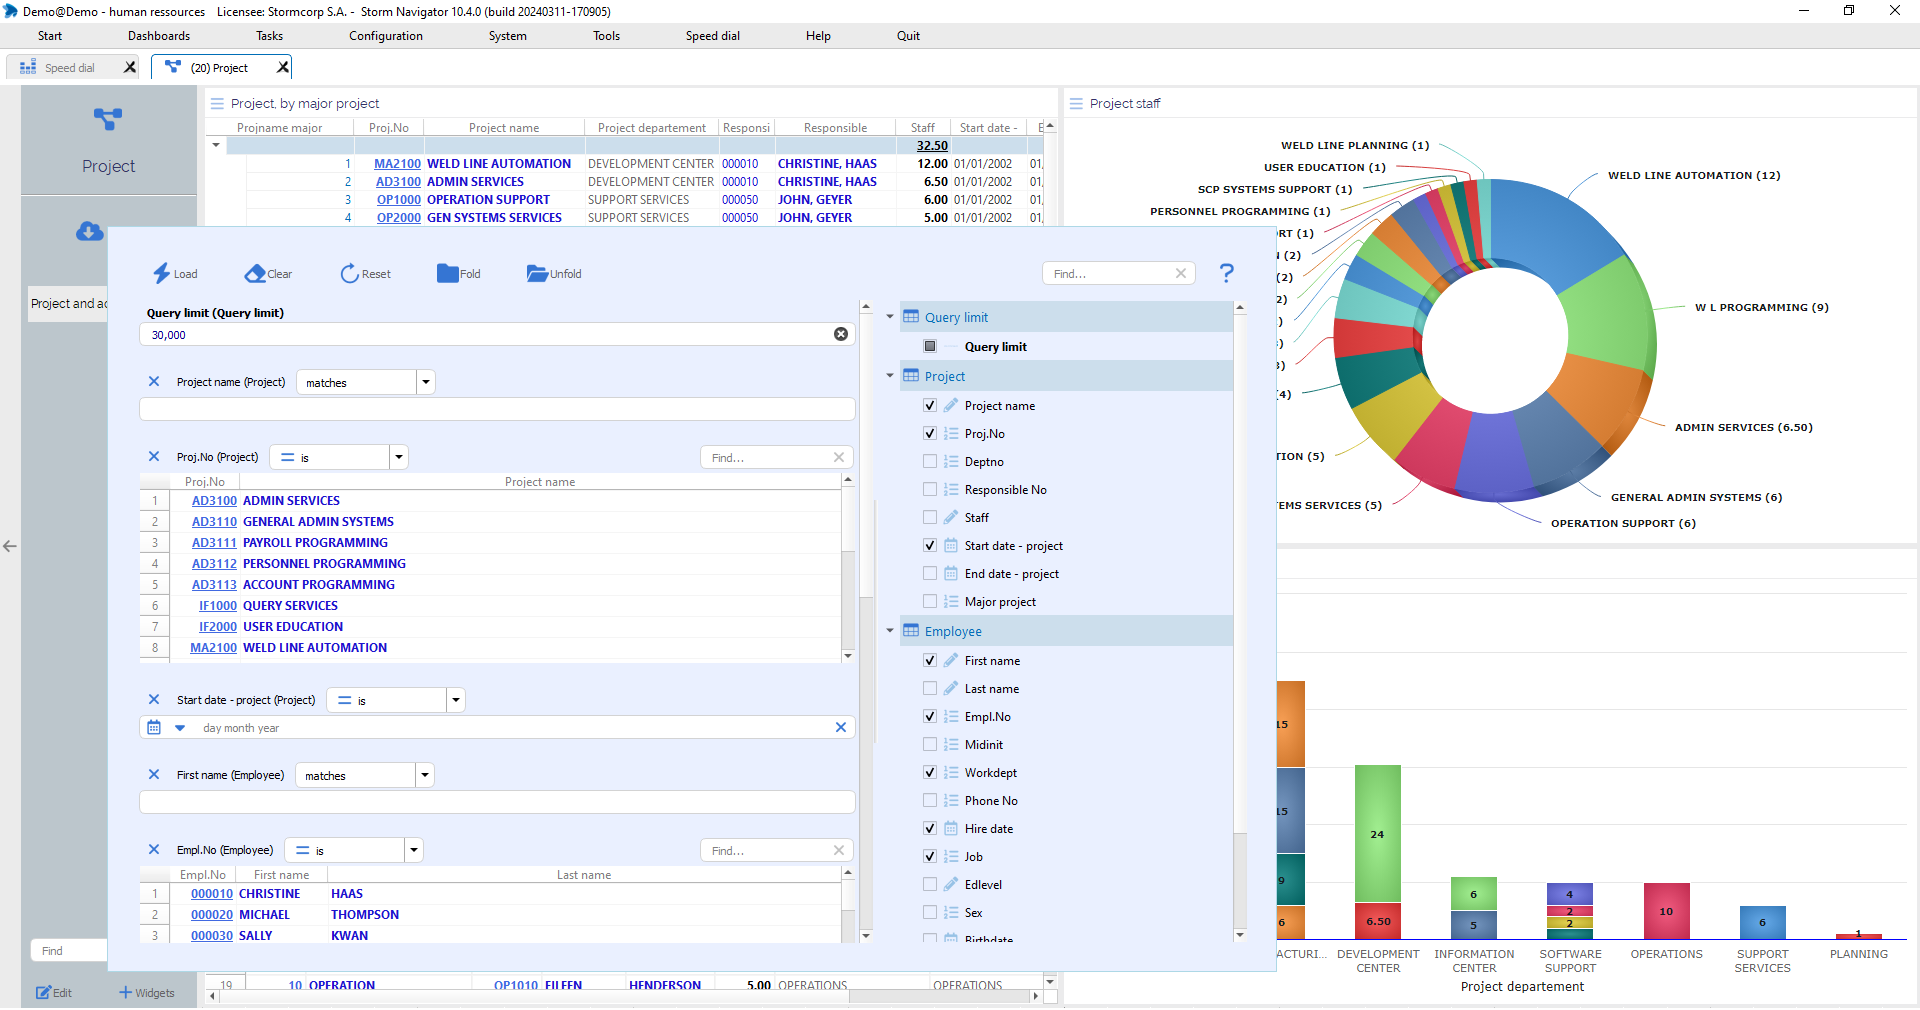
Preview: Load params
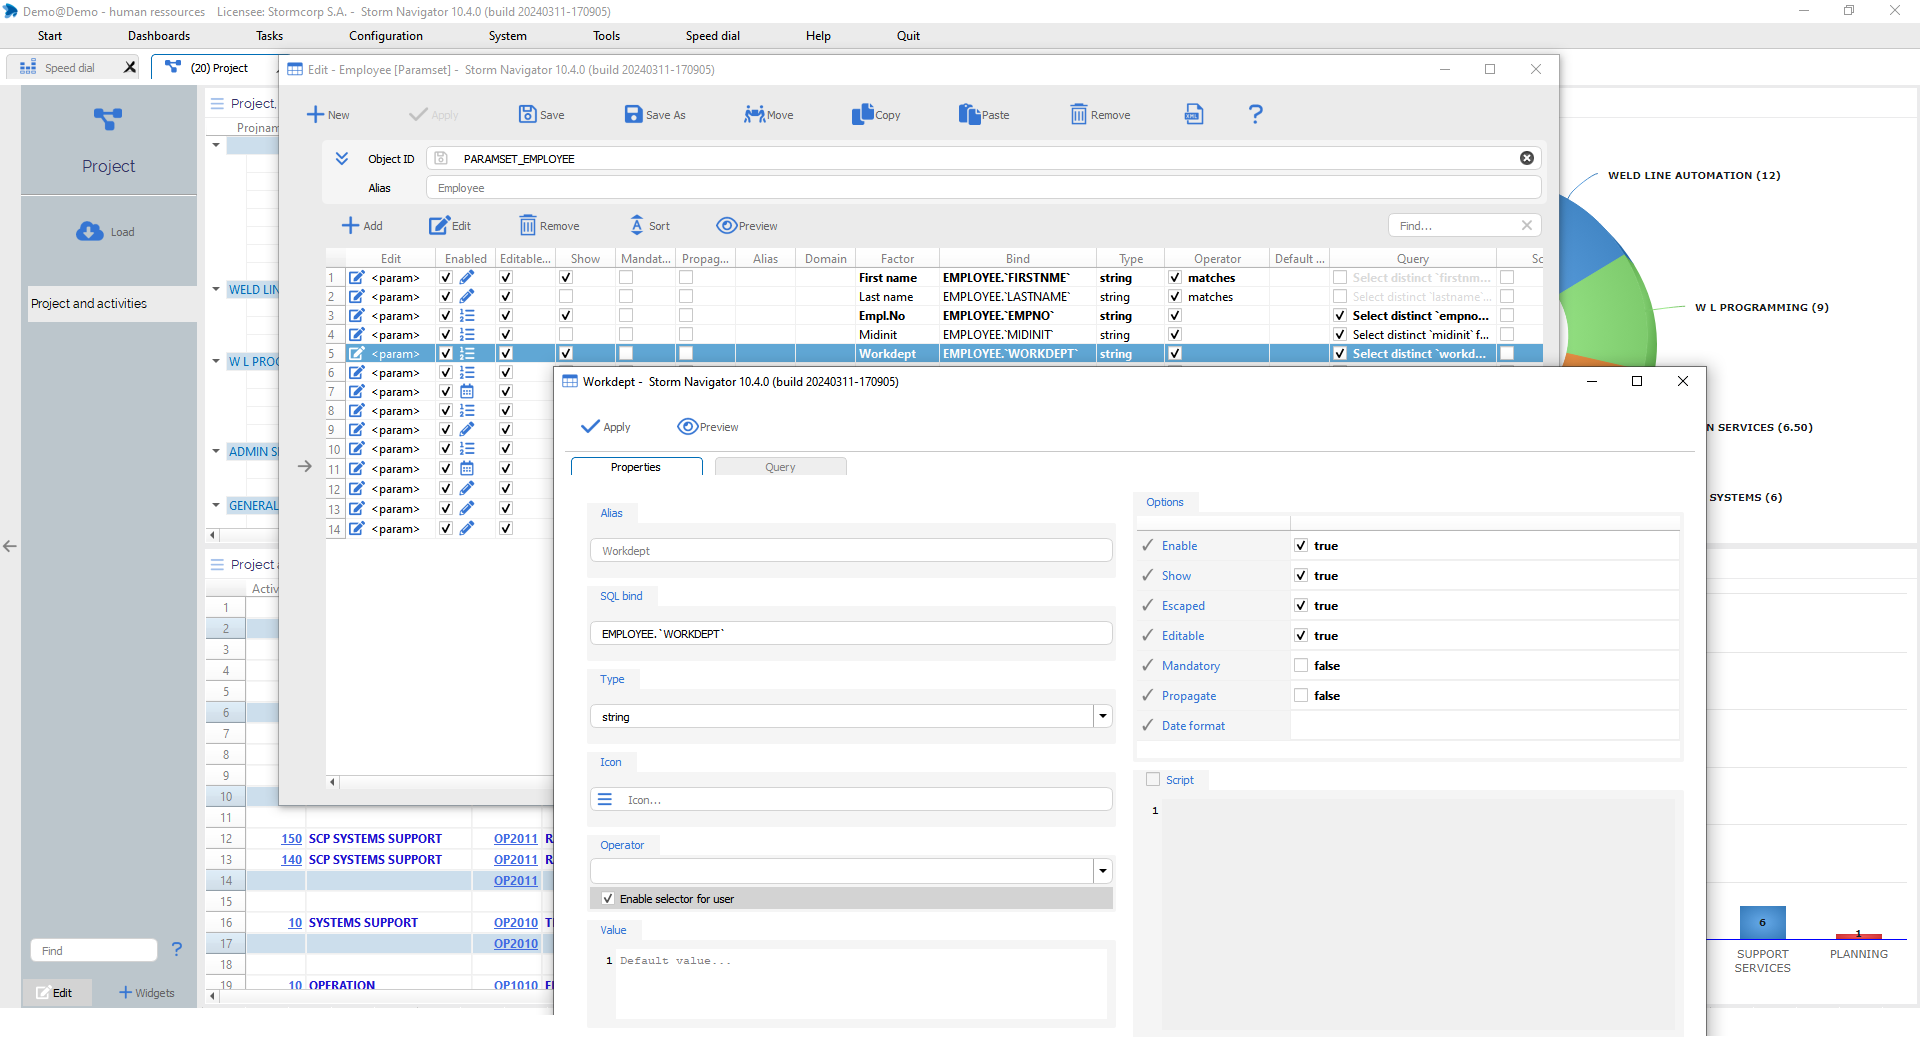
Param properties: SQL Bind, type, operators, options
Param properties:
Alias: to overhide factor name
SQL Bind: Table.Fieldname for the WHERE condition
Icon: specific icon
Operators: Logical operator for the WHERE condition
Value: Default value can be set
Enable: Enable the param
Show: Show it by default
Escaped: Enclose value with ‘
Editable: Value can be edited by the user
Mandatory: Cannot be empty
Propagate: Propagate to next level dataset
Date format: Parser for date
Steps:
- Param: Right-click -> Edit
- Preview to see it
- Apply, and Save
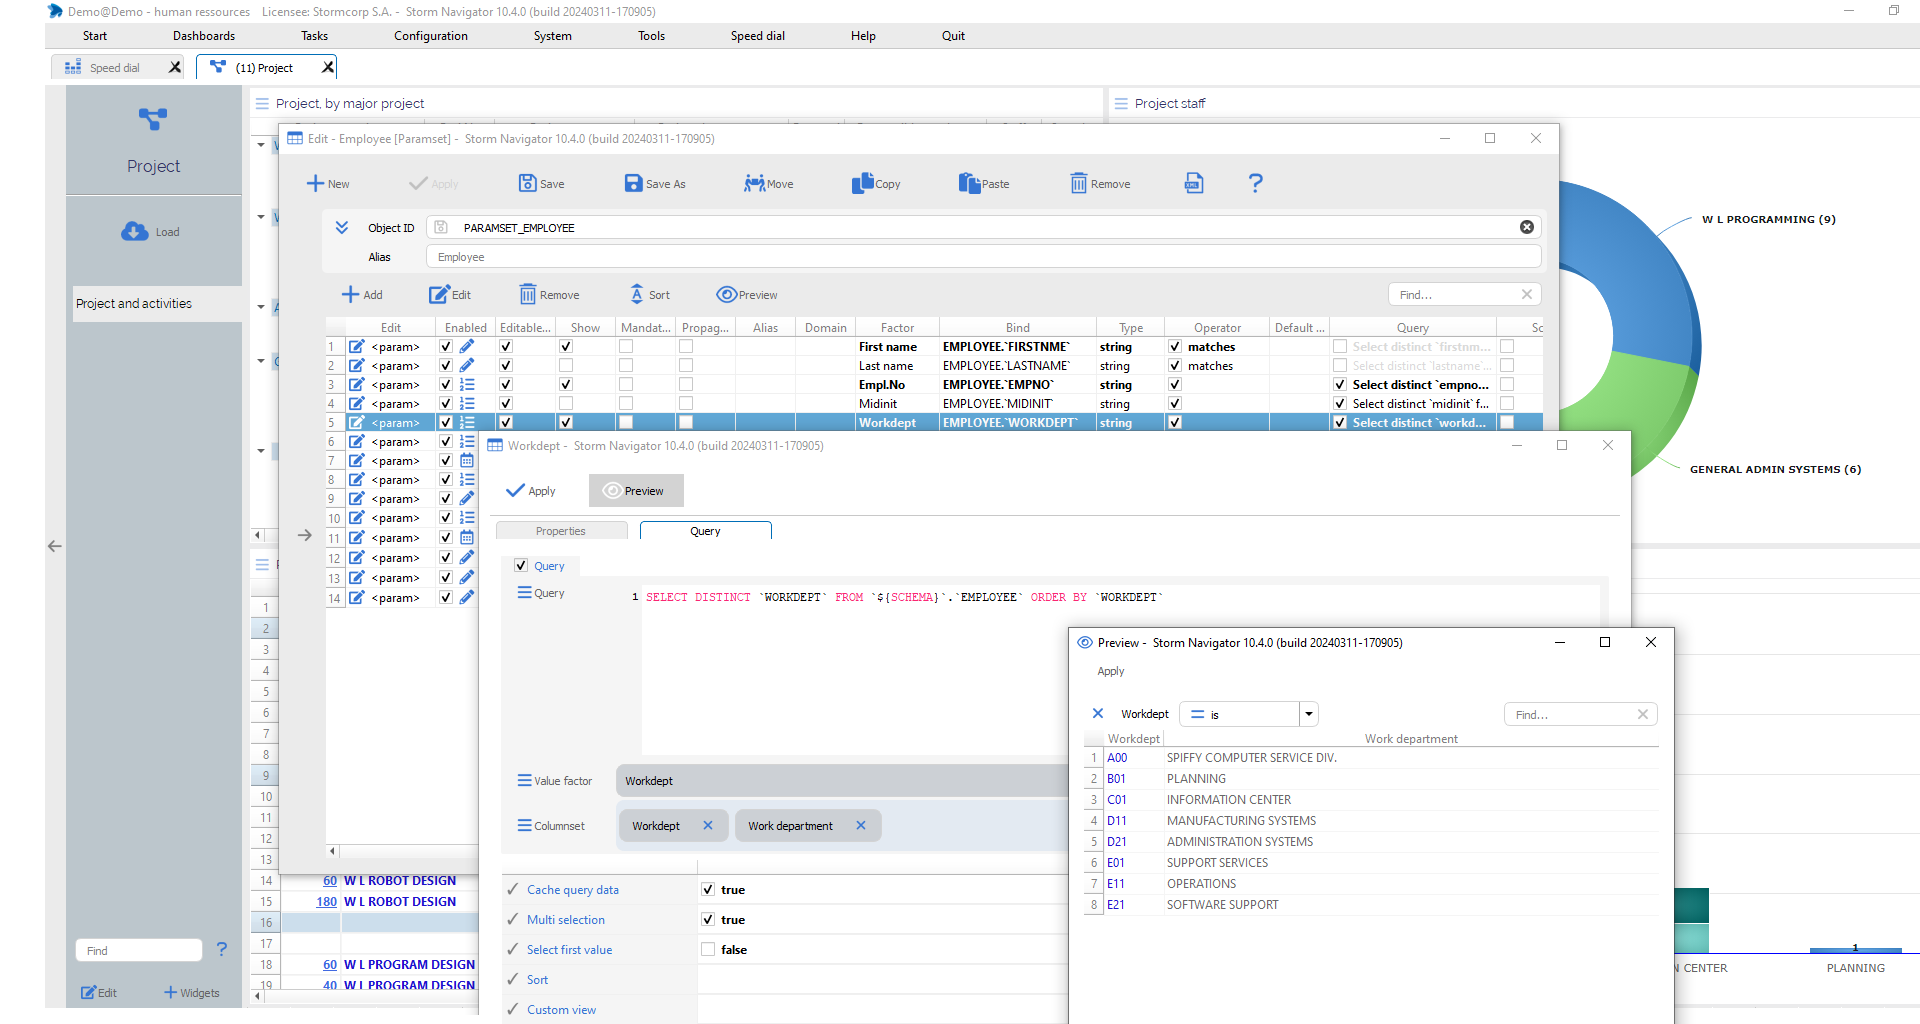
Param query: Field with a foreign key
Create config generates a Query with “select distinct” to obtain the list of elements to be selected in the Load dialog. It also displays the resolved column in the Columnset.
Query :
Query source code to populate the param list
Steps:
- Param: Right-click -> Edit
- Query: Adjust the generated query according to your needs
- Value factor: Select a Factor for SQL Bind
- Columnset: Factor to be displayed
- Preview: the param
- Save: Paramset
- Close and reopen dashboard
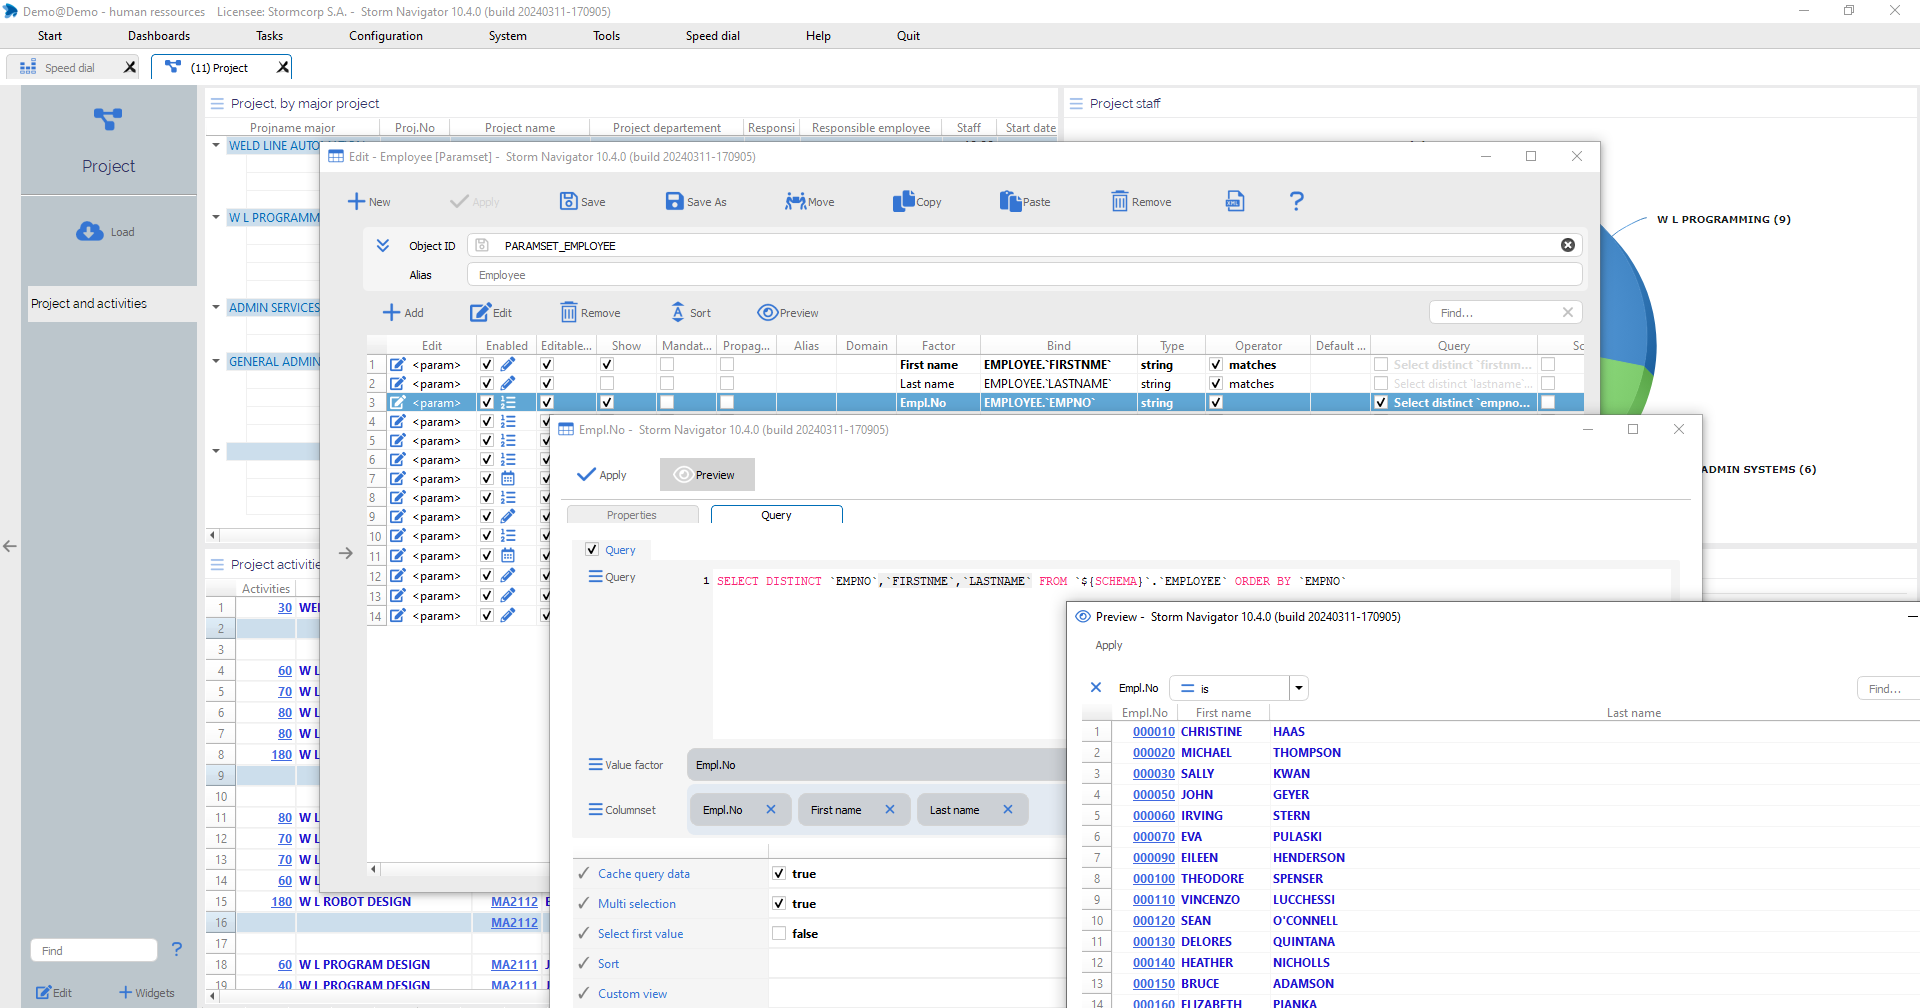
In this example, the parameter EMPLOYEE.`EMPNO` has been manually enhanced to display the list of employees, with: job number, first name and last name. Multiple selection is allowed, to load selected employees.
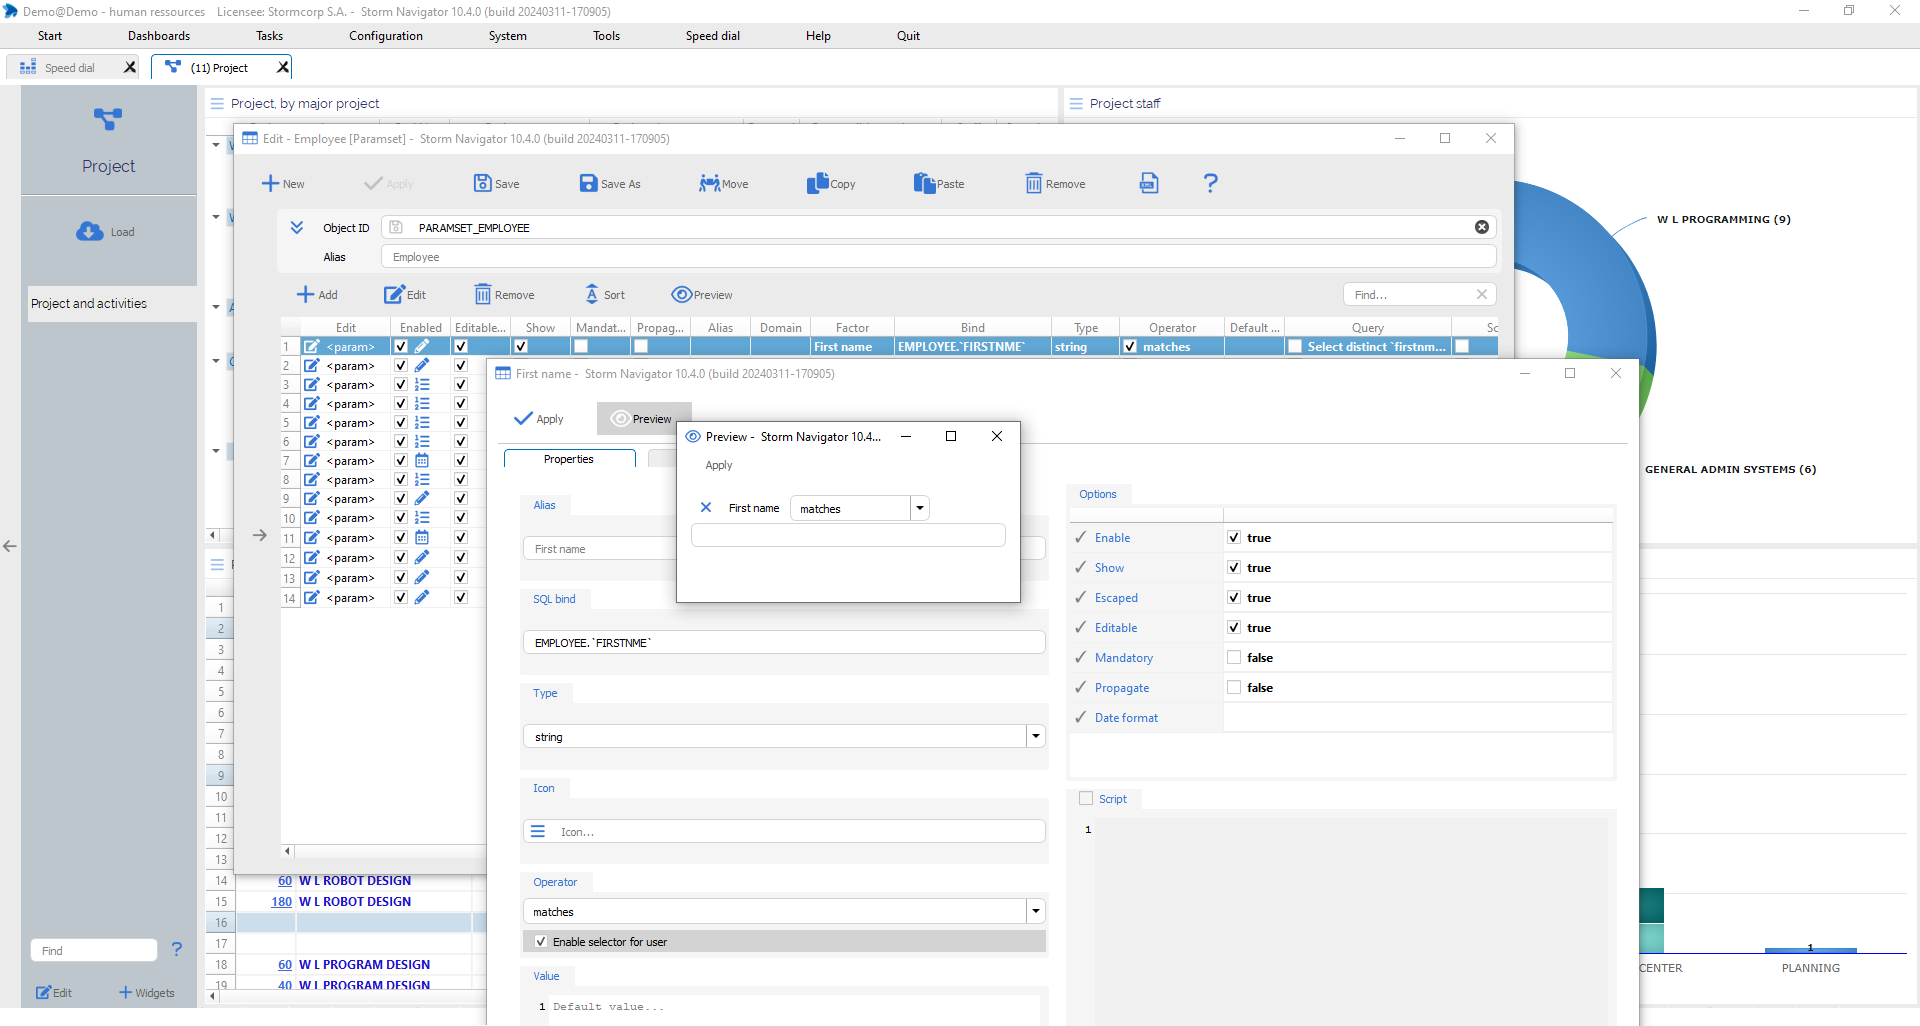
Param string: String field
A string field, combined with the logical operator “Matches”, is used to find the desired records.
A string field with no foreign key is a text field. The logical operator can be adapted accordingly.
Steps:
- Param: Right-click -> Edit
- Operator: matches
- Preview: the param
- Save: Paramset
- Close and reopen dashboard
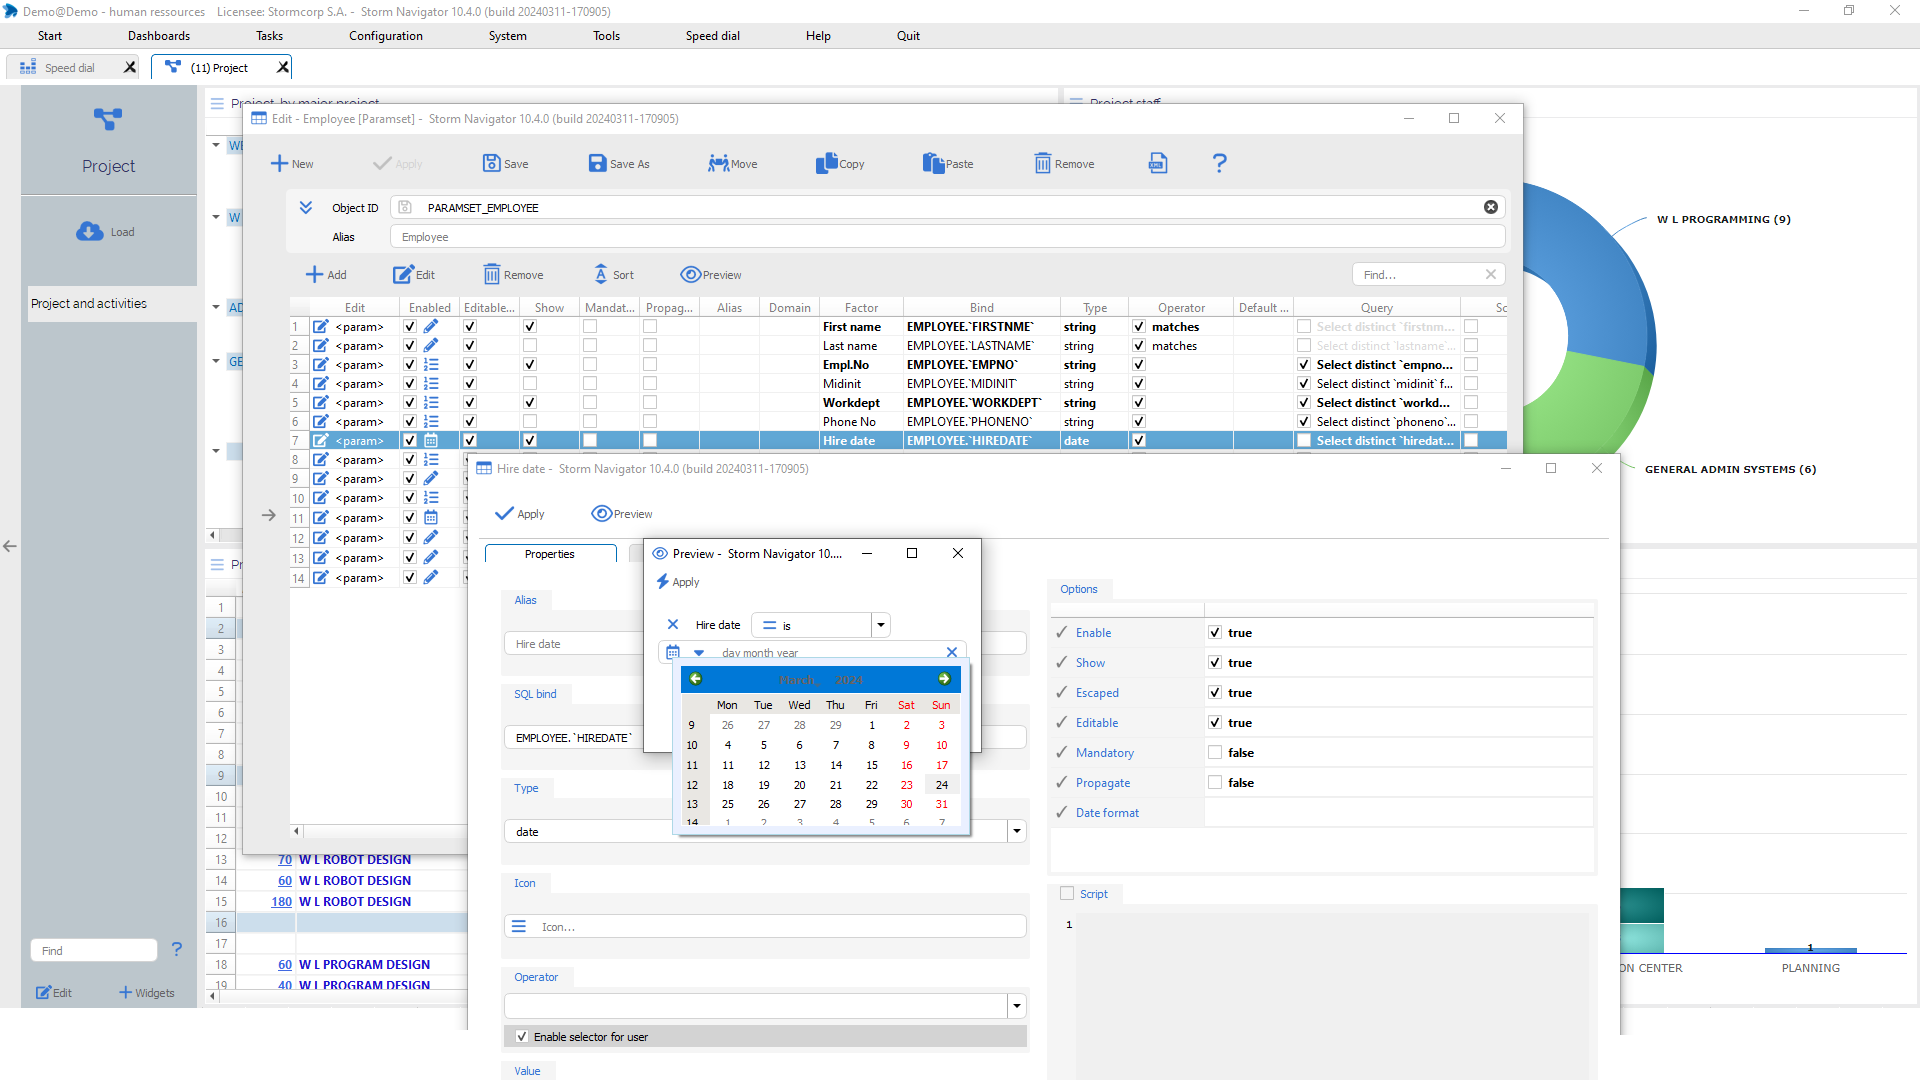
Param date: Date field
A date field in the database will be converted into a date selector.
A database field with a type string containing a date can be converted to a date by selecting the date type.
Depending on the storage, to convert a wrong storage into a date, use:
- Factor edit -> Option -> Date/Time parse format
Steps:
- Param: Right-click -> Edit
- Type: Date
- Preview: the param
- Save: Paramset
- Close and reopen dashboard

